¶ Introduction
The OpenAstroExplorer shares many of the same usage principles as the OpenAstroTracker, so users familiar with OAT will recognize a lot of the workflow. For general astrophotography knowledge that goes beyond this device, readers can consult the broader Astrophotography and Astrophoto Setup resources. This guide is intended to serve a wide audience – from DIY builders and astrophotography beginners to more advanced users – and aims to provide a clear foundation for everyone.
¶ Quick Start: Your First Night with OAE
For a very brief field manual, please see the dedicated Quick Start Guide. That quick overview assumes that you have already read and understood the broader instructions in this Usage Guide, and is meant as a condensed reference for use in the field.
¶ Before You Start
¶ Choosing a lens and camera
Most DSLRs made in the last 15 years will work fine with OAE. Using your existing gear is the best way to start. Even kit lenses are sufficient for beginners, although a very poor lens can limit results more than an older camera. For those looking to upgrade, many used vintage lenses are excellent, affordable options.
If you want to delve into proper telescopes, detailed information about those would take too much space here. As the OAE functions no differently than other commercial telescope mounts, much of the knowledge and resources available online for astrophotography telescopes will apply here as well. A general rule of thumb: bigger is not always better. Larger telescopes can be heavy, harder to balance, and more demanding on tracking accuracy. Smaller, lighter telescopes often provide a more forgiving and enjoyable starting point, especially when paired with OAE.
¶ Laptop requirements
The OAE requires a computer connection to operate. While OAT can be partially standalone, OAE can not. A Windows laptop is recommended for best compatibility. Linux and macOS can also be used, but with extremely limited support, and some features (such as AutoPA) do not work. The PC handles control software, guiding, and data capture, making it an essential part of the setup.
¶ Why use Autoguiding?
Autoguiding uses a small, dedicated guide scope and camera to monitor a single star during long exposures. If the star drifts, the PC sends corrections to the mount’s motors, dramatically improving tracking accuracy. This allows for longer exposures and higher focal lengths without star trailing. For more details and setup instructions, see the OpenAstroGuider and Guiding pages.
¶ Initial Calibration
(Performed before first use, not required every session)
In order to do these calibrations, you should have the Firmware flashed and set up a connection with a PC with OATControl open and connected.
¶ Home Positions
The following postions are referred to as the home positions for each axis. At the beginning of a session, the mount should be moved into these positions.
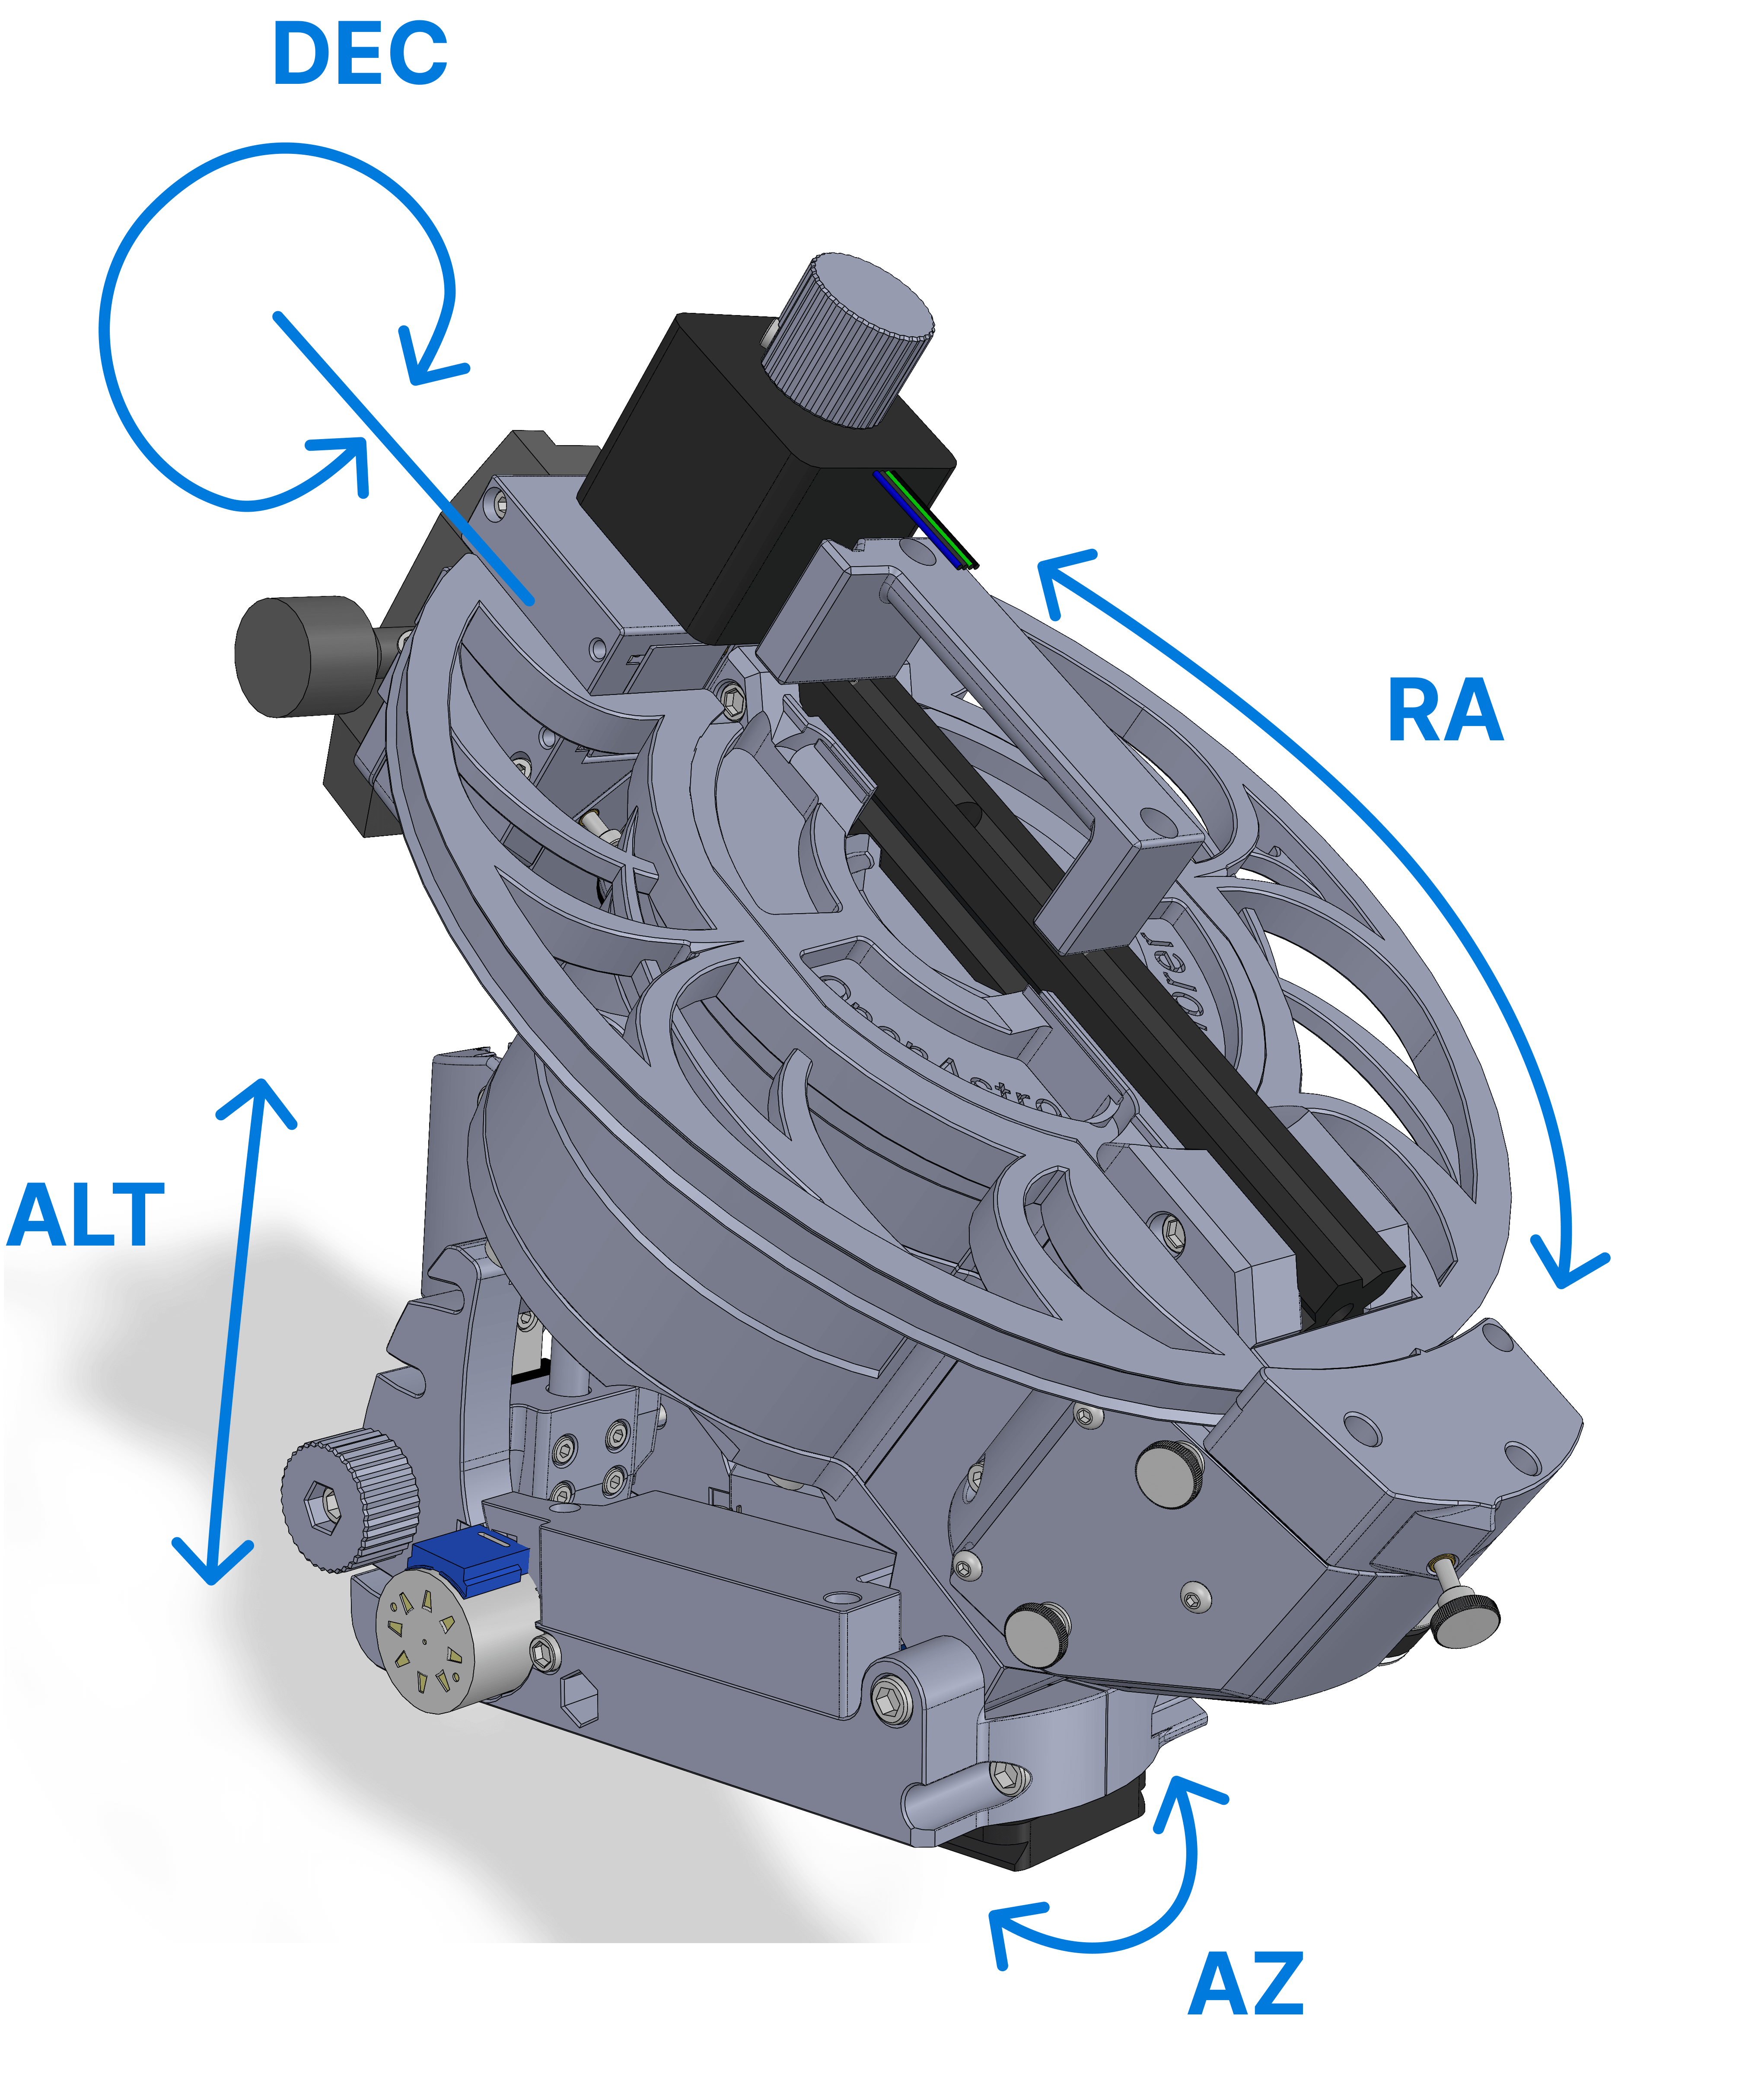
¶ RA
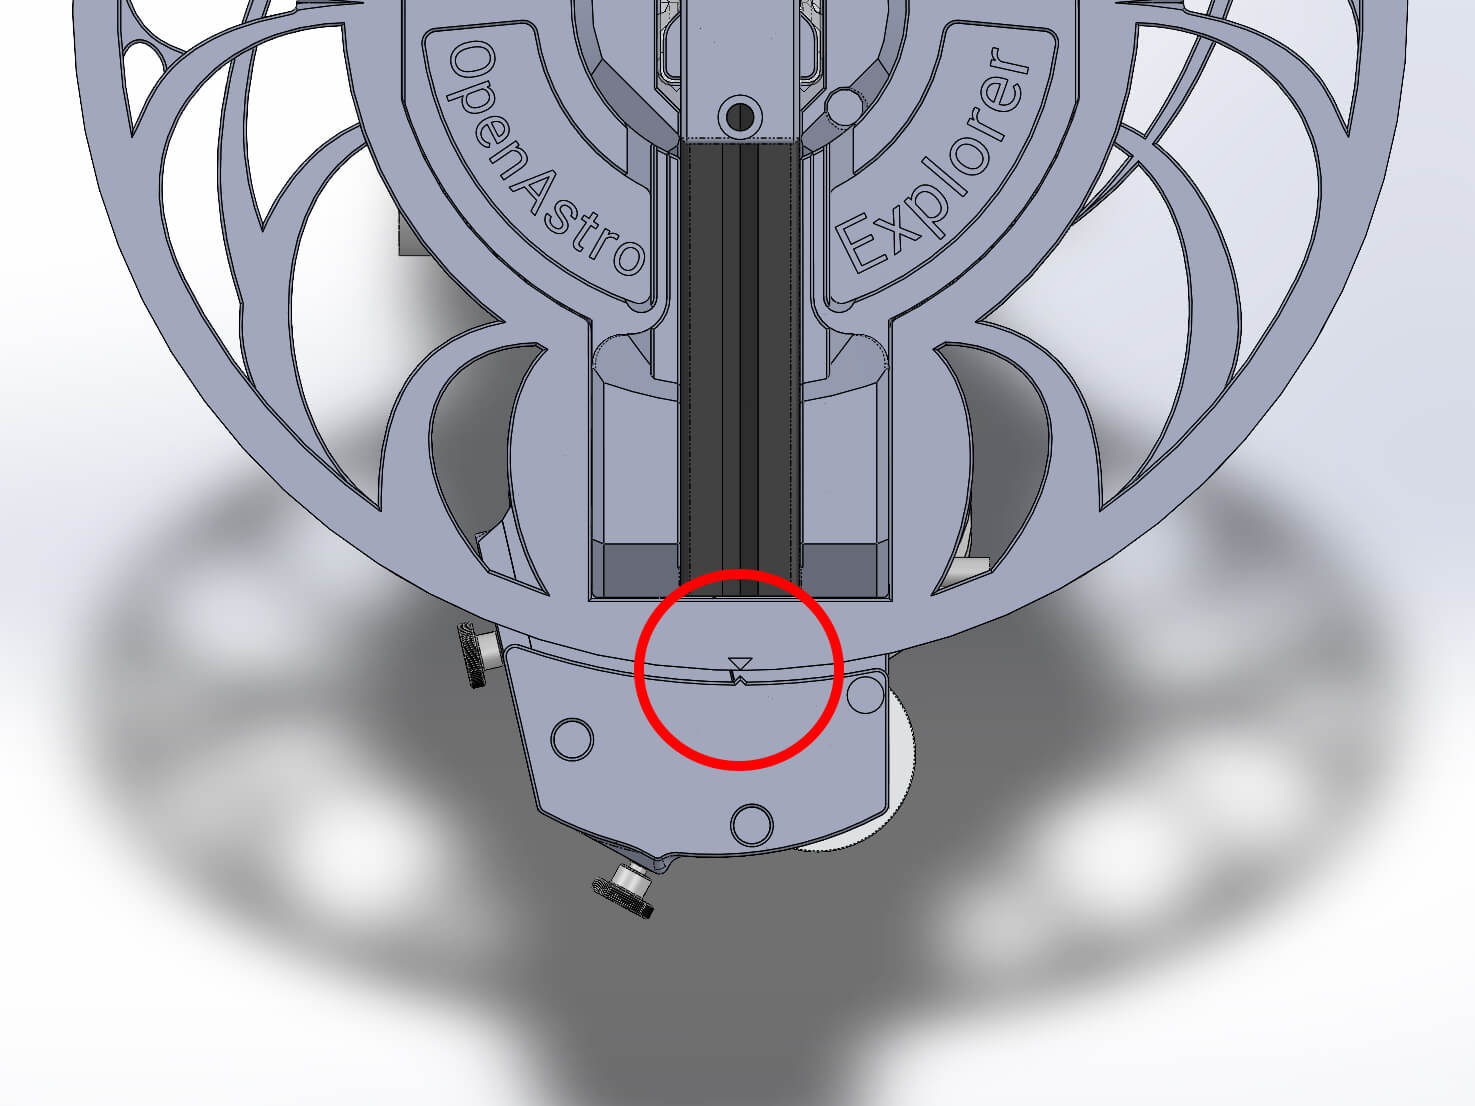
¶ DEC
¶ ALT
¶ AZ
The AZ axis is the only axis that does not have a precise indicator. It doesn't have to be moved to a precise point, just having the ground palte somewhat straight is enough.
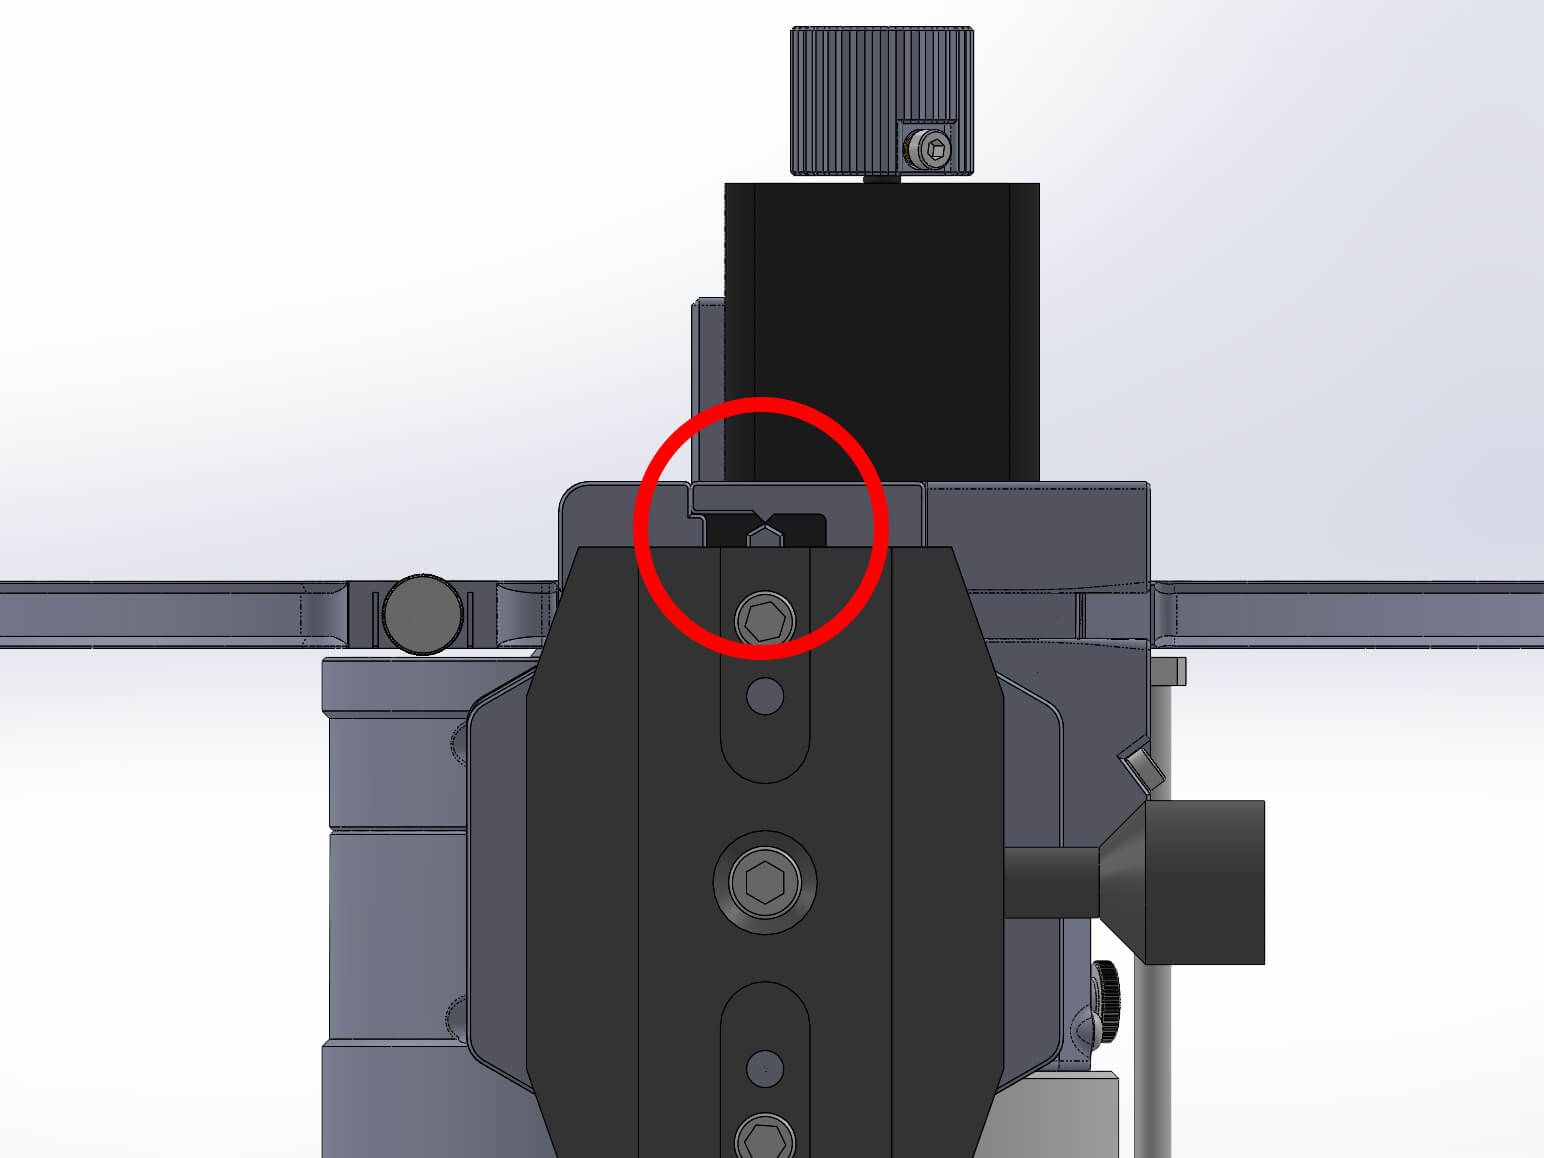
¶ RA & DEC Axes
If these terms are unclear to you, check the corresponding section in Astrophotography.
-
Verifying correct steps/degree:
In OATControl, slew the mount exactly 6 hours in RA. This should result in a 90° rotation of the RA axis. If not, double check your step configuration in the firmware.
OAE Kits will have a second marker on the RA Ring. If a decrease of exactly 1h in RA moved the mount from the home marker to the second marker, the RA axis is moving correctly. -
Verifying direction:
Home the mount, and set the home position again.
Increase the RA target by 1h and press slew. This should result in a CCW rotation.
Decrease the DEC target, this should result in a CW rotation.
Both assume you are looking at the respective axis head on.
¶ ALT & AZ Adjustments
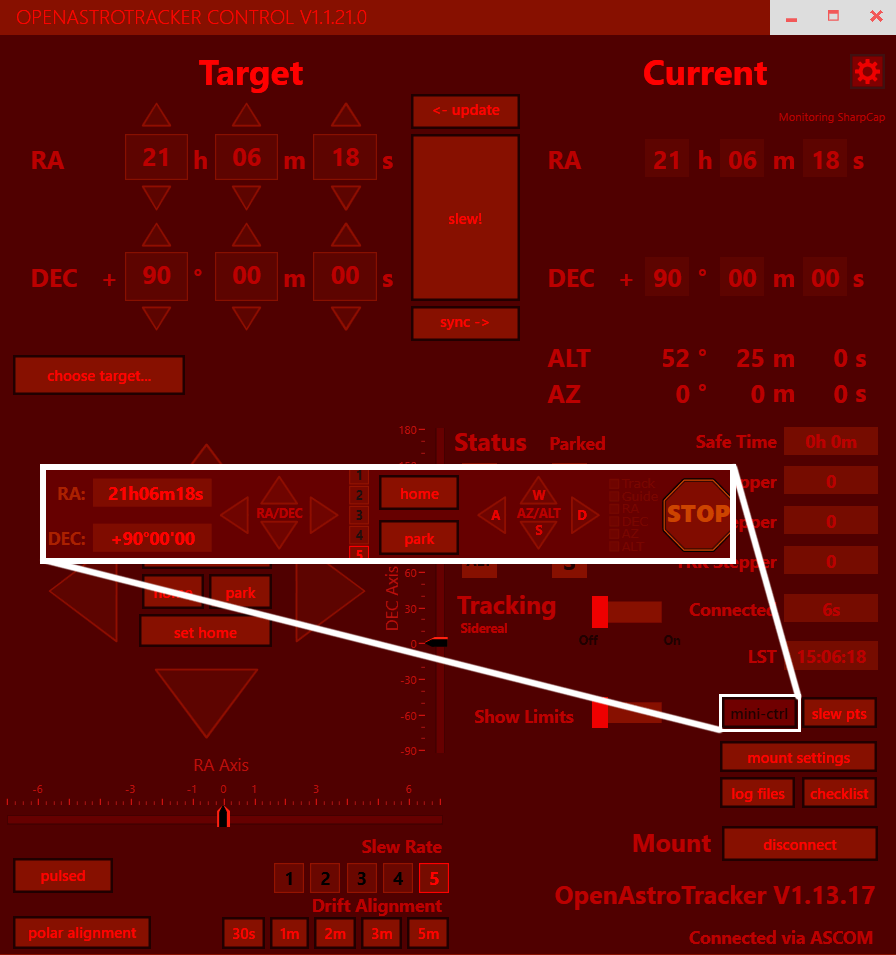
The Altitude and Azimuth axis can be moved manually within the mini-ctrl in OATcontrol (Bottom right corner). The 1-5 numbers change the length of the move for ALT/AZ, unlike RA/DEC where it changes the speed.
The control for the ALT and AZ axis on the mount are from the telescopes perspective. So pressing the UP button in OATcontrol might cause the rear of the mount to come down, but that would cause the telescope to look further up. The same thing applies to AZ, when pressing the RIGHT button, the mount will rotate clockwise and the telescope will look further to the right.
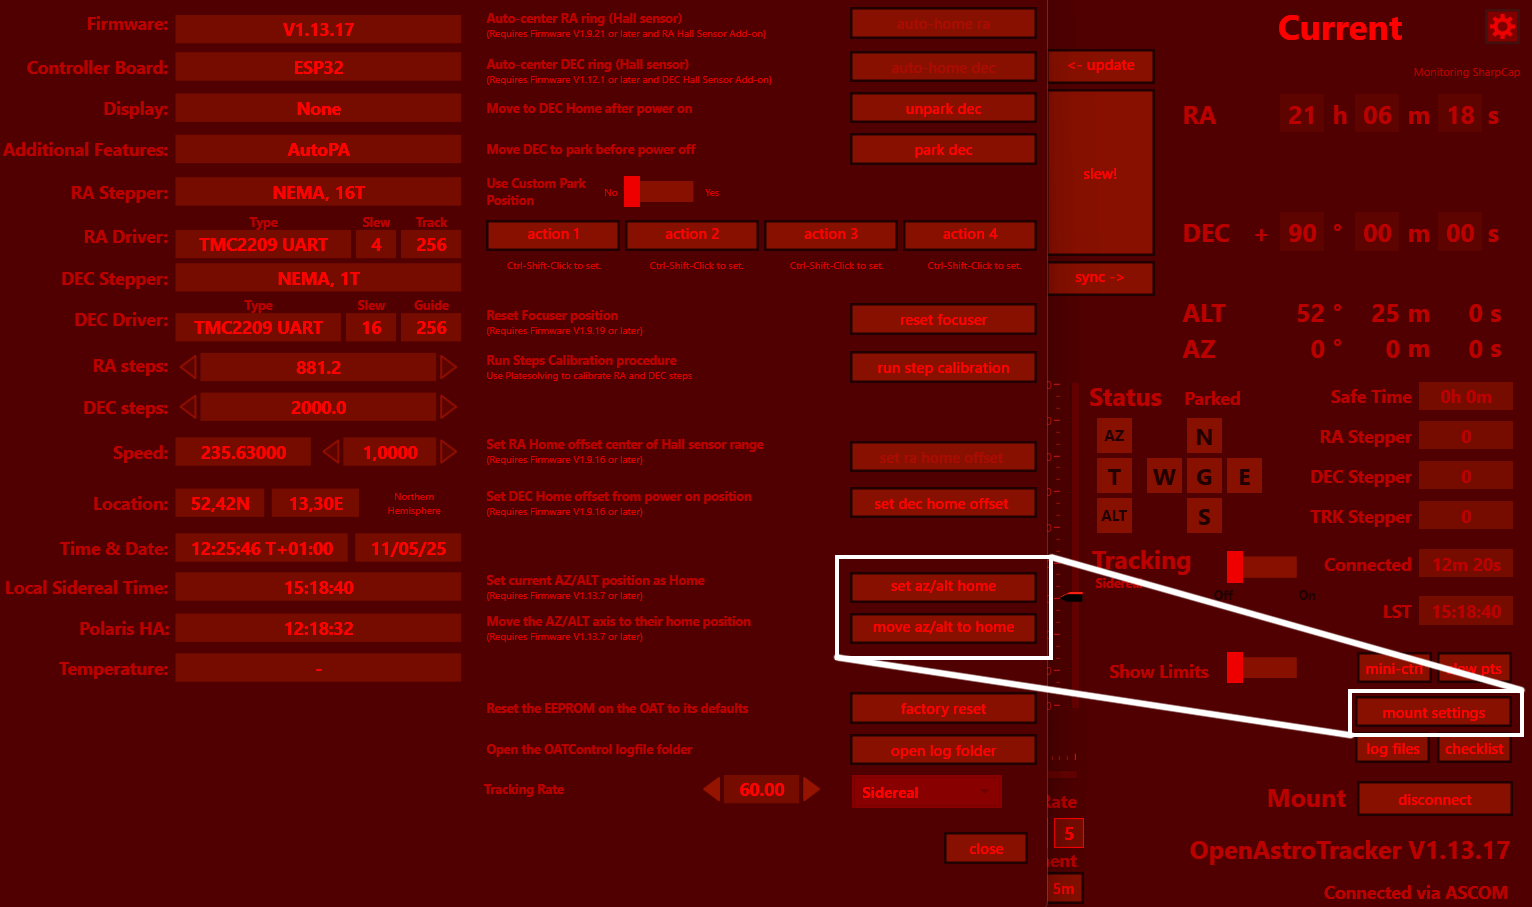
The ALT and AZ axis also have a homing feature. When both axis are homed, you can "set az/alt home" in the OATcontrol settings. You can then move the axis back to those locations by pressing "move az/alt to home". The locations are stored between sessions, so even if you power down the mount while ALT/AZ are not in the home position, it will still be able to find home. This only works properly if neither of the steppers have lost steps.
There is currently a bug in the firmware where pressing "move az/alt to home" while the steppers are already at the home position causes the steppers to not power down and overheat!
¶ Verifying Motion
To test both RA and DEC, aswell as the function of the PC connections, download and install Stellarium. This is assuming a setup on Windows. Make sure it is set to your current time and location. To connect to the mount you will need the "Telescope" Plugin.
Connect OATcontrol through ASCOM, make sure it uses your current coordinates. Home the mount and press "set home".
If you now have Stellarium move the mount to a point, the mount should copy that motion. For example, if you set up the mount facing roughly north and select a point on the eastern horizon, the home location marker on the DEC axis should now also point east. Or, if you select the sun (assuming you do this during the day), it should point roughtly to the sun.
If not, you have either configured your mount wrong (the RA or DEC axis might be inverted), or either Stellarium or OAE doesn't have the correct time and/or location.
¶ Setting Up the OpenAstroExplorer
¶ Tripod setup
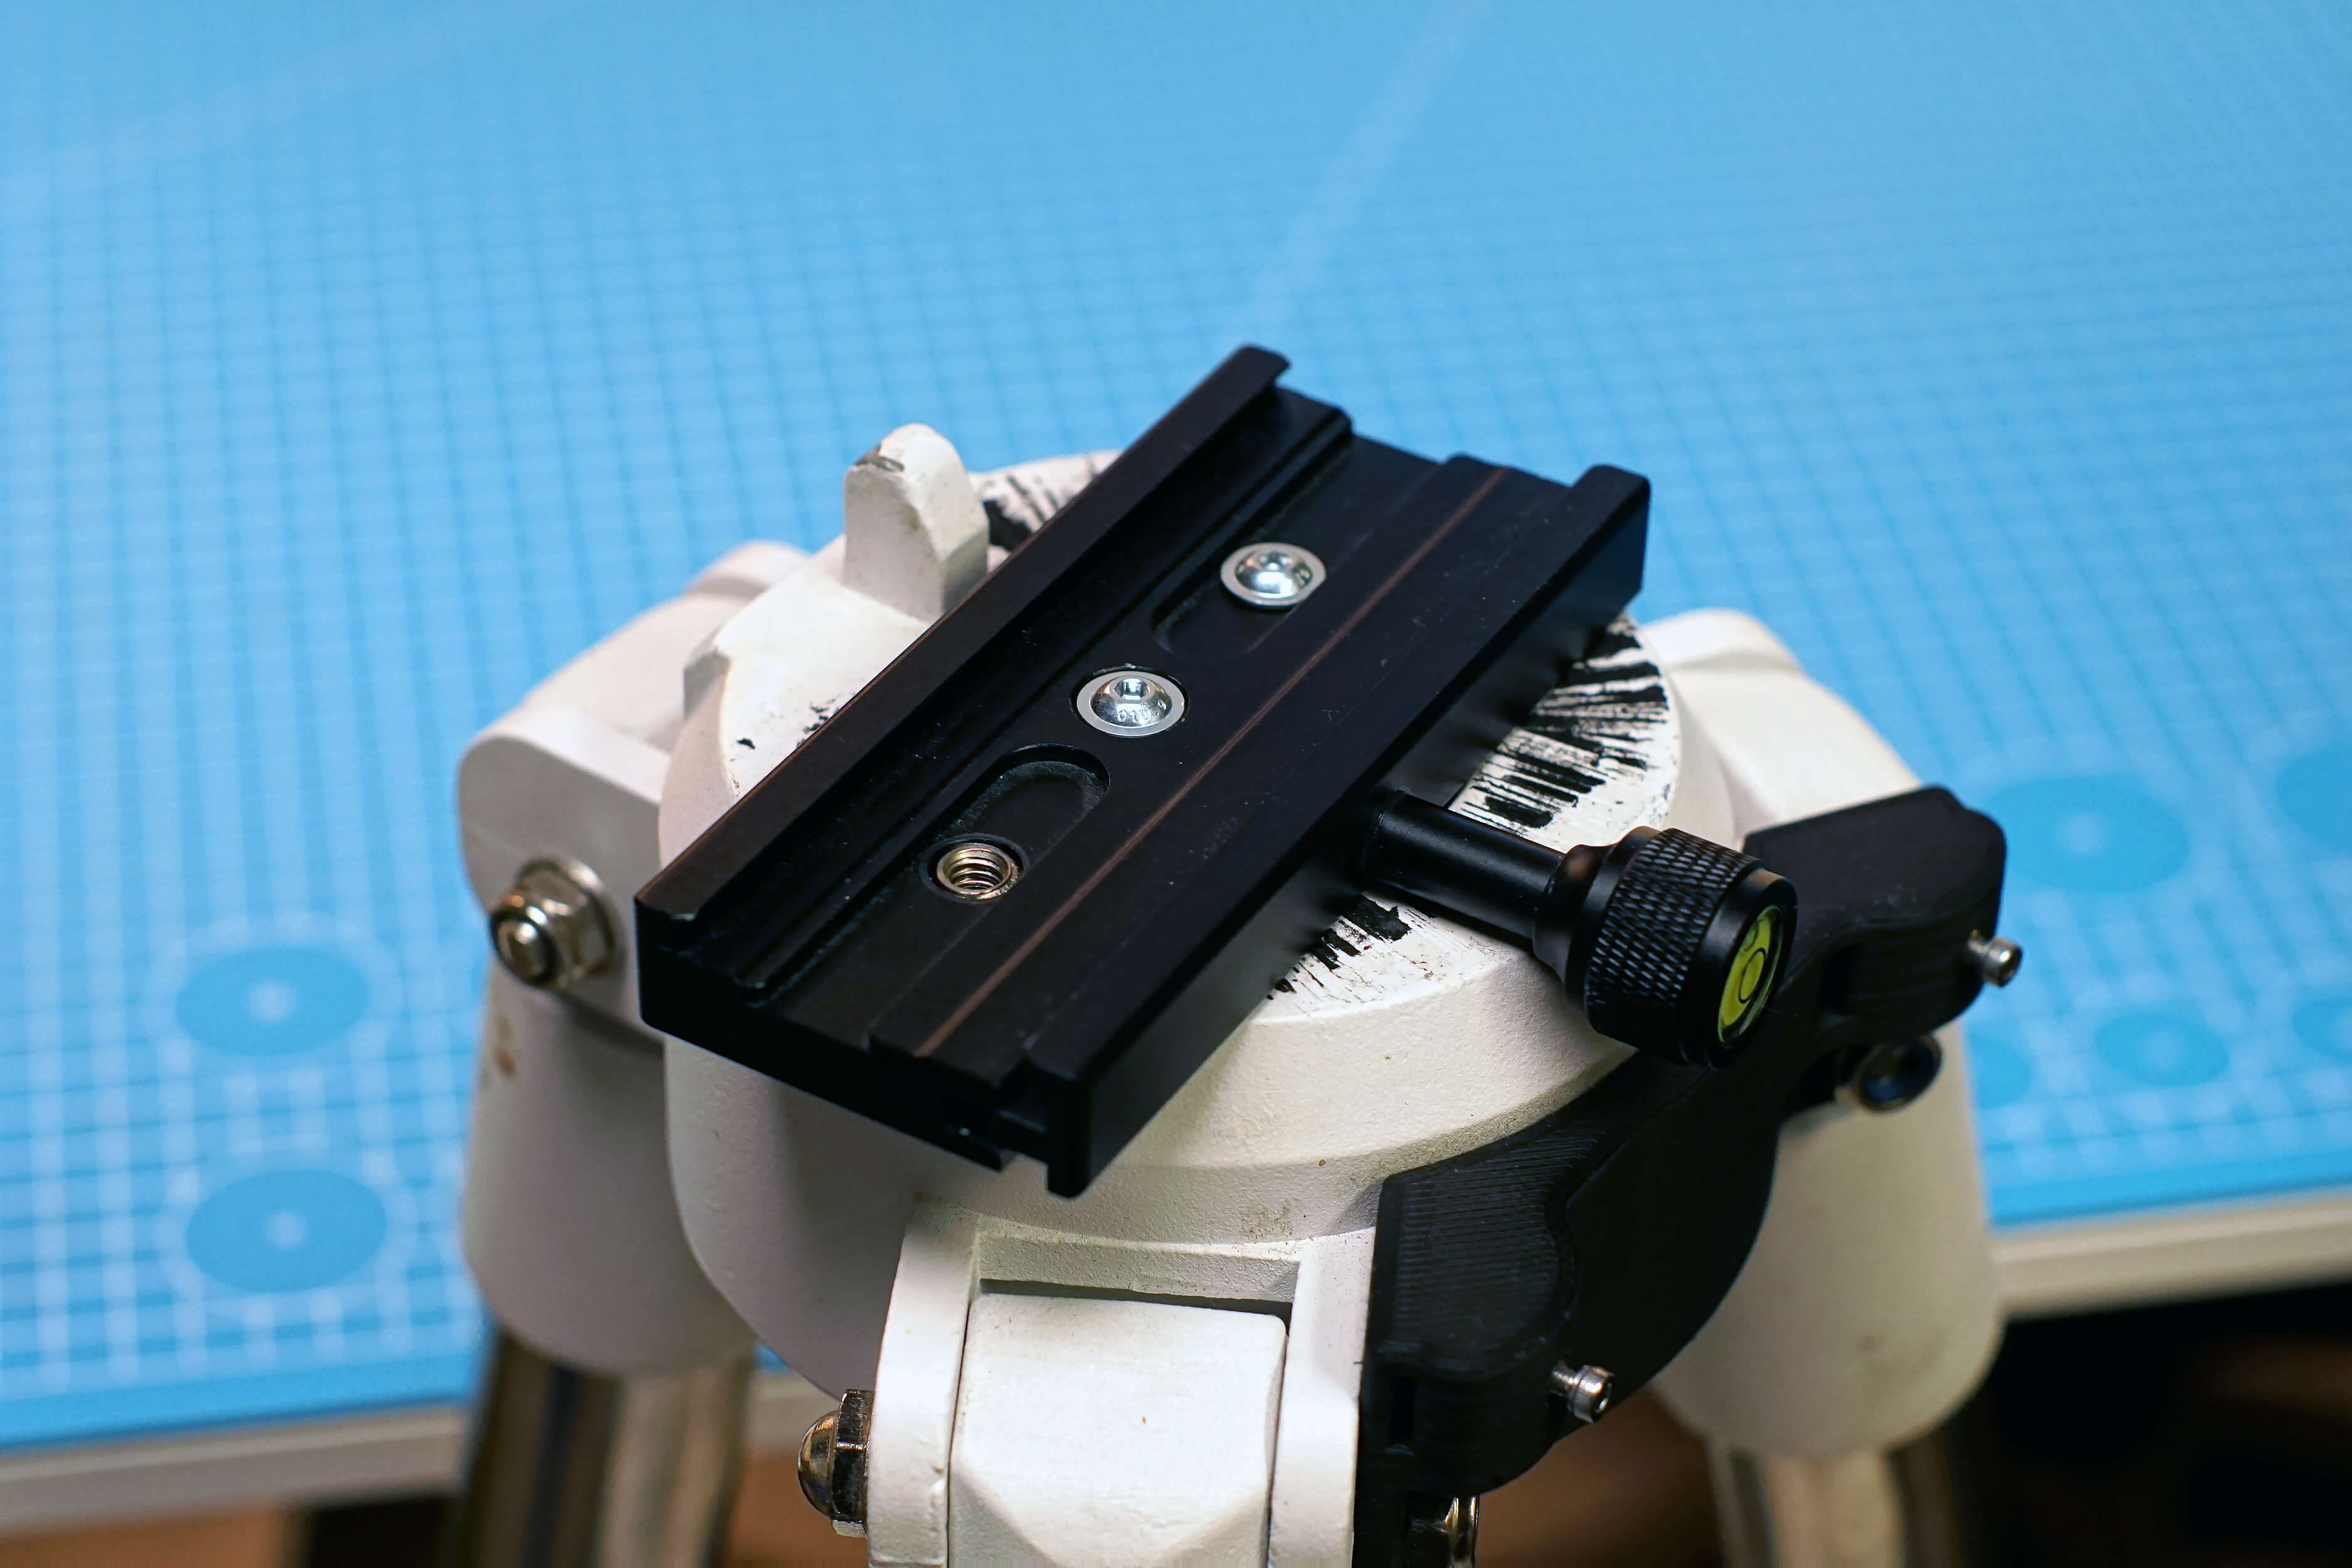
The included Arcaswiss clamp can be attached as usual to a Photo tripod, it should be a sturdy one however.
If a EQ5 style tripod is used, there are generally two options: the steel and aluminum versions.
The steel EQ5 tripods have to be modified slightly.
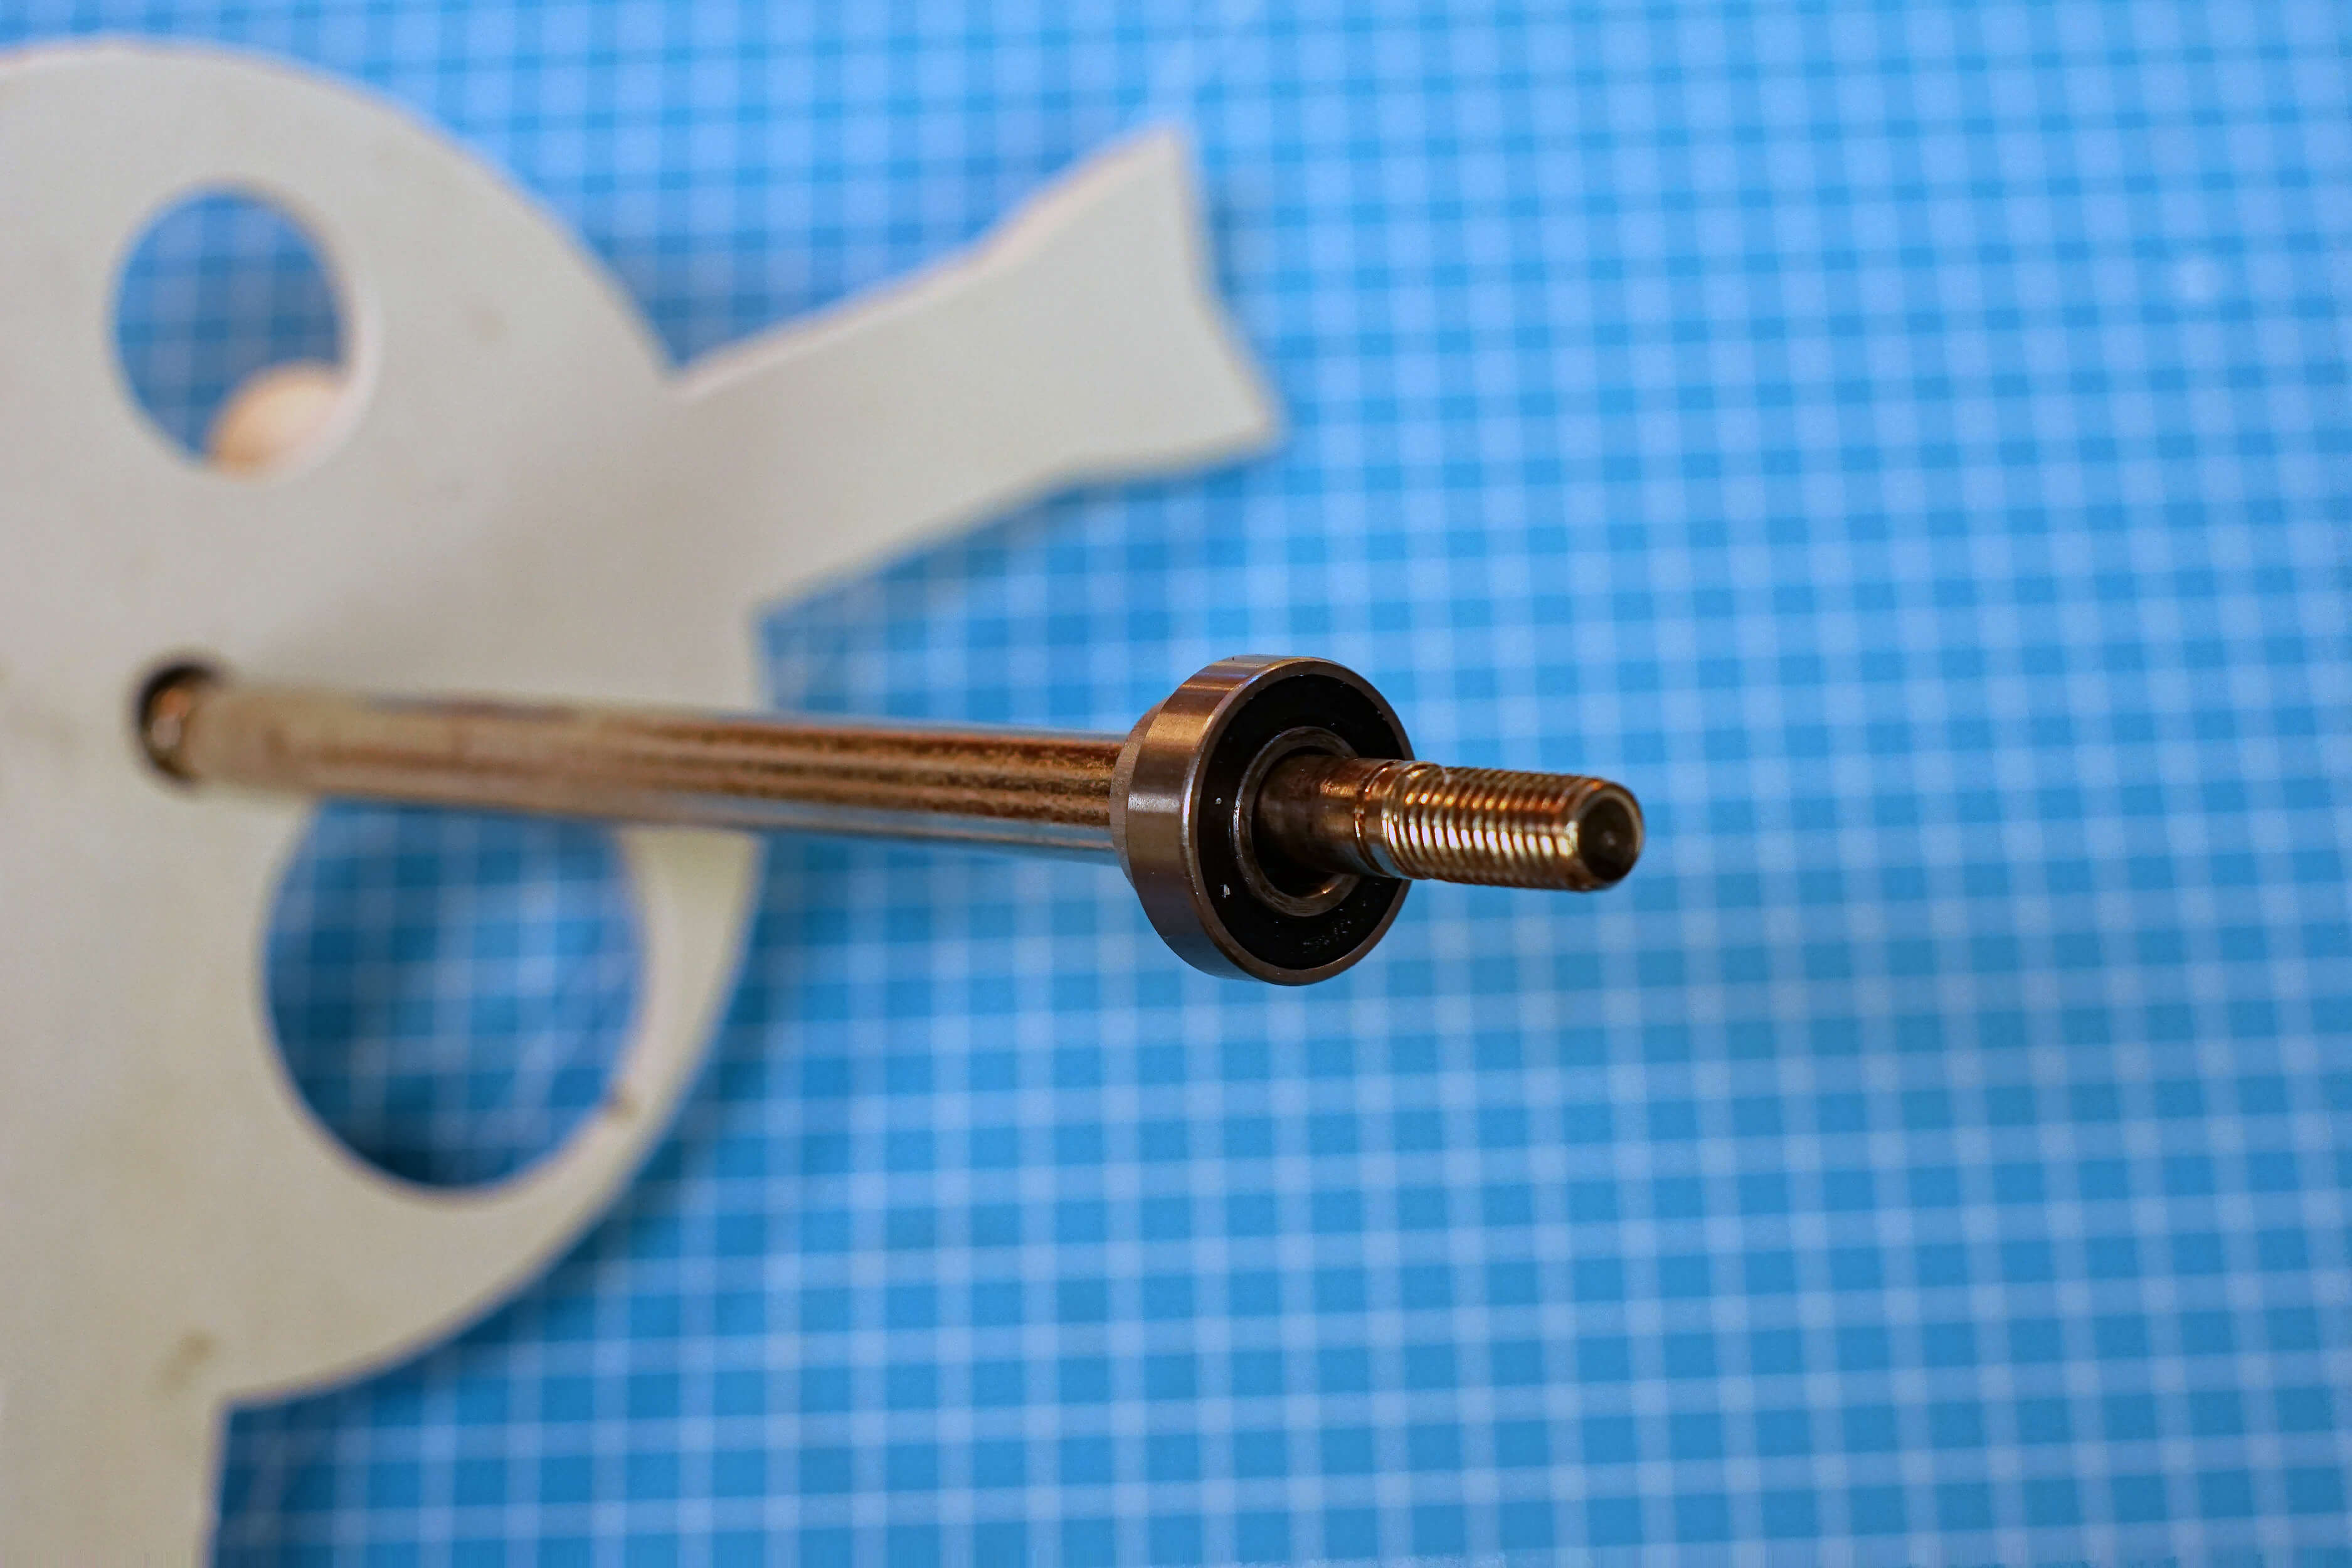
Remove the central M10 rod and attach either a 6001 bearing or the printed spacer as shown.
You can then attach the clamp to the tripod, having assembled the tripod adapter.
For EQ5 aluminum tripods, the AZ Key tends to be very high. For those, use the alu eq5 adapters instead.
The mount can then be attached to the tripod.
¶ Mount unfolding and mechanical preparation
The ALT axis of OAE can be set to 4 distinct positions, each corresponding to a latitude range. The motorized motion of the axis then fine adjusts within the 10° of range.
When attaching, the M5 bolts that come out of the ALT axis slide into the slot. Insert them fully into the slot. Then tighten the ALT Knobs with a light tug.
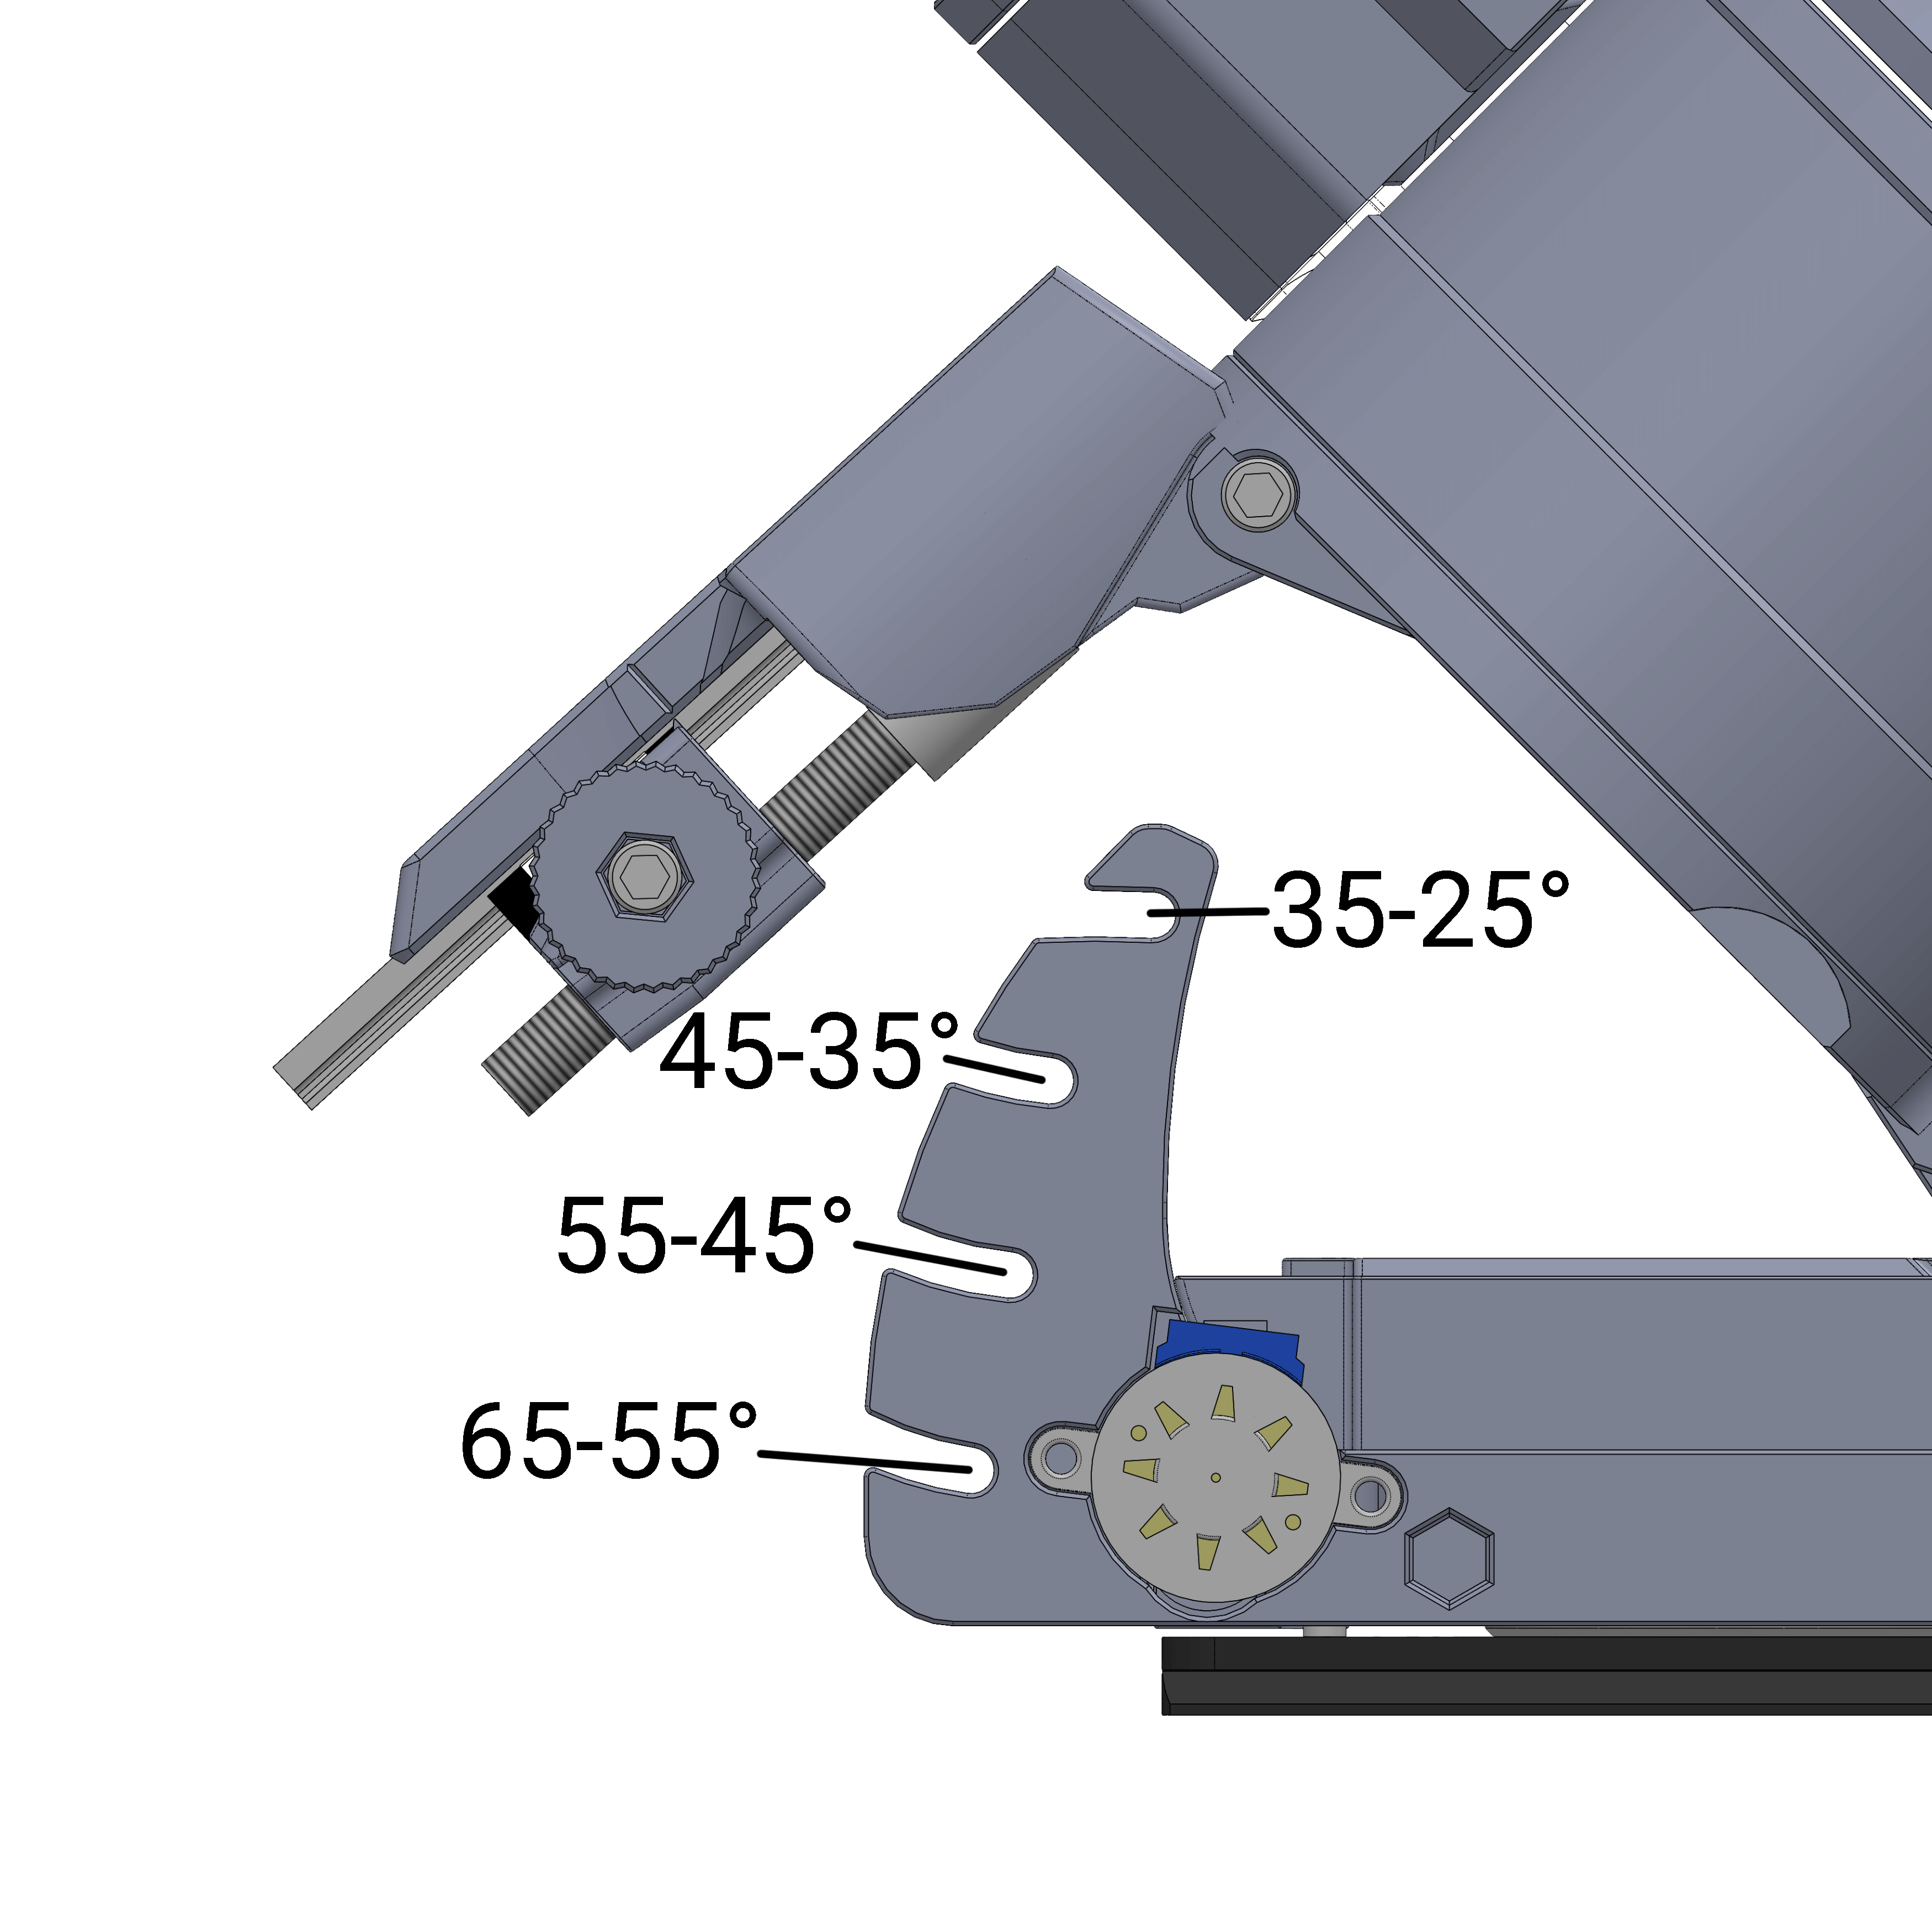
The front of the mount should be pointed north (or south in the southern hemisphere). As the previous picture was looking at the back of the mount, in this example north (or south) would be towards the right side.
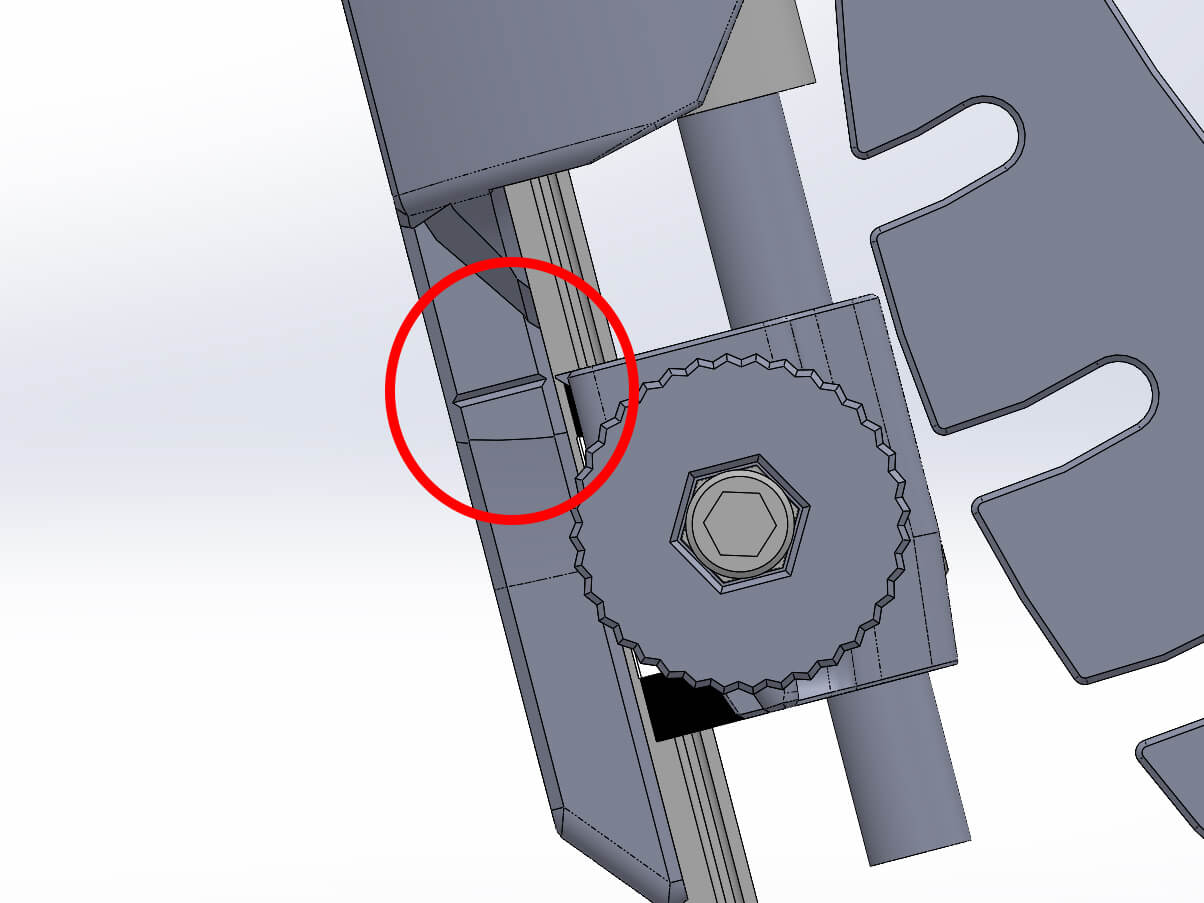
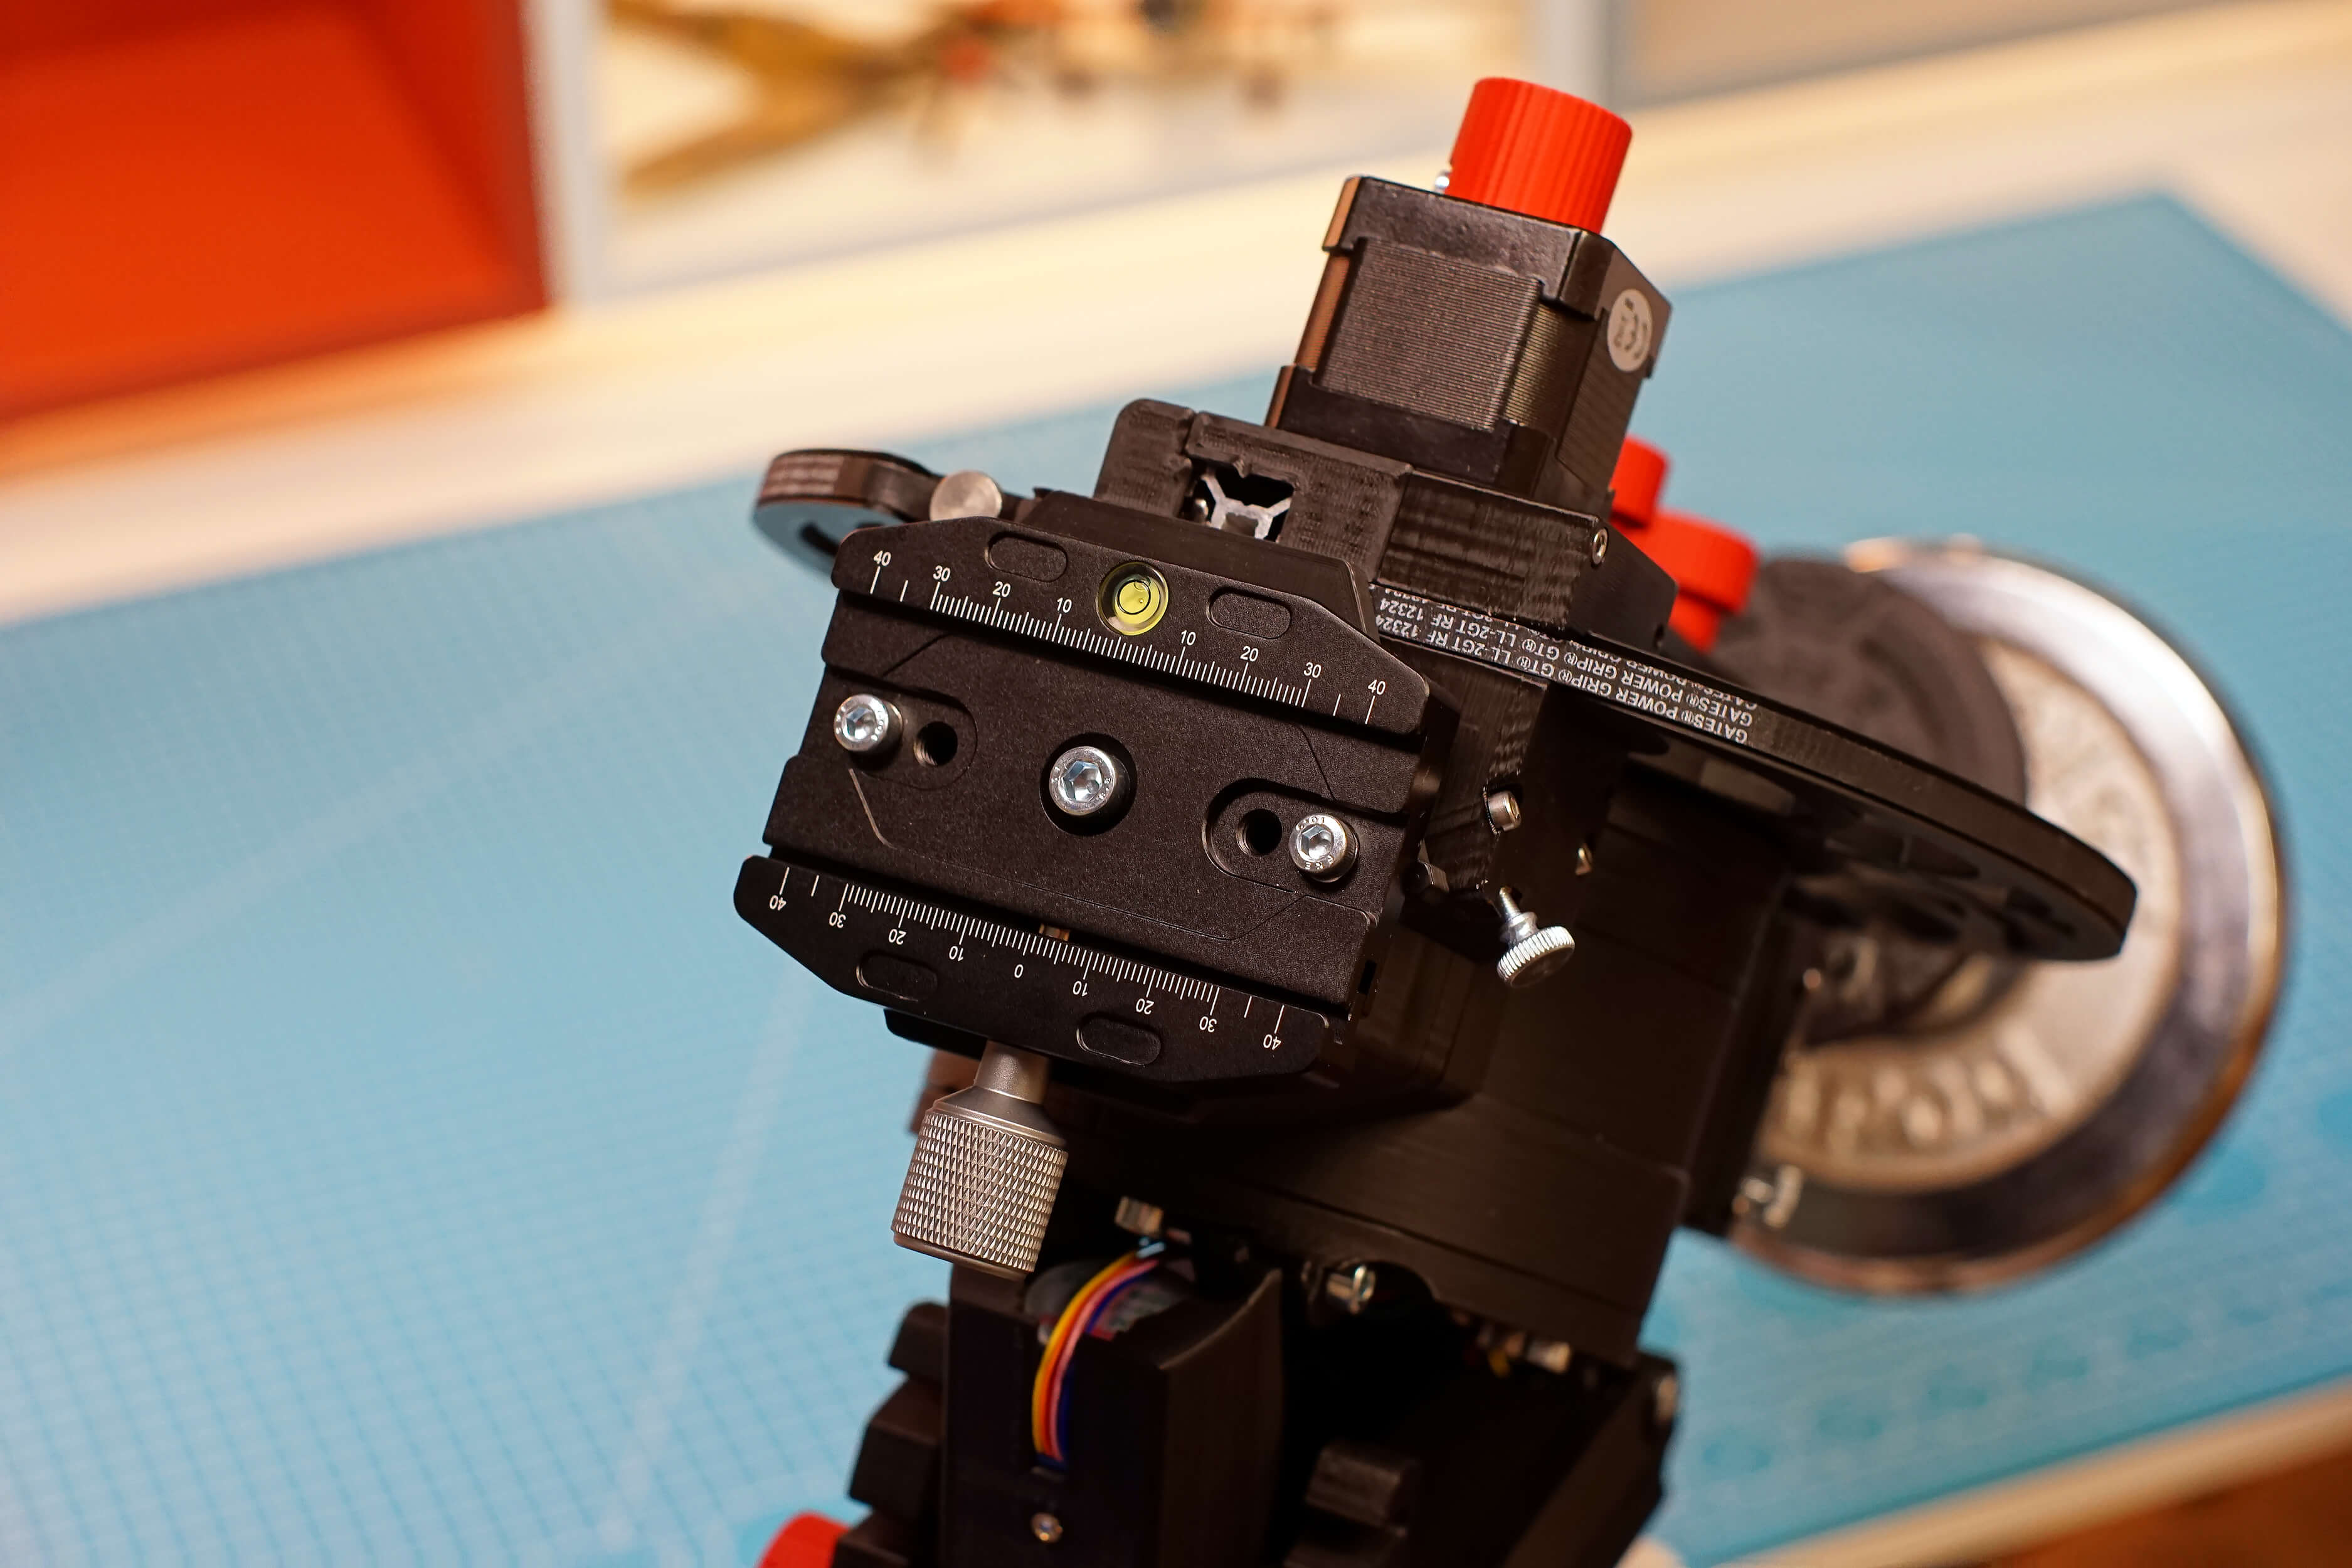
¶ RA Ring & Belt tension
|
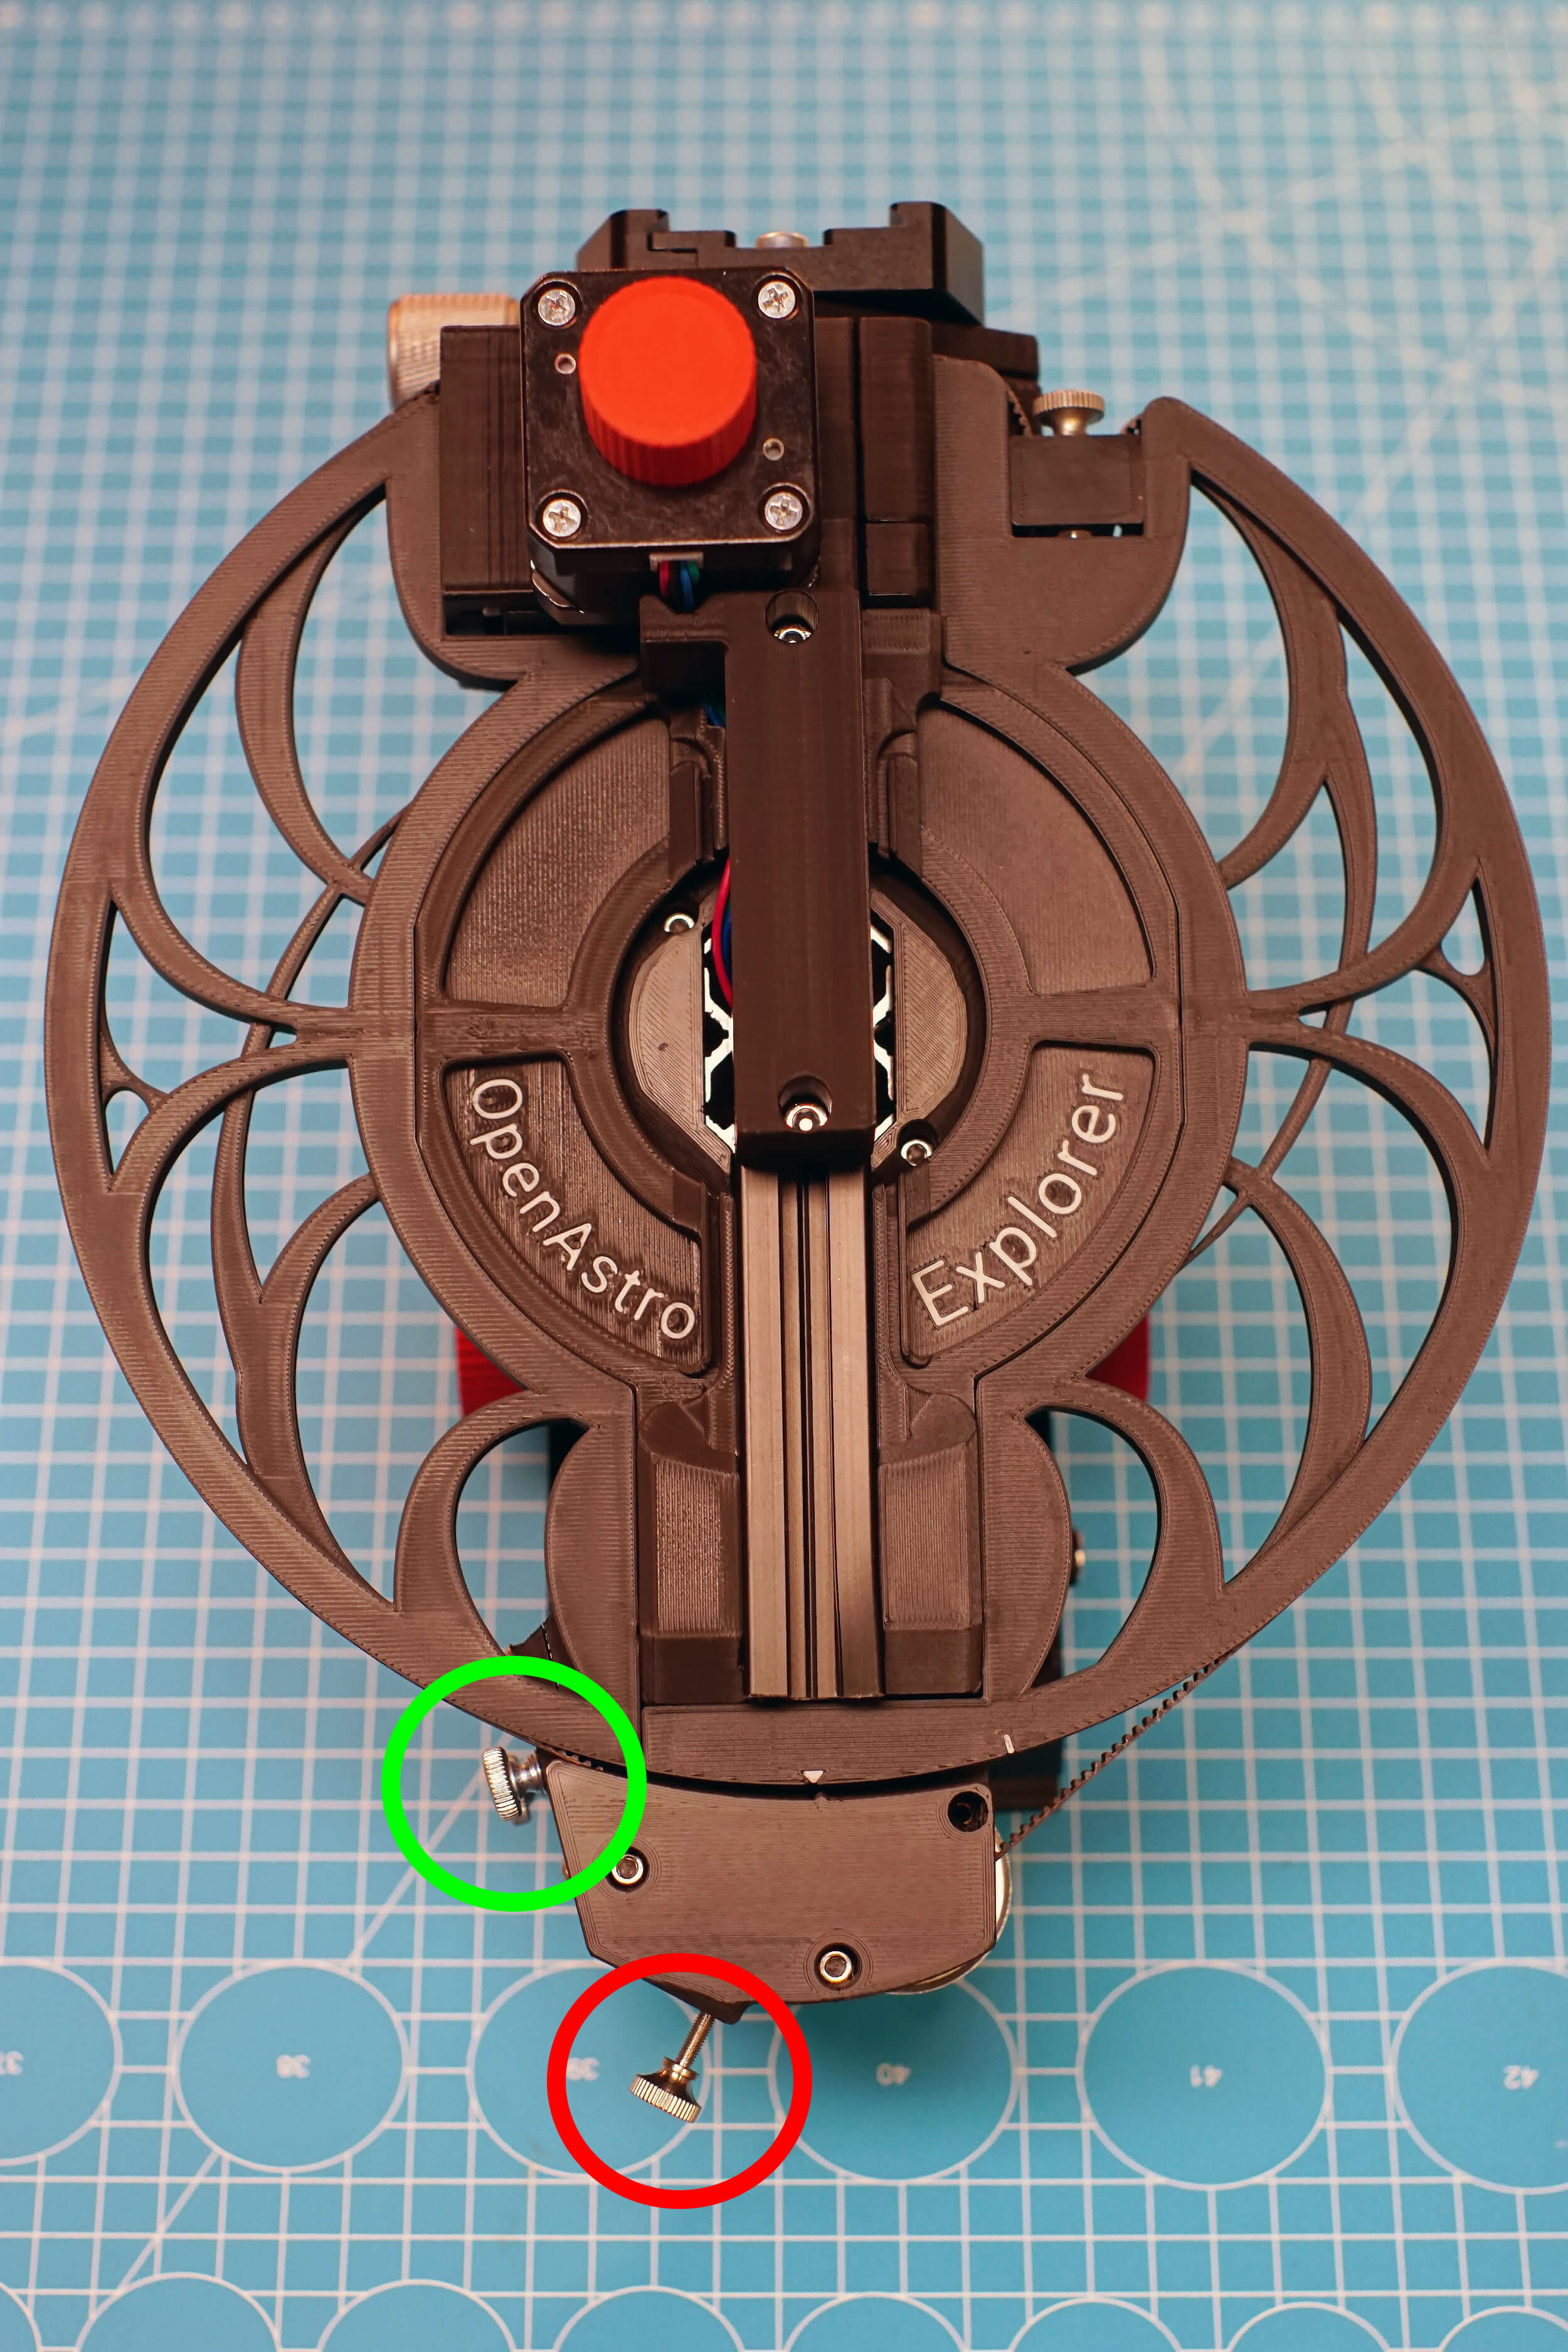
This is how OAE should be transported to save space and protect the RA Ring. To operate, remove the belts from their holding slots and attach the two RA Ring halfes with the help of the magnets. Slide the belt around the ring. It helps to screw out the tensioner on the bottom. Then screw in the belt holder on the top. |
|
The belt holder should only be screwed in partly, with it in and the bottom tensioner unscrewed, the belt should be relatively loose.
Adjust the RA Tensioner (circeled red) and the gearbox tensioners (circeled green) only so much that there is no backlash in the system. Overtensioning the belts will lead to negative performance. The gearbox tensioners should always be adjusted in sync.
Note that the belts are sensitive to temperature changes. When exposed to cold temperatures they will loosen, requiring re-tensioning. It's recommended to do the tensioning once the mount has acclimated outside for a while. |
¶ Attaching and balancing counterweights
The counterweight knobs should be attached already.
The counterweight plates are attached with their respective adapters. Supported are 28mm, 32mm and 2 inch diameters. Put a retainer infront of the plate so it can not move. The retainer and adapters are attached with M4x12 screws and TNuts.
You will need slightly less weight than your imaging gear weighs. For example, for my 3.5kg rig, I need 3kg in counterweigths.
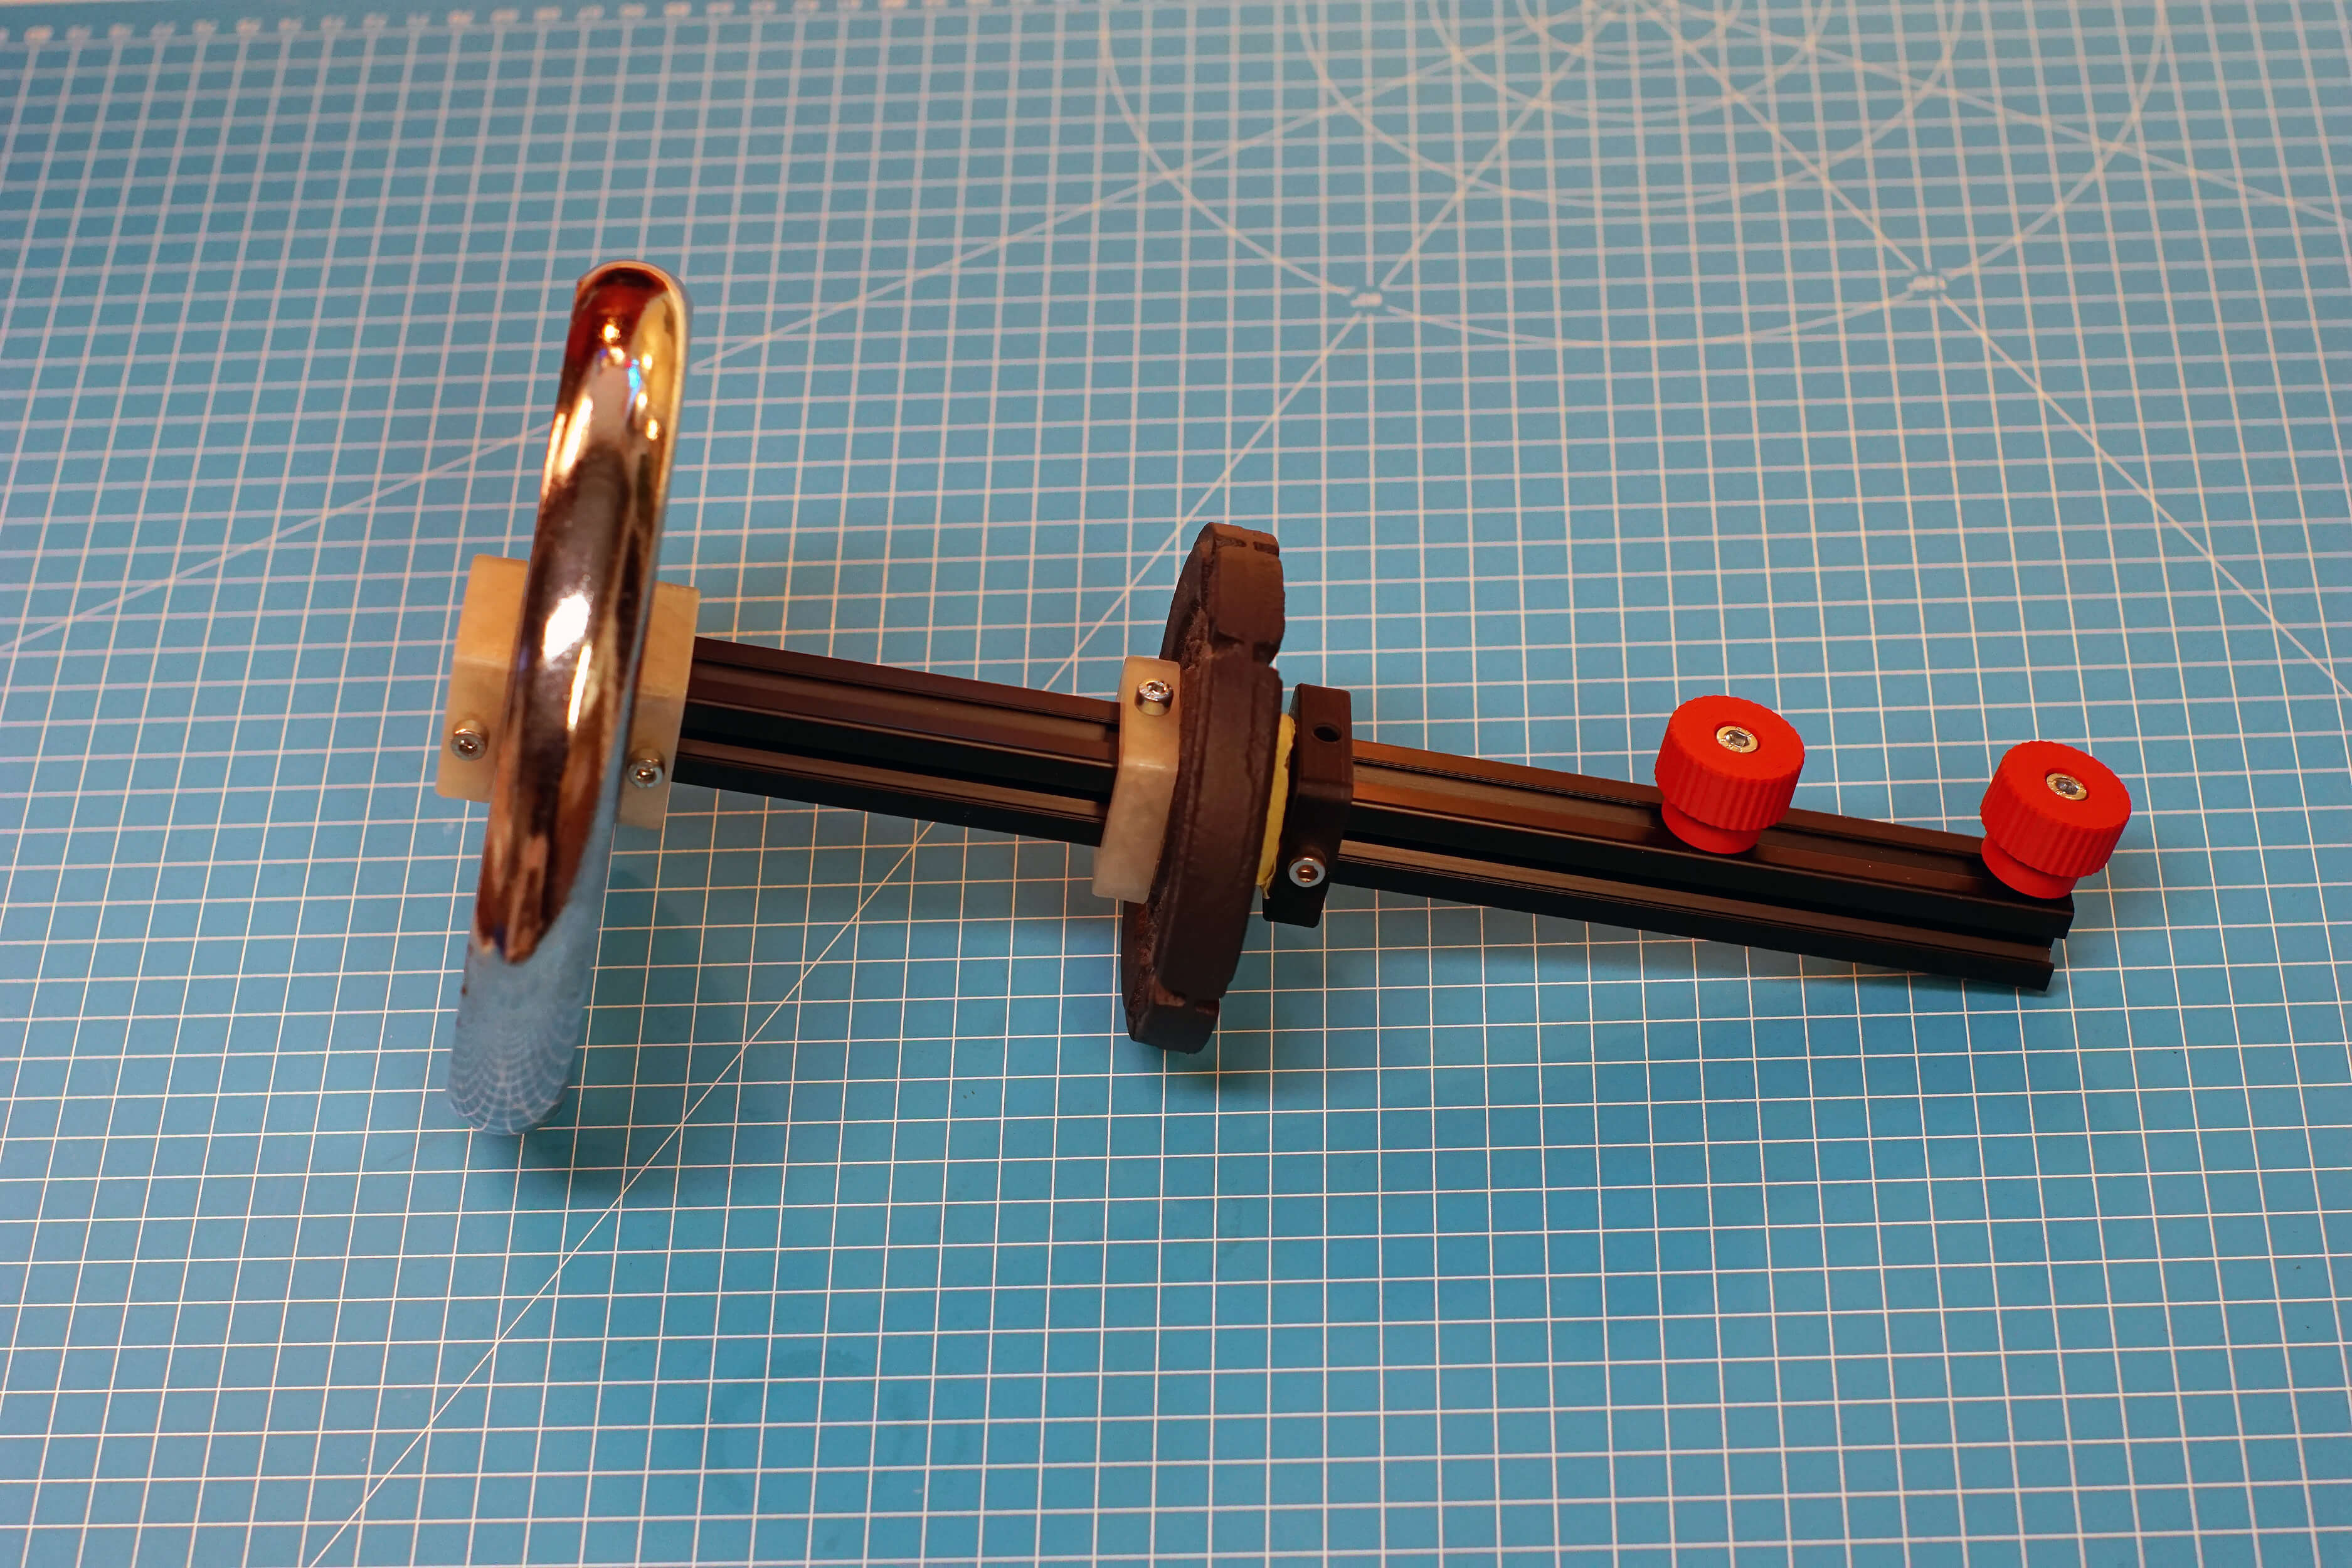
The Counterweight bar is attached to OAE via the 2 Knobs with TNuts on, directly underneath the carrying handle.
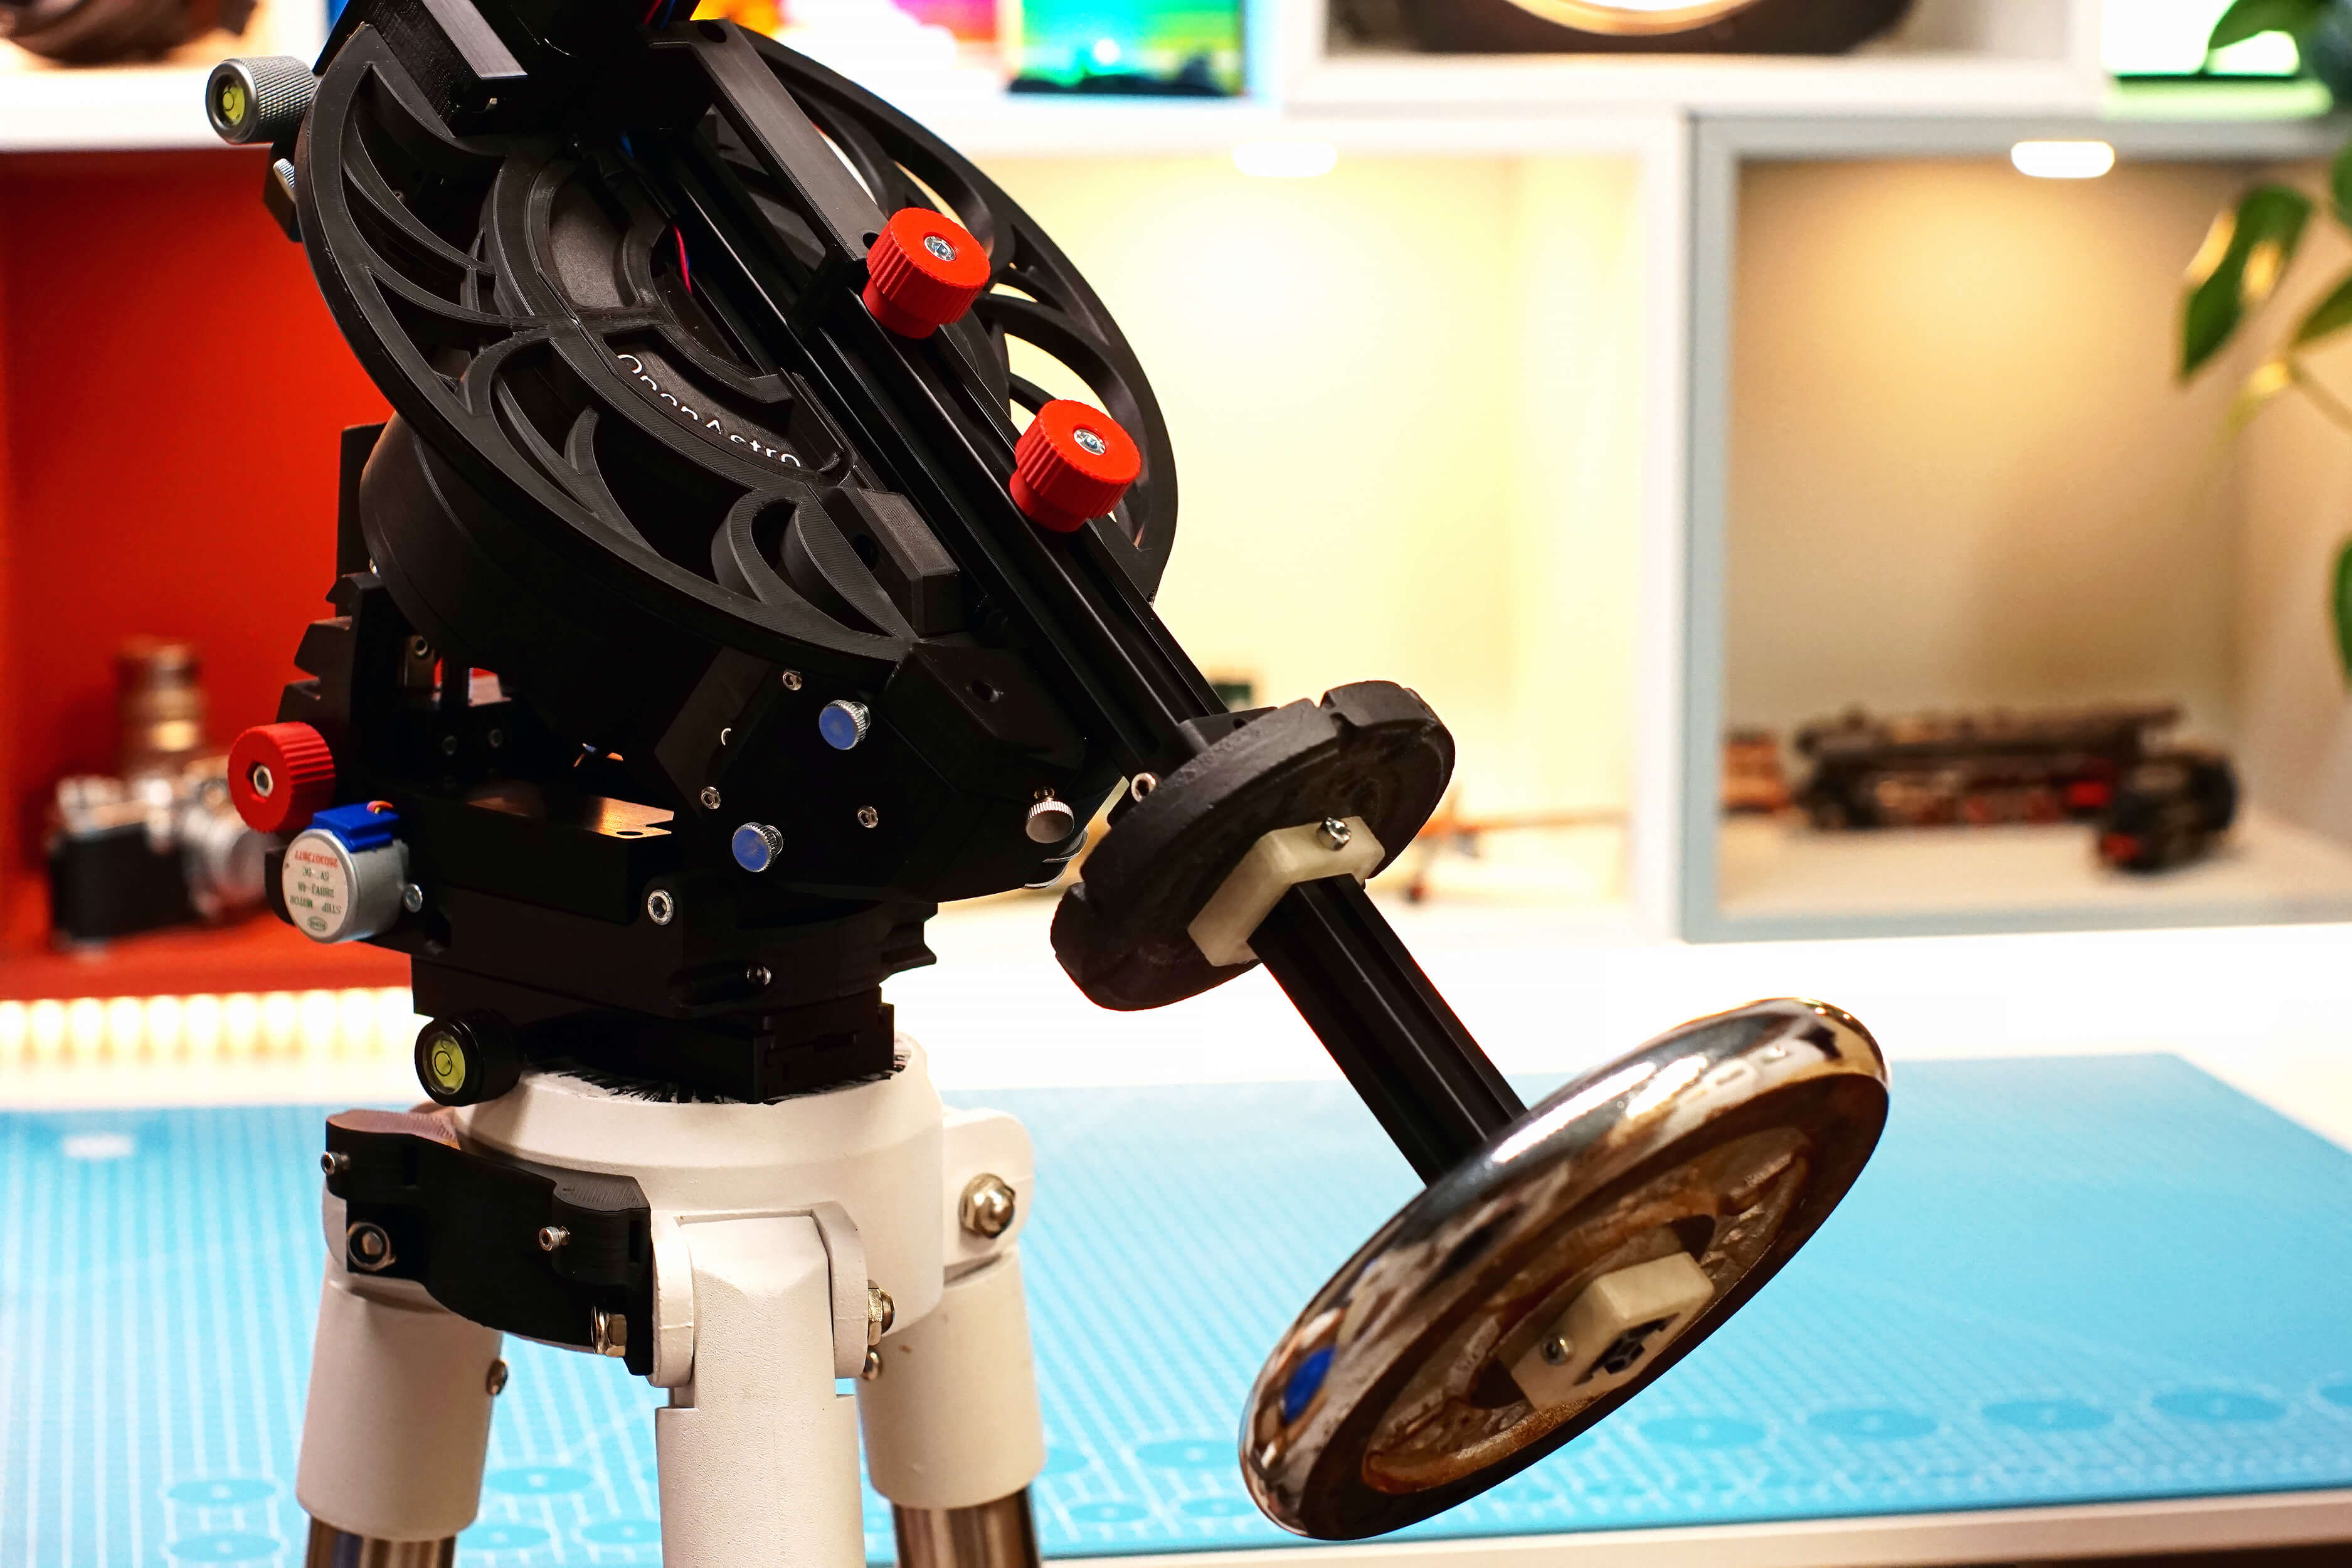
For balancing, attach all of your imaging gear (see next section), remove the belts so the RA axis can rotate free and add/move the counterweights until the mount wants to return to a neutral position. It is wise to add slightly more counterweight than needed, so that in the unlikely event something goes wrong, the telescope doesn't crash into the tripod.
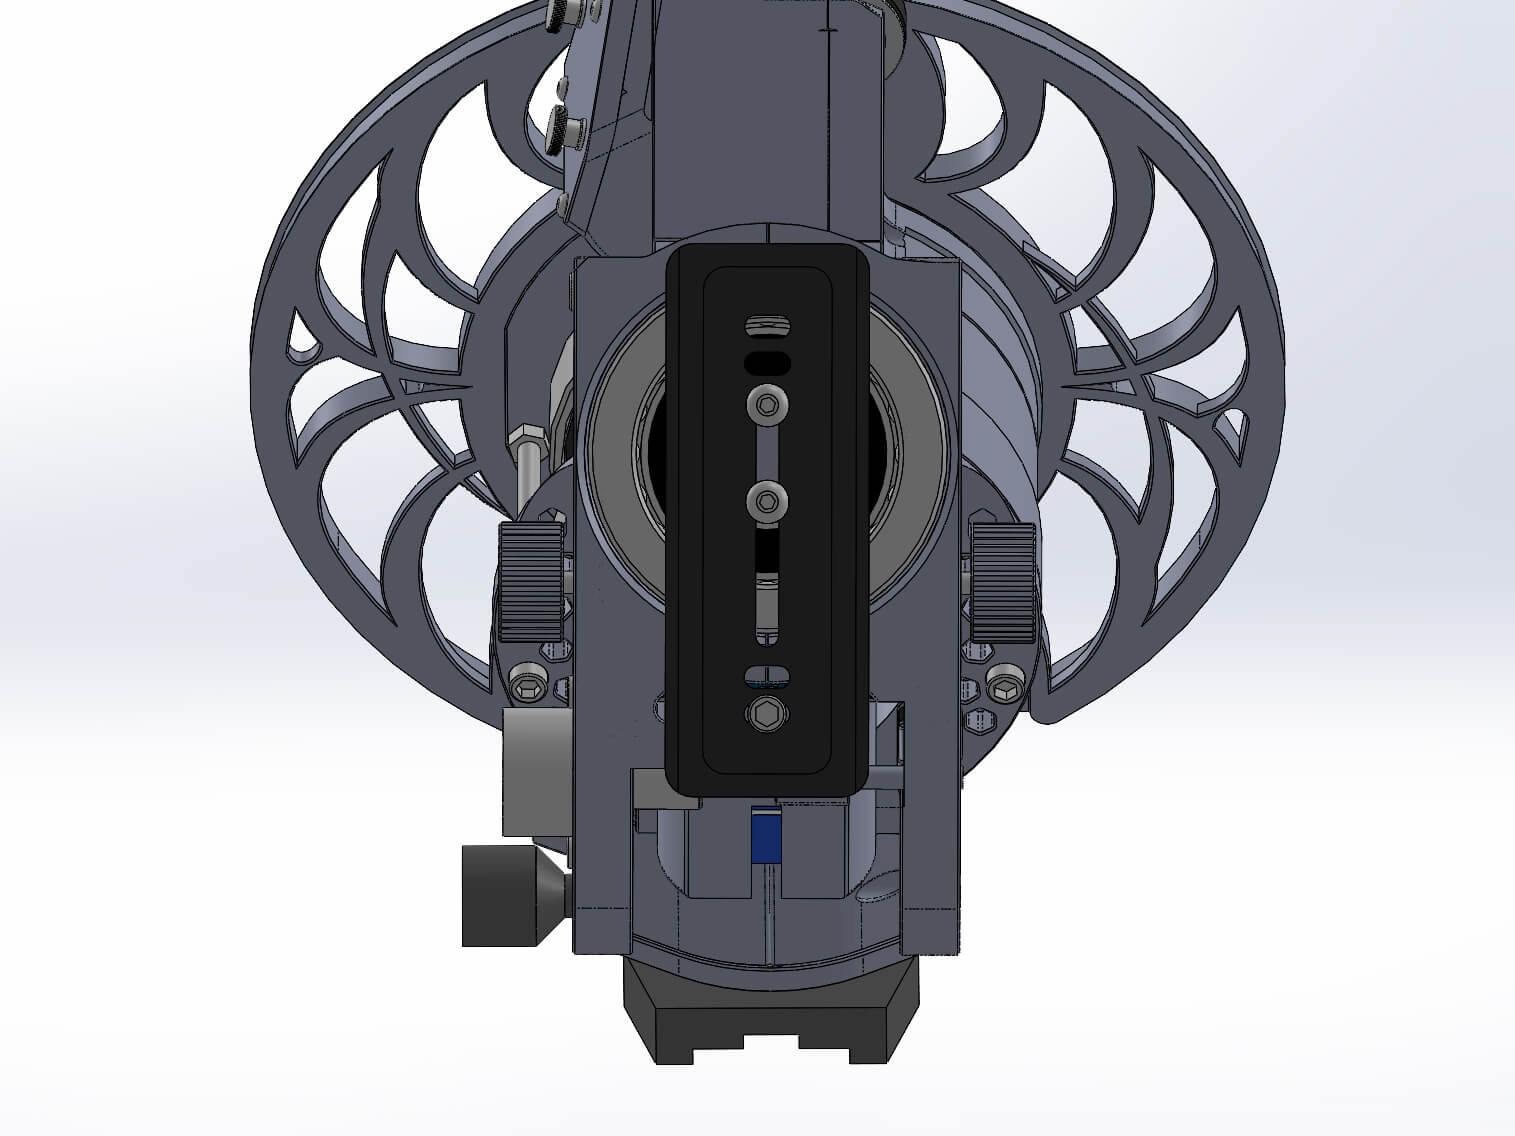
¶ Attaching imaging gear
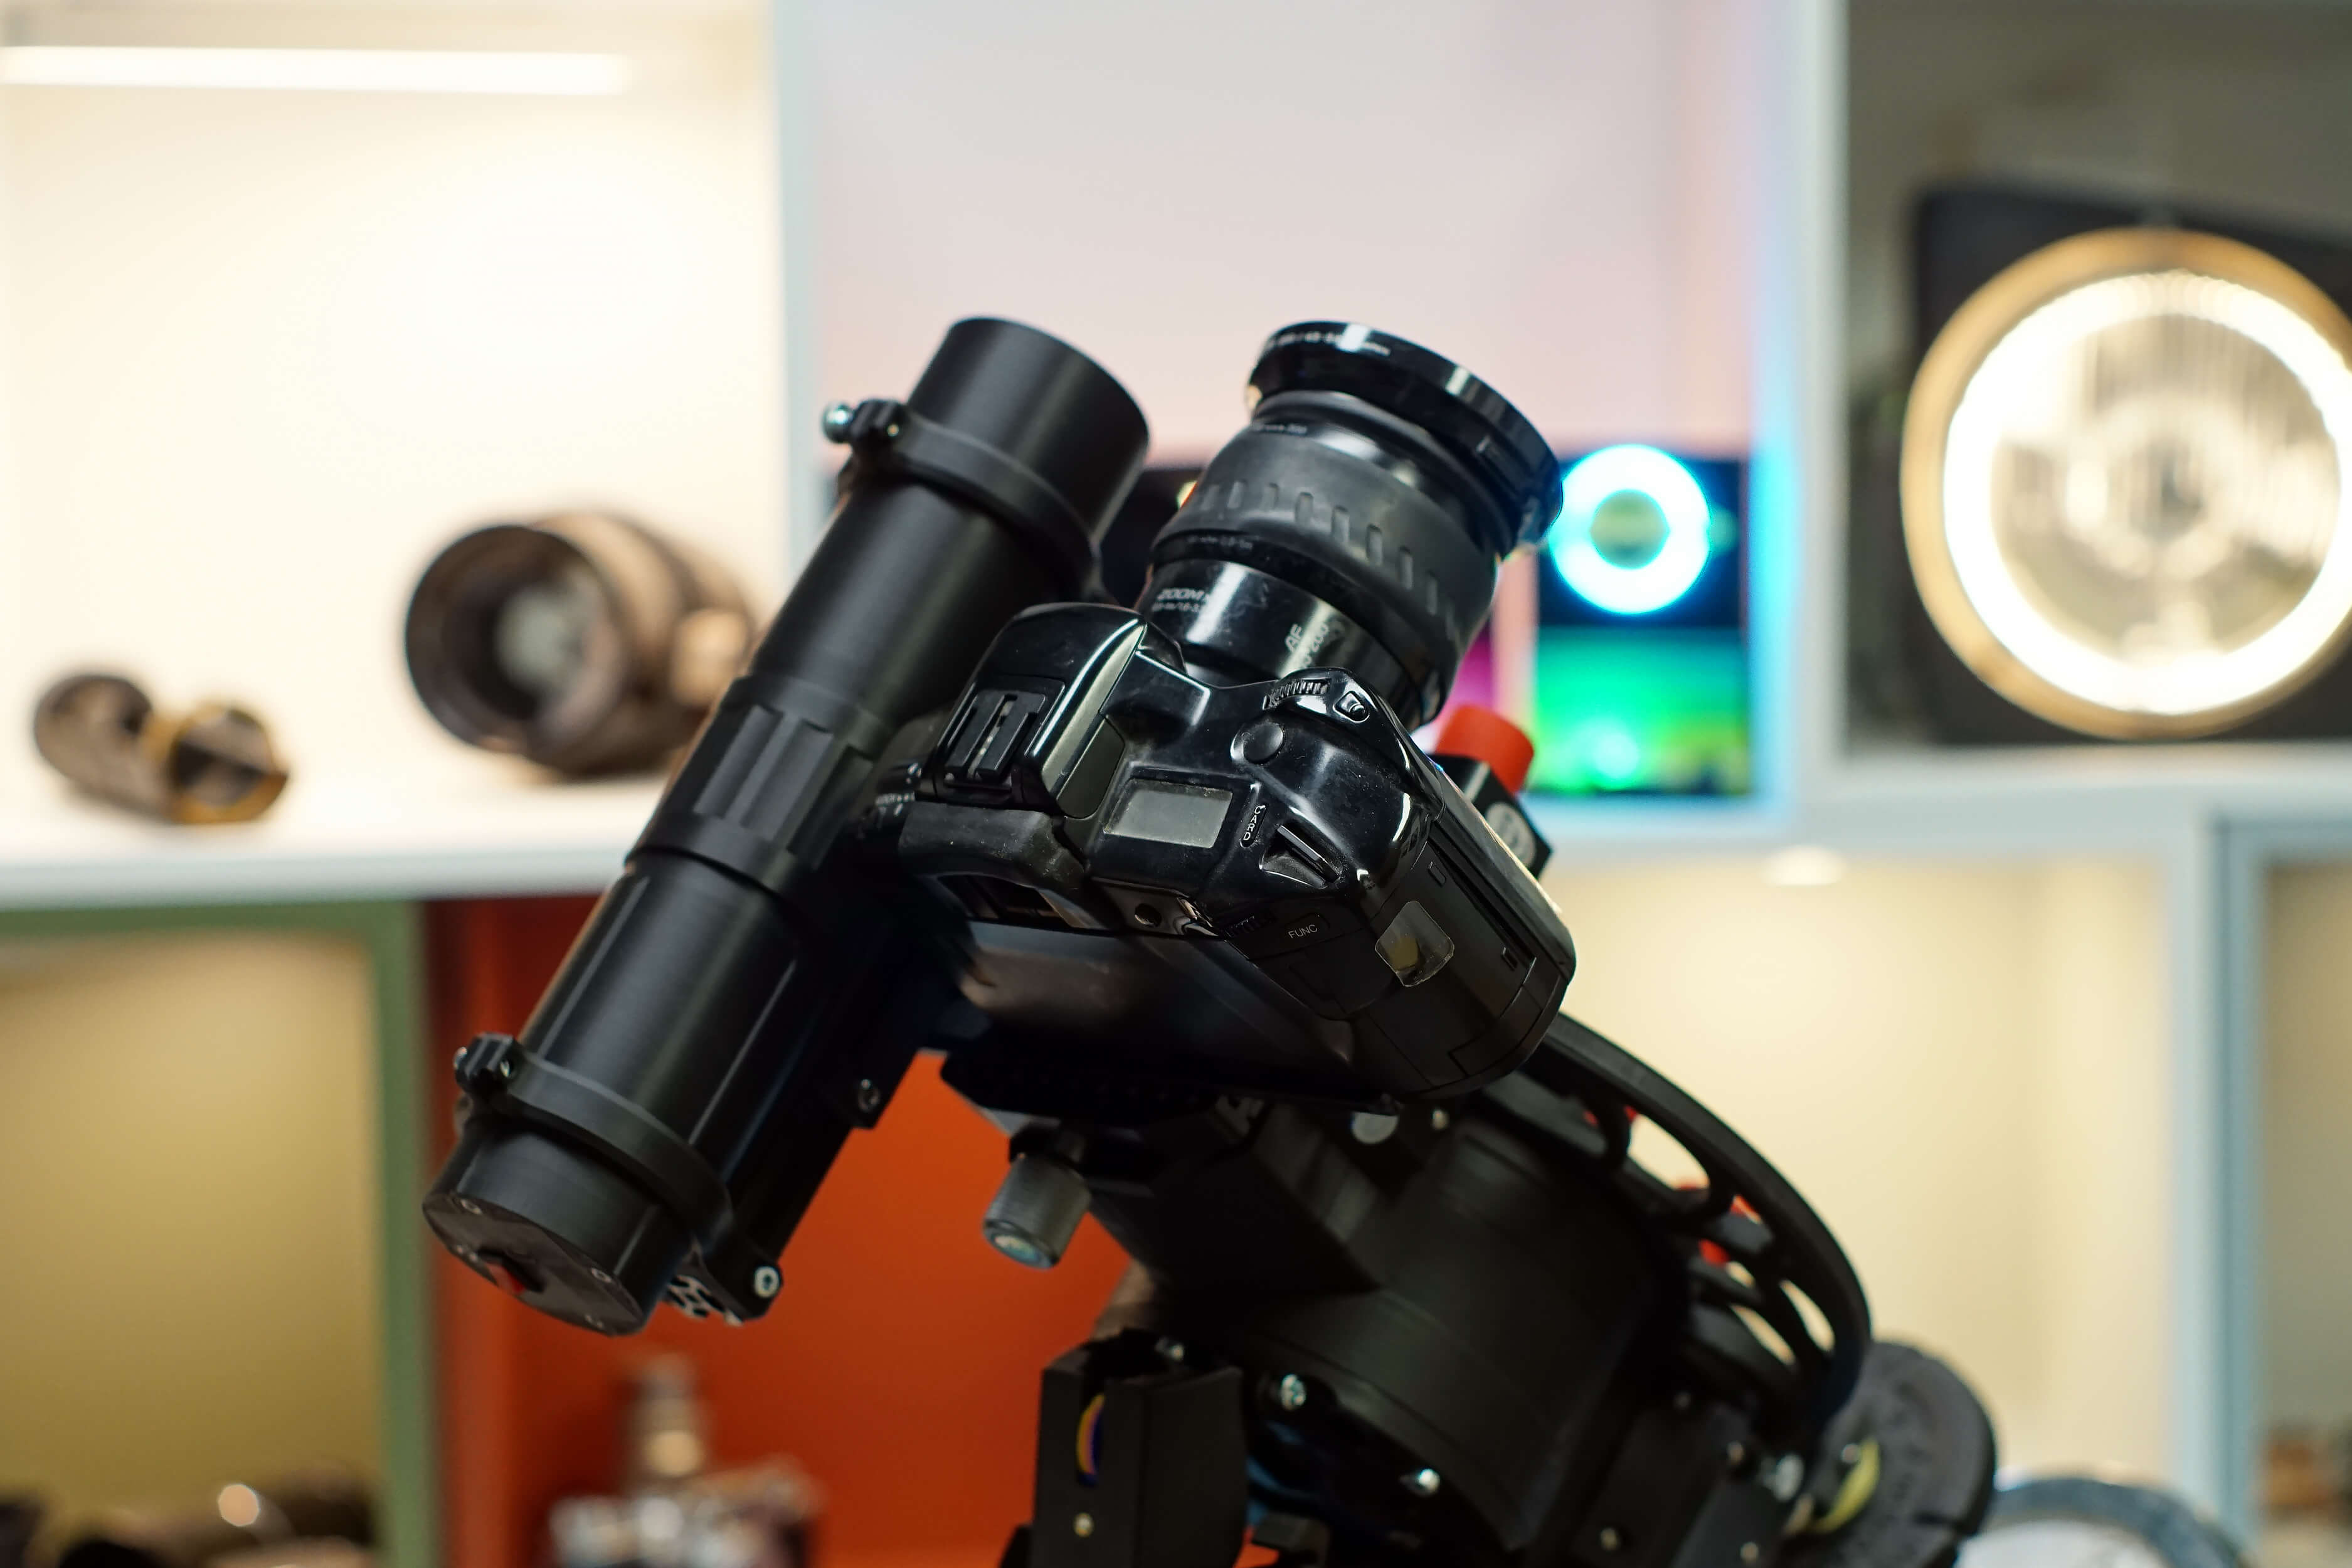
For any telescope that can attach an arcaswiss plate and has a mini-Vixen clamp for the guider, attaching it is pretty straight forward. It is simply attached to the clamp on DEC as shown. Just make sure it is roughly attached near it's center of gravity.
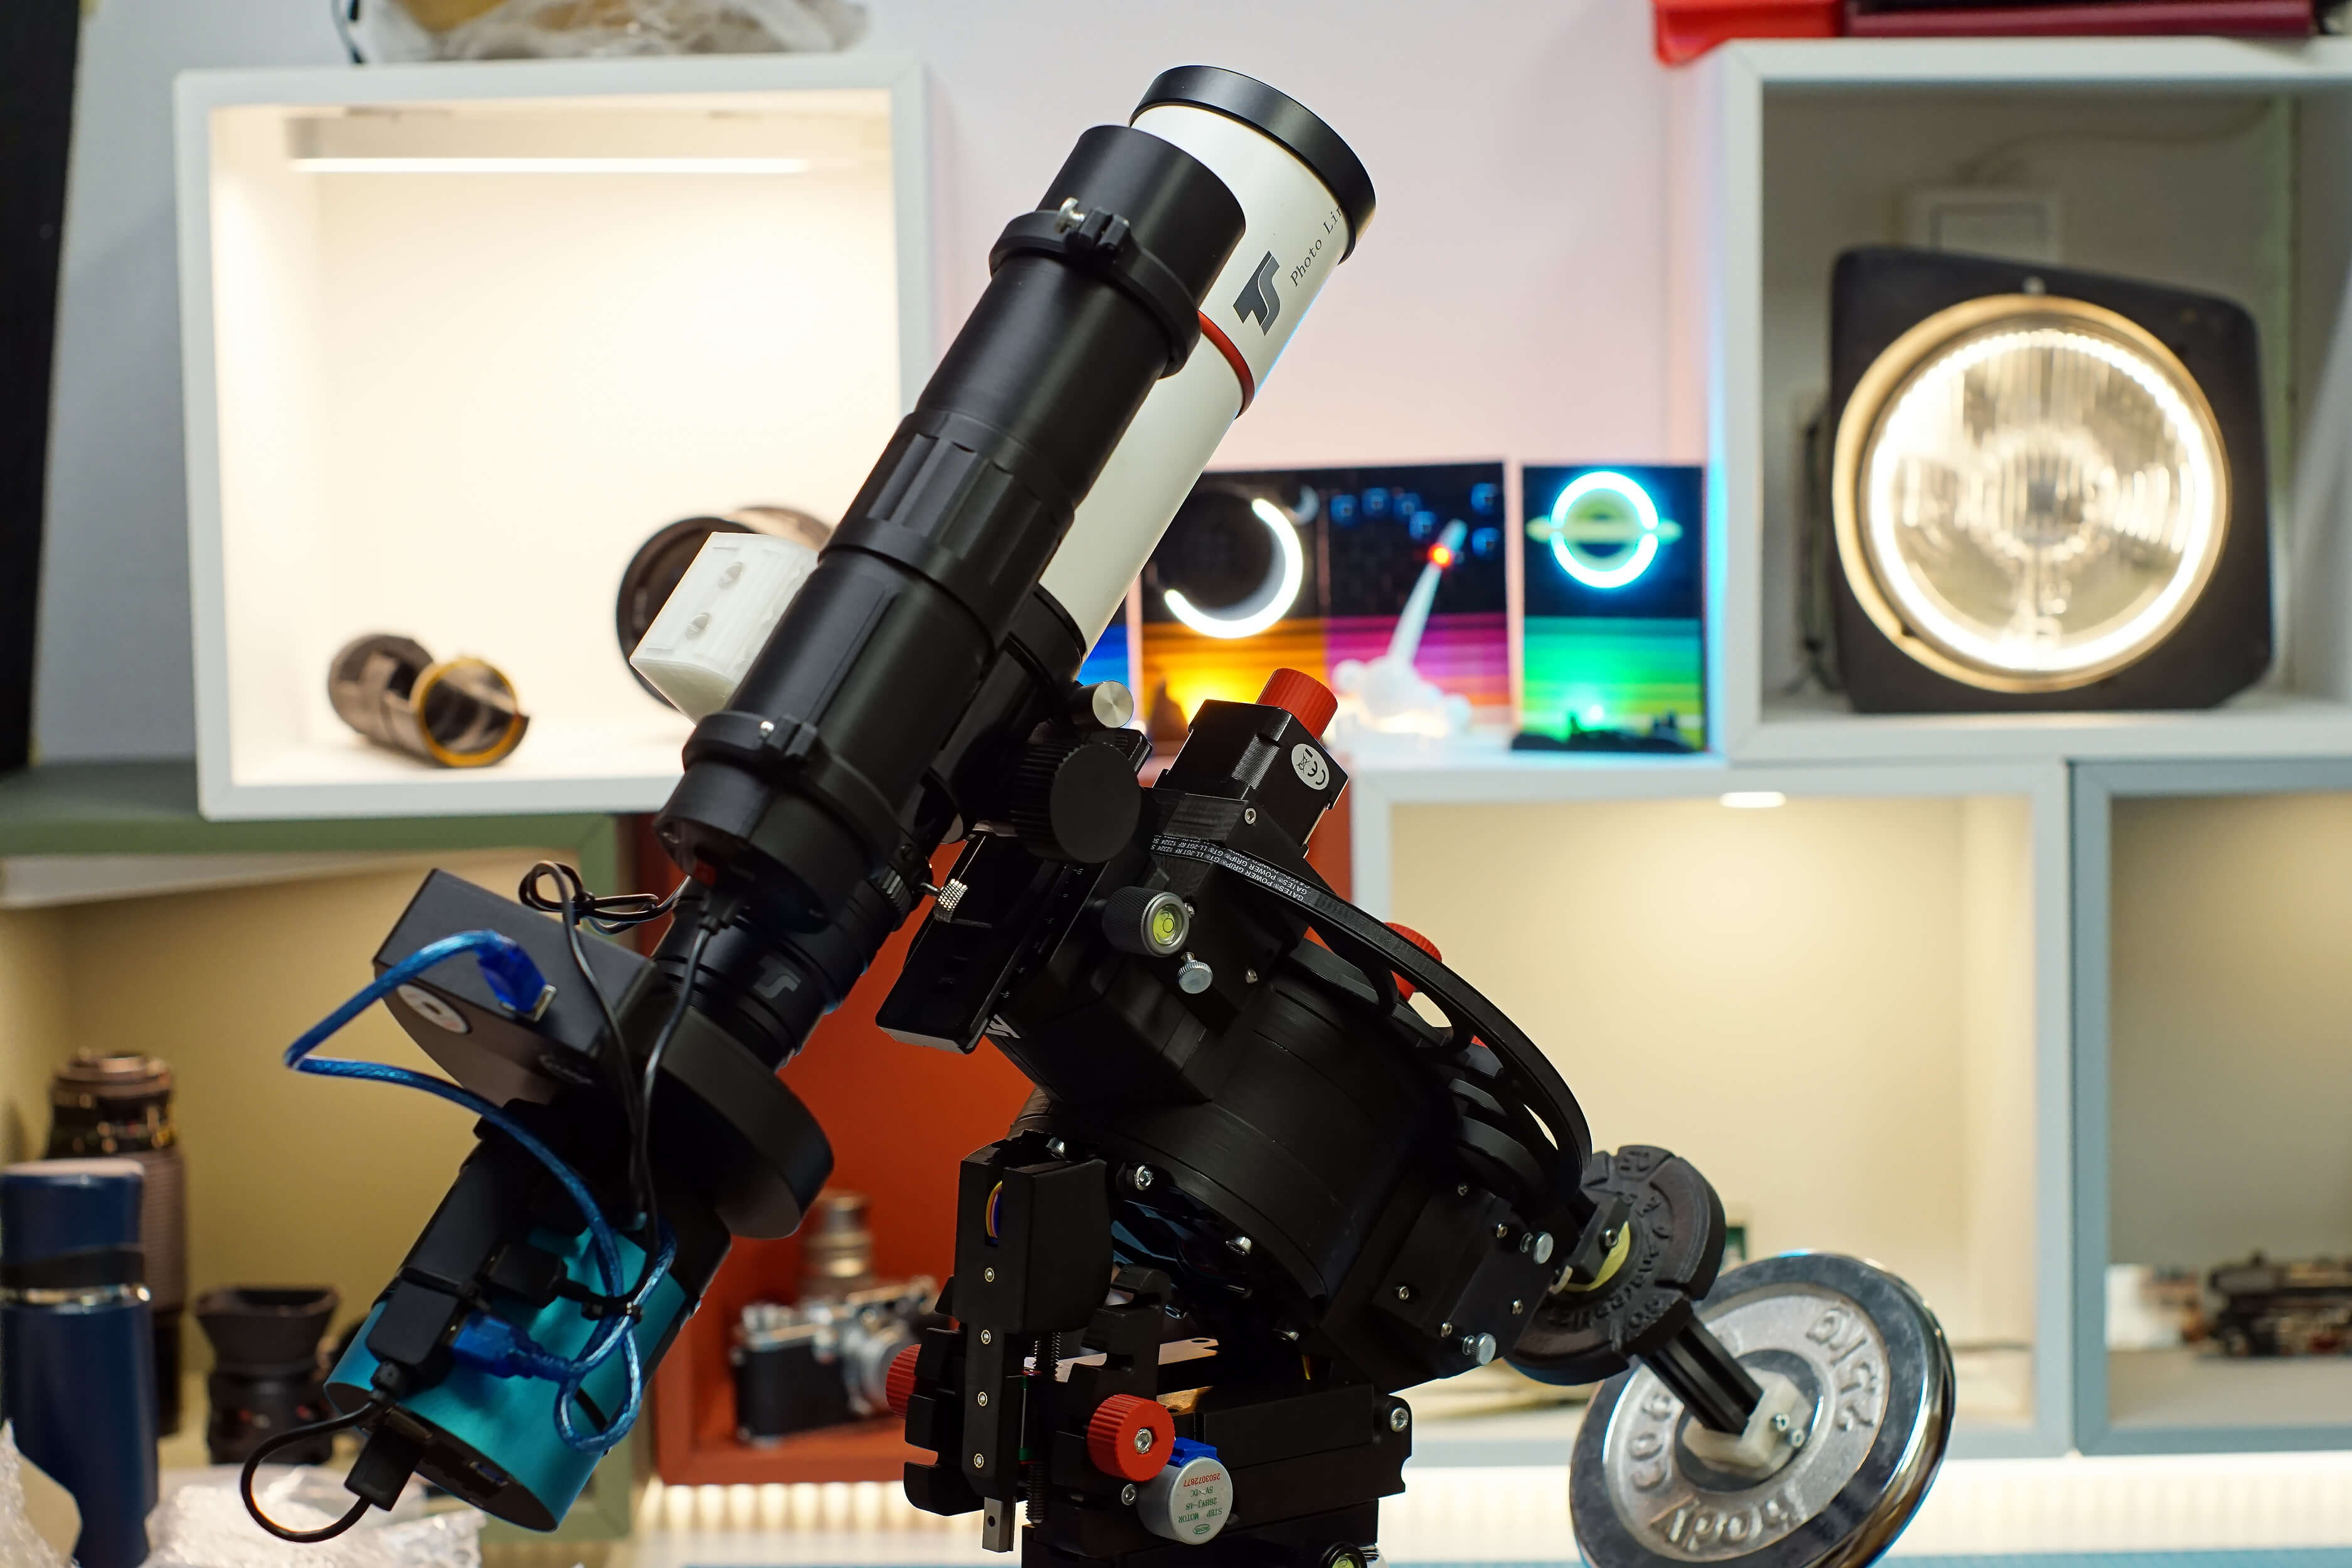
If using a DSLR, or telescope without an attachment for guiders, you can mount the DSLR and Guider side-by-side. The Guider can be attached with a short M4 or M5 screw and TNut.

Rotate the DEC axis by 90° as shown, then mount the camera and guider to it. When setting the home position in OATcontrol to this position, the mount will behave as usual.
¶ Cabling & PC connection (link to Software/OATControl pages)
¶ Session Operation
Now that you have gone through the previous steps, you are ready for your first Astrophotography session! Just wait for the next clear night. As a general rule of thumb, the more new gear you aquired, the longer the clouds will linger over your place specifically. This is normal.
If you are completely new to the hobby, don't expect the first nights to result in APOD-worthy images. It remains one of the hardest things to do, capturing a few photons from thousands of lightyears away, from your light polluted backyard, with a tiny little lens or mirror.
If I can give you a tip, don't compare yourself to others. This also applies to life in general but is especially true to Astrophotography. There will always be someone with better (read: more expensive) gear and better processing technique.
¶ Connecting to PC and software
Above you have already gotten to know OATcontrol. This is the central Software for OpenAstroTech mounts. For a session, these are the bare minimum steps you need to take:
- Power up mount and connect USB
- Connect OATcontrol through ASCOM
- Verify Lat and Long for current position
- Home the mount and press "set home"
¶ AutoPA (Automated Polar Alignment)
OAE has the capability to do the Polar alignment route automatically. This can be done either through Sharpcap's Polar alignment routine (paid licence) or NINA's "Three Point Polar Alignment" Plugin, abbreviated TPPA.
Fully automated PA currently has an issue with SharpCap:
The logging in Sharpcap is too slow to be useful. We are working with the Sharpcap team to resolve this issue.
¶ NINA TPPA
N.I.N.A. TPPA Common Issues
If the TPPA routine does not popup a window in OATControl when it is started, make sure that NINA Logfile monitoring is enabled in OATControl App Setings.
If the window pops up but no corrections are issued, make sure you are on the latest version (at least 2.1.0.2) of the TPPA plugin.
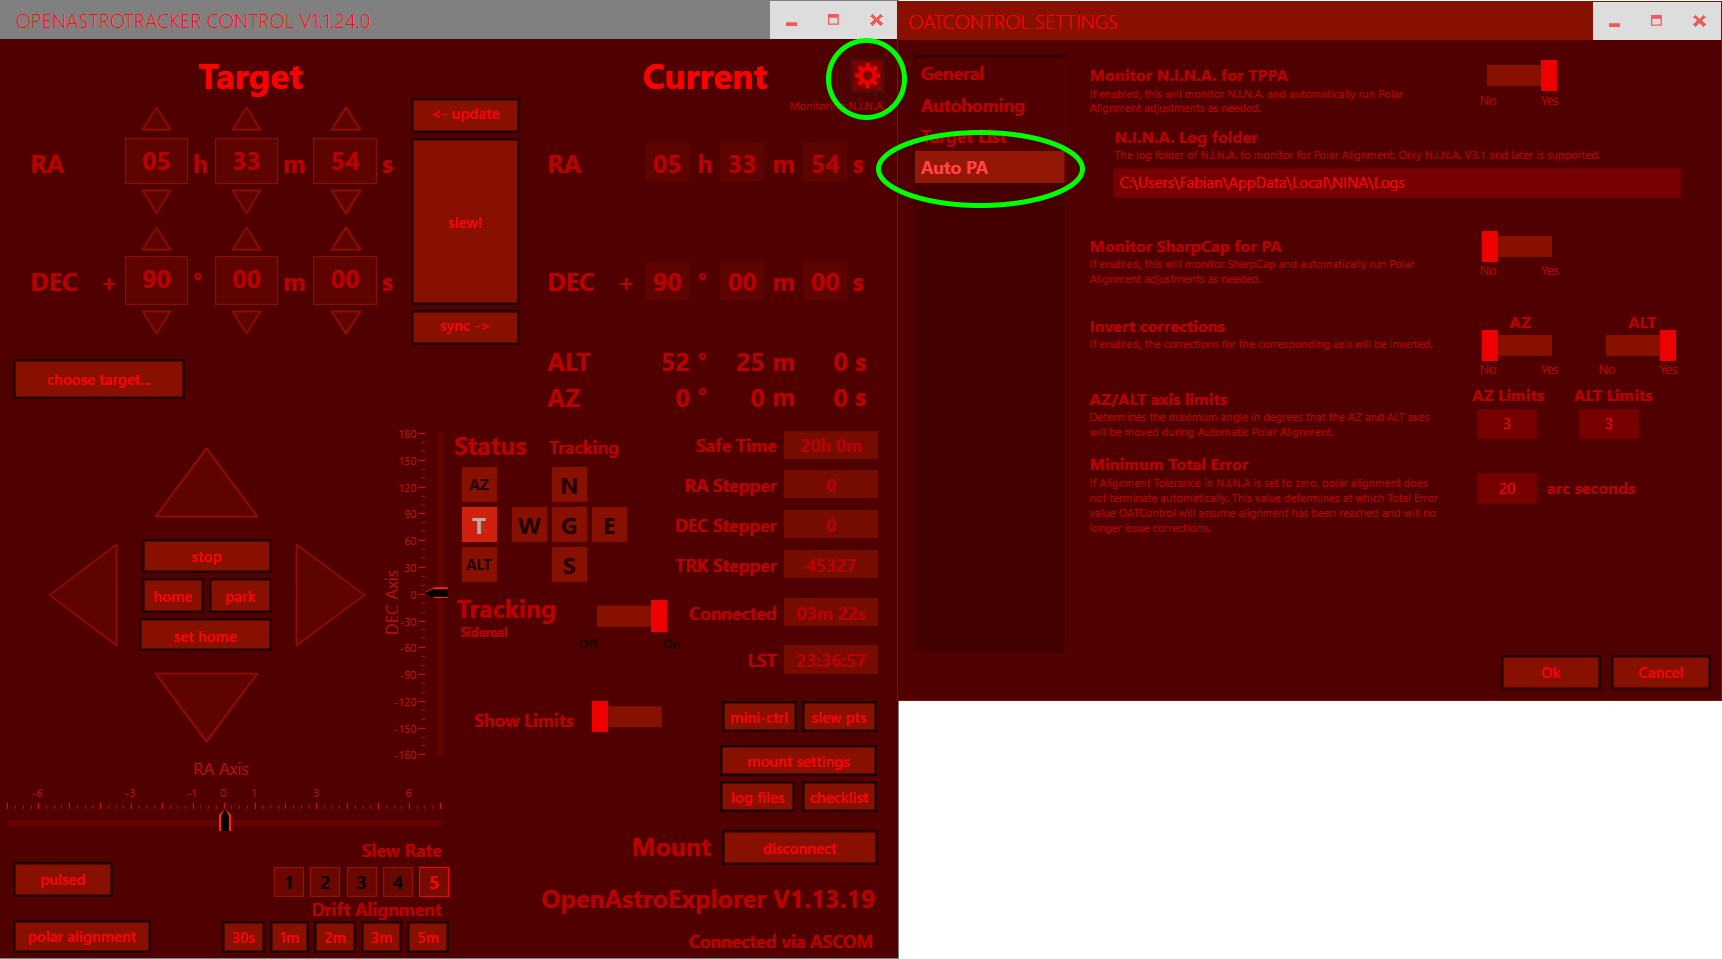
In order for TPPA to work, you must first enable the function in the settings in the top right, then navigate to the autoPA settings. Enable the monitoring of NINA and make sure it has selected the correct log folder for NINA. It usually does a good job of guessing the folder.
Here you can also find other settings related to autoPA.
- You can invert the directions for ALT and AZ in case they go in the wrong direction during autoPA.
- You can increase the motion limits for OAE to 5° for both axes.
- The "Minimum Total Error" setting determines until what threshold autoPA will run. If you notice that the correction oscillate below a certain value, you can increase this threshold here.
You can test the function inside by connecting the mount to NINA, as well as either your camera or choose the Camera Simulator in NINA. If you then start TPPA, a window should pop up in OATControl. Of course it won't have any real data to work with, but this means the two softwares are correctly communicating.
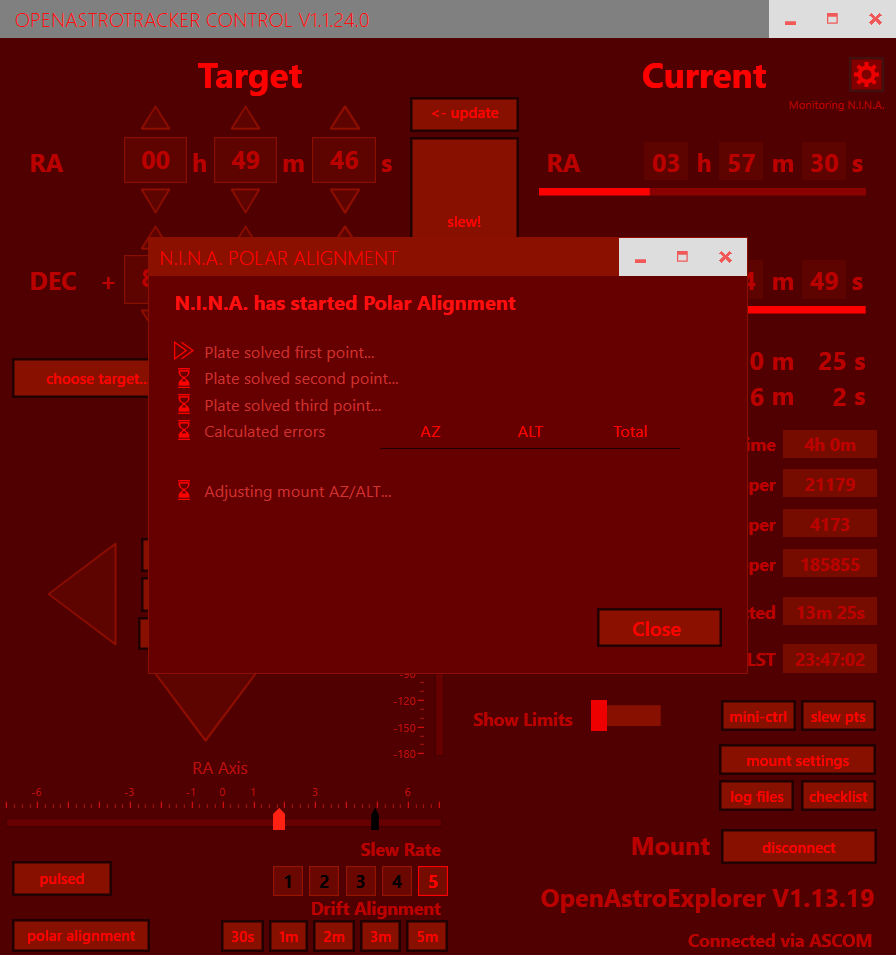
In a real setup, TPPA will run until it has calculated the Polar Alignment error, at which point OATControl will take over and issue the necessary corrections. Some things to note here:
- autoPA will only run if the error for ALT and AZ is smaller than the ALT and AZ Limits set in the settings (see above). OAE can physically move +/- 5° in both axes, assuming it starts in the home positions for ALT and AZ. This means you will have to at least very roughly point the mount towards the celestial pole
- If the error for one or both axes gets significantly larger rather than smaller, invert than axis in the settings, then re-run TPPA
- autoPA will run until it has reached an error smaller than the threshold set in the settings (20 arcseconds by default). If the "Alignment Tolerance" in the NINA TPPA settings is anything other than 0, TPPA will quit at that value. It is recommended to leave this at 0 and manually stop TPPA once OATControl has reached it's own threshold. This is because the NINA devs, maybe rightfully so, argue that no one would need alignment more accurate than 1 arcmin. We can achieve better results however, so it's better to leave NINAs threshold at 0. When manually quitting TPPA in NINA, tracking is stopped and has to re-enabled in OATControl manually.
¶ Manual adjustment
You can also use the manual method for Polar Alignment with OAE. This is at least semi-automatic, as it doesn't require you to sit outside in the cold. OATControl has a "mini-control" button in the bottom left, which enables you to manually move the ALT and AZ axis. Together with that and NINA/Sharpcap, you can do the Polar alignment as with any other mount.
¶ Running guiding
The overall procedure for guiding is described on the Guiding page.
¶ After the Session
Verify the mount is in the home position. If it's not, press home/park in OATcontrol. Also home the ALT/AZ axis through the settings (explained above).
Then go through the setup in reverse order:
- Remove power & USB cables
- Remove imaging gear
- remove counterweights
- fold ALTAZ
- detension all belt tensioners, 4 in total. RA ring, RA gearbox, DEC gearbox
- Remove belts and RA Ring, store belt
- remove from tripod
¶ Troubleshooting & Common Issues
¶ Mount does not connect
- Version 1.0 of the OAE board does not support USB C-C cables. A USB A-C cable is required. Version 1.0.1 supports USB C-C cables.
- Some ESPs don't seem to work. Use one with the USB C plug.