This page describes different software tools which provide PC control of your OpenAstroTech mount, camera and other devices.
¶ Drivers and Platforms for Windows
¶ USB driver
In exceptional cases, the computer may not see the OpenAstroTech mount connected via USB. The first thing to check is that the USB cable used is of sufficient quality (some cables shipped from China with the motherboard can cause problems). Test if the cable allows you to use it with another verified device (printer etc). If the cable is OK, you need to make sure that the necessary drivers are installed on the PC. This should be done when installing the Arduino IDE and after connecting and loading some script into the motherboard, if you are using only VS and platformio you may need to install the CH340 driver.
¶ ASCOM
ASCOM is a many-to-many and language-independent architecture, supported by most astronomy devices which connect to Windows and now Linux and MacOS computers.
Many (if not even most) astrophotography tools are built on top of ASCOM. These are mostly tools for automation of devices like mounts, guiding cameras, main cameras, optical filters, sensors, observatories etc. Some of these tools control only one part of astrophotography setup, others allow complete automation of all the devices and sequencing session. The main benefit of the ASCOM architecture is that it acts as an interface between devices and software tools. This way a device supported by ASCOM is also supported by all the software tools around it.
¶ What problem does ASCOM solve?
Astronomy devices (mounts, focusers, filters, cameras) connect to a computer via USB (mostly). Usually the USB connection appears as a serial communication port (COM on Windows) to the software on that computer.
In general, only one software program can use a COM port at a time, since otherwise it could lead to conflicts when two apps try to send something at the same time.
In order for multiple programs (Stellarium, SharpCap, SGP, NINA, PHD2, OATControl, etc.) to talk to (say) a mount at the same time, ASCOM created a "driver architecture" that presents various astronomy devices to apps in an abstract high-level way (this is a Telescope, this is a Camera, this is a Mount, etc.) and is the only thing connected to the hardware itself.
ASCOM clients (applications) connect to this ASCOM "server" and use it to ask the devices to do things like slew to this RA/DEC coordinate, stop and start tracking, etc. without apps needing to know what actual data the device expects or what protocol it uses. Each supplier/vendor of astronomy equipment just needs to write a driver that takes the high-level commands from ASCOM and sends the appropriate low-level commands to the actual device. We have written such a driver for the OpenAstroTech mounts that uses a COM port to send the actual commands that the OpenAstroTech mount firmware expects.
This allows multiple applications to connect to the ASCOM system and use it to all talk to our mounts.
¶ How to get ASCOM?
In order to connect an OpenAstroTech mount through ASCOM, you need to download and install two things:
- The ASCOM-Platform, from the ASCOM website (download link is on the right)
- OAT ASCOM driver, from our GitHub releases page
NOTE: You might need to scroll a bit for the ASCOM Drivers, since we release new OATControl version way more often than new ASCOM Driver versions)
If you successfully installed the drivers, you should be able to see "OpenAstroTracker" in any astronomy program's mount/telescope chooser.
¶ Desktop apps for Windows
Most software for Astrophotography is Windows based and our software is no exception.
¶ OATControl
OATControl is a remote control tool developed by the OpenAstroTech team. It allows tools for calibration and basic control of the OpenAstroTracker.
¶ How to get OATControl?
In order to control an OpenAstroTech mount from a Windows PC, you can download and install the latest release from OpenAstroTracker-Desktop repository in GitHub.
¶ PHD2
PHD2 is the software that does guiding for your mount.
¶ How to get PHD2?
It is available for download from the PHD2 Website.
¶ N.I.N.A.
This is an open source (free to use), Windows based, one-stop app for controlling all your equipment and running a session to capture images. We strongly recommend watching this video by Cuiv (it's over 4h long, so consume in chunks) that goes into great detail about how NINA works and how to set it up, starting with a blank PC. He shows all required downloads and how to isntall them, as well as how to operate the entire app.
Once you're familiar with the app, you can also watch our video that shows how you can use NINA with one of our mounts. Youtube
When using the OAM with N.I.N.A., one setting you need to change to make the meridian flip work correctly, is to set Minutes after Meridian to 10m. The mount has a slightly different calculation of when to switch sides of the pier that lags about 3-4 minutes after what NINA thinks, so waiting a few minutes ensures that the mount will switch sides.
Here are settings that should work with the OAM:
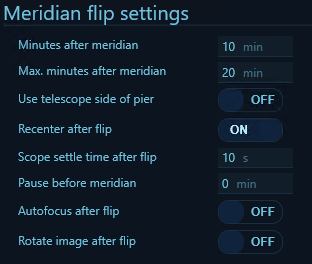
This means that N.I.N.A. will continue the sequence for 10 minutes after the meridian has been crossed and will wait for the current exposure to complete before initiating the flip. The 20 minutes just means don't wait more than 20 after the meridian crossing to do the flip.
You also need to adjust the limits in the OAM firmware like this:
#define RA_LIMIT_LEFT 6.0f
#define RA_LIMIT_RIGHT 6.0f
When using an OAT with N.I.N.A., there is no way to make the default meridian flip work. N.I.N.A. expects a GEM mount, and the OAT is a non-standard tracker with the DEC axis flipped on its side. This breaks all meridian flip logic inside the N.I.N.A. codebase.
As a workaround, you can use this user-made NINA-OAT-SafeTimeSync plugin. This is NOT an official OpenAstroTech plugin, and no support will be available.
After installing the plugin, you will find a new trigger element called "OAT safe time flip" in your Advanced Sequencer instruction set. Replace the default "Meridian flip" trigger with this one in your sequence and adjust the settings to your needs:
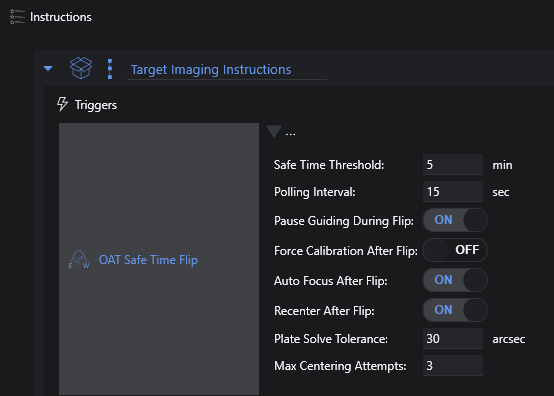
Set the safe time threshold higher than your exposure time. If you need more than 15 minutes, set the RA limits in the OAT firmware to account for this:
#define RA_LIMIT_LEFT 6.0f
#define RA_LIMIT_RIGHT 6.0f
This gives you 44 minutes of maximum exposure time with a 45-minute threshold. More information is available on the plugin’s GitHub page.
OpenAstroMount and OpenAstroExplorer mounts can execute a meridian flip under N.I.N.A. just fine.
¶ Non-Windows options
¶ Using an OpenAstroTech mount remotely with Astroberry and KStars/Ekos
The following describes how to configure your OpenAstroTech mount to be used remotely with any computer running compatible INDI software, so long as it can connect to the Astroberry's wireless hotspot. For example, you can have your OpenAstroTech mount and Pi outside in the cold, while you're inside on your computer of choice and control everything remotely using the Astroberry's INDI services. Think of the Astroberry as a server that you're connecting to rather than a Desktop you're accessing remotely.
This guide is NOT how to use Astroberry as the main interface via it's remote desktop functionality - as such, using it in this way is nearly identical - you're just not doing some weird remote desktop thing. I do not recommend using it in this way because it's weird.
¶ What is KStars?
"KStars is free, open source, cross-platform Astronomy Software. It provides an accurate graphical simulation of the night sky, from any location on Earth, at any date and time. The display includes up to 100 million stars, 13,000 deep-sky objects,all 8 planets, the Sun and Moon, and thousands of comets, asteroids, supernovae, and satellites. For students and teachers, it supports adjustable simulation speeds in order to view phenomena that happen over long timescales, the KStars Astrocalculator to predict conjunctions, and many common astronomical calculations.
For the amateur astronomer, it provides an observation planner, a sky calendar tool, and an FOV editor to calculate field of view of equipment and display them. Find out interesting objects in the "What's up Tonight" tool, plot altitude vs. time graphs for any object, print high-quality sky charts, and gain access to lots of information and resources to help you explore the universe!" -- KStars Website
¶ What is Ekos?
"Included with KStars is the Ekos Astrophotography suite, a complete astrophotography solution that can control all INDI devices including numerous telescopes, CCDs, DSLRs, focusers, filters, and a lot more - Basically everything the OAT and everything on it. Ekos supports highly accurate tracking using online and offline astrometry solver, autofocus and autoguiding capabilities, and capture of single or multiple images using the powerful built in sequence manager." -- KStars Website
¶ What is Astroberry?
"Astroberry is ready to use system for Raspberry Pi for controlling all your astronomy equipment. You can remotely control your telescope, focuser, camera and much more! All of these with just a small and portable single board computer. Take a sit at your desk and manage your equipment located in the backyard or hundreds kilometers away."
¶ Configurations
NOTE: This guide assumes that you already have your OpenAstroTech mount running on an Arduino Mega or ESP32 and that you know how to install various operating systems on a Raspberry Pi. You should already have KStars installed as well, which is easily done on any OS. The configuration of Ekos is the same regardless of the system you're on.
¶ Hardware
- Plug the OpenAstroTech mount, either the Arduino MEGA or the ESP32, into one of the Pi's 4 USB ports
- Plug your Camera into one of the remaining USB ports on the Pi.
If your camera is not supported, you may ignore reference to it. For the purposes of this document, your imaging camera will be referred to as DSLR. To see a list of cameras that are supported by Ekos, check the gPhoto capability list. - Plug in the guide camera if available. Focus it to infinity first (in daylight) by using any webcam app.
- Power on the Raspberrry Pi (no monitor required). After a few moments, you should see a new wireless SSID of "astroberry". Connect to it using the default password of "astroberry".
¶ Astroberry Web Frontend
- Open a web browser and navigate to https://10.42.0.1/.
- Click the Telescope icon on the left to reveal the "INDI Web Manager" screen.
- Enter a name for your Profile in the "New Profile" field, and click the "+" button.
- Click the dropdown for "Local Drivers", and select the drivers required: "LX200 GPS" from the Telescope section ( It's recommended you use the LX200GPS protocol regardless of whether you have a GPS installed or not), "Canon DSLR" from the CCD section (or Sony etc), and "V4L2 CCD" for the Guider (there is no Guider section, you have to choose the guider cam in the CCD section). This UI is a bit strange and it's not obvious what you're doing - but you should see a check mark to the right of your selection, as well as the selections populated in the header. Click the dropdown header again to close the selections.
¶ KStars/Ekos setup
- Launch KStars, and click on the Ekos icon from the right end of the toolbar. Alternatively, you may use CTRL+K or Click on Tools > Ekos.
- The Ekos Profile Wizard window may appear, click the close button
- On the main Ekos window, click on the + button in the profile line, and fill out the following:
- Name: Astroberry
- Mode: Remote
- Host: 10.42.0.1 (Astroberry's default IP address)
- INDI Web Manager: Checked
- In the "Select Devices" section. Leave the rest to their defaults and click "Save".
- Mount: LX200 GPS
- CCD: Canon/Nikon/Sony DSLR
- Guider: V4L2 CCD
- Focuser: Meade
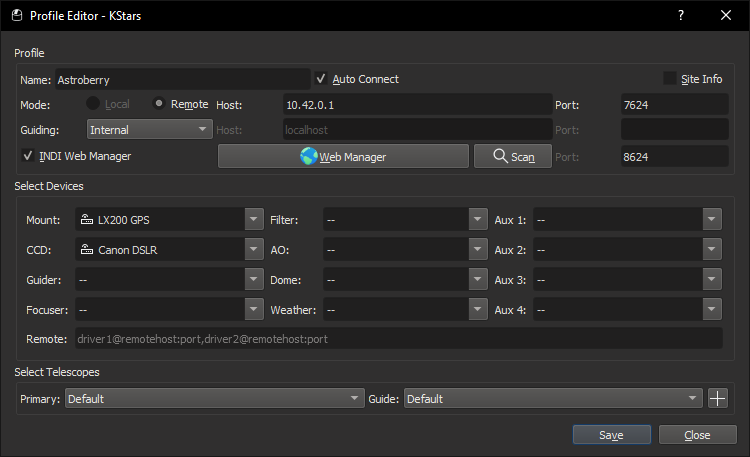
- Back on the Ekos window, click the Play Button (make sure your cameras and the OpenAstroTech mount are turned on first).
- Upon successful connection with INDI, the back-end used by Astroberry, you will be presented with the "INDI Control Panel" where you can further configure the OpenAstroTech mount and Camera.
- Click on the LX200 GPS tab, and then on the "Connection" tab, set "Baud rate" for Firmware V1.9.04 and later to "19200" or for earlier versions use "57600". Make sure the right-most device listed on the Ports line is "/dev/ttyACM0". It may default to "/dev/ttyUSB0". If it does, type "/dev/ttyACM0" into the right-most box, and click the "Set" button next to it (reference the screenshot above). (Note: ESP32 might use /dev/ttyUSB0.)
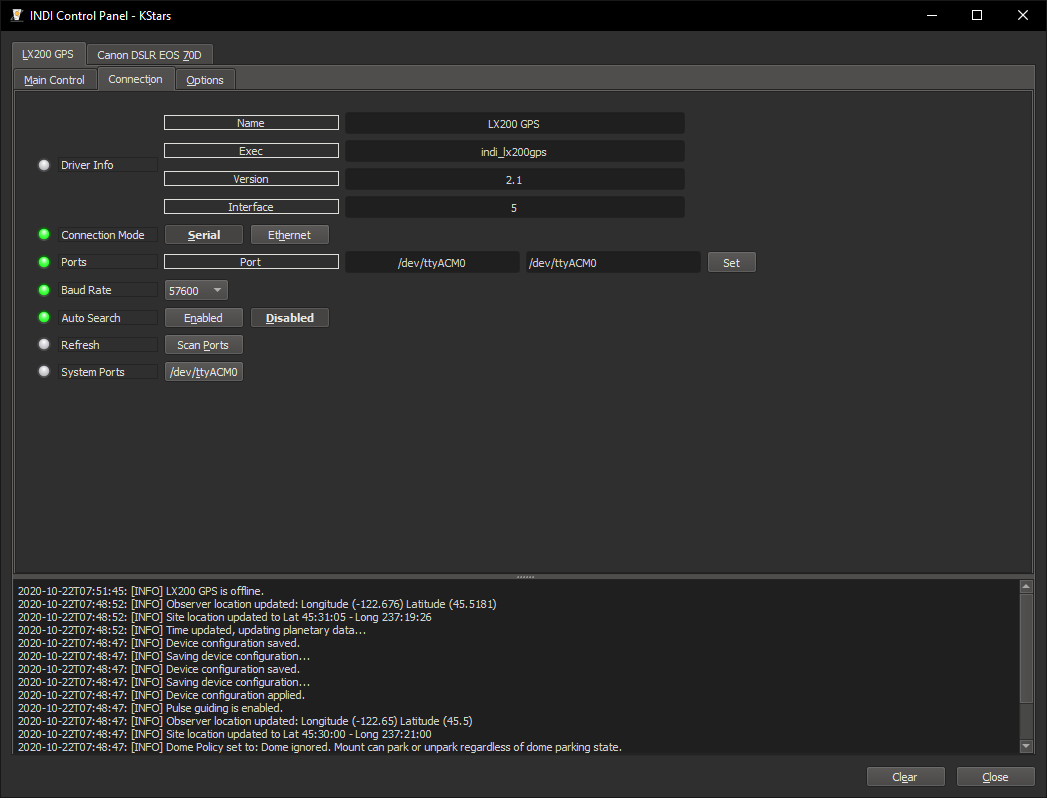
- Now click the "Main Control" tab, and click the "Connect" button. You should see text in the lower log section appear, and the red circles turn green.
- Click the "Canon DSLR" tab, and make sure it's in a green, or "connected" state. If it isn't, turn your camera off, make sure it's set to Manual mode, and turn it back on. Then click the "Connect" button.
- In the case of a Canon 70D, Wifi must be disabled for this to work
- For Sony, set to M, BULB, RAW only, disable Steadyshot, disable silent shutter
- Click on the "V4L2 CCD" tab. If you have another camera attached (e.g. Pi camera) you may have to change the /dev/video* device in the options, or just disable it for now. Check the connection by turning on streaming in the "Streaming" tab. Most webcams seem to have an exposure limit of 0.5s. Set the exposure to something less than this. Under Image settings change the values to the following and the click on Set.
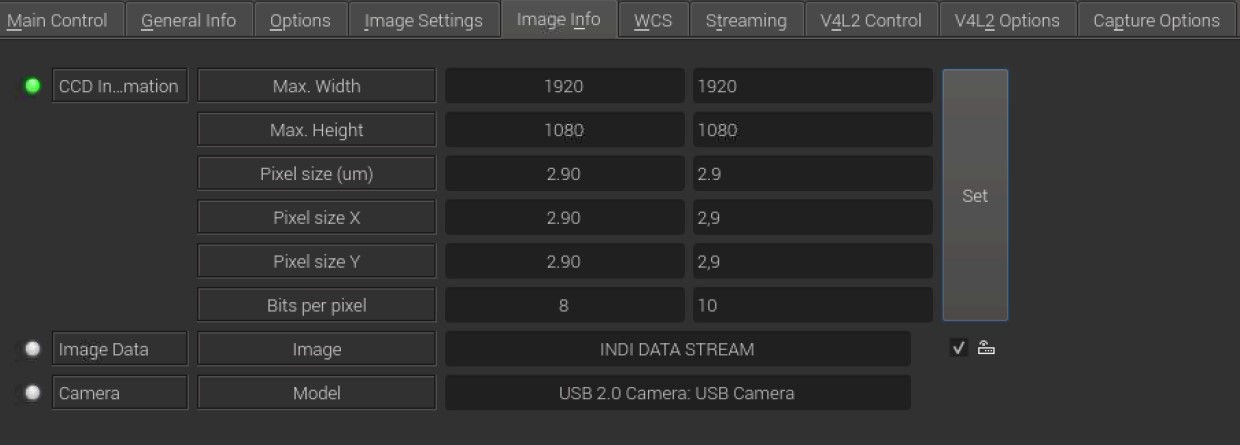
Finally, head to the Capture options tab and check the following

You may now click "Close" at the bottom, as you're ready to start using KStars and EKos to do your imaging.
¶ Using KStars/Ekos
Using the software is a bit out of scope here, but basically you can now right-click on a celestial object in the main KStars window and select "LX200 GPS > Goto", and the OAT will slew to the object and begin tracking it. From there, you can use the Camera tab on the Ekos window to begin taking exposures. There are many youtube videos on the subject.
¶ Other noteworthy mentions:
- By default images are captured in FITS format and saved to the Pi, not your computer nor the camera SD card - this is configurable in the Camera, or CCD, tab in Ekos. I recommend running KStars on the same computer you will use for image processing, and saving "client side" as that will save you a good amount of time.
- A bulk of Ekos features are geared toward running a full on Observatory, which is quite impressive, but mostly useless with the OpenAstroTech mount
- unless you've built a dome and all that whizbang stuff.
- I use this setup with an 8g Raspberry Pi 4. It will likely work fine with a 3 if you're not running the application on the Pi's desktop (weird)
- You can also connect to the Astroberry via VNC, and run KStars from there - but it then becomes a local configuration (weird)
- You may also connect this way via the web front end by clicking the big "Connect" button in the center of the screen on the Web Frontend (weird)
¶ Useful Python scripts
Currently OATControl software works only under Windows environment. Anyone running linux/macos are left with a choice of either installing VM software with Windows or tediously configuring their OpenAstroTech mount sending MeadeCommands through terminal. Python (which is OS agnostic) can be used to bridge this gap. Bellow are some useful scripts.
¶ OATConfig
A simple Python script at GitHub to set-up your OpenAstroTech mount in Linux environment. It mimics OATControl initial configuration of your mount and lets you set Home position. It also disables reset when opening given port, so that settings are not lost when other client tries to connect (tested only on Raspberry HW).
¶ Why should I use it?
It let's you read DigitalLevel values, set proper Lat/Lng, run RAHallSensor auto homing and Home the mount.
Also there is some mismatch between Meade protocol implementation in generic LX200 GPS INDI driver for Linux and OpenAstroTech ASCOM driver for Windows.
Namely "Set Site Longitude":
:Sg100:00 //OpenAstroTech mounts expect 179W is 359 and 179E is 1 from 180 at Greenwich
:Sg-80*00 //LX200 sends 179W is -179 and 179E is 179 from 0 at Greenwich
And "Set Site UTC offset":
:SG+02 //OpenAstroTech mounts expect site UTC offset
:SG -02 //LX200 sends (site time - UTC time) difference
It leads to improperly configured OpenAstroTech mounts upon initial connection from KStars/Ekos if "Time & Location Updates" are enabled. This should be mitigated by successfully running solver and syncing RA/DEC coordinates with a mount. Or you can uncheck "Time" and "Location" in Settings->Configure KStars...->INDI:
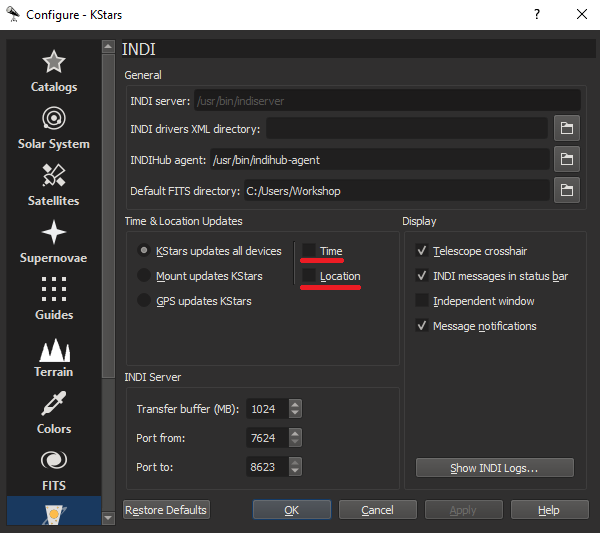
In Kstars 3.7.x it's under Ekos --> Mount
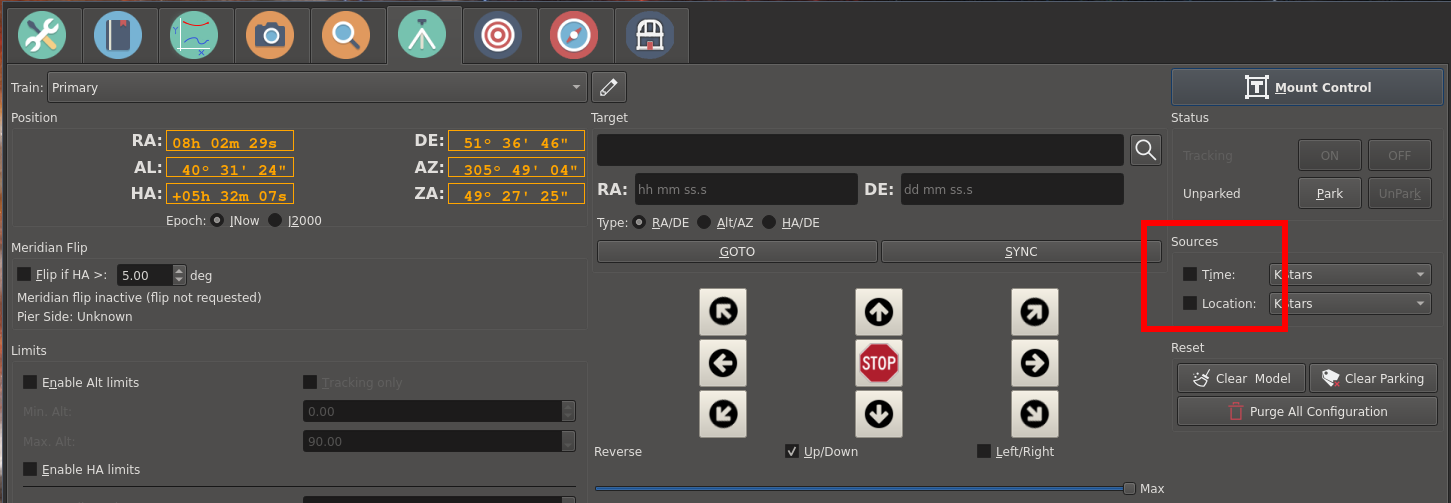
And run this script before connecting to LX200 GPS. This way you will have correct Goto commands from a get-go (make sure KStar location and Time are the same as set by a script) and then can run solver to increase it's accuracy.
¶ How do I use it?
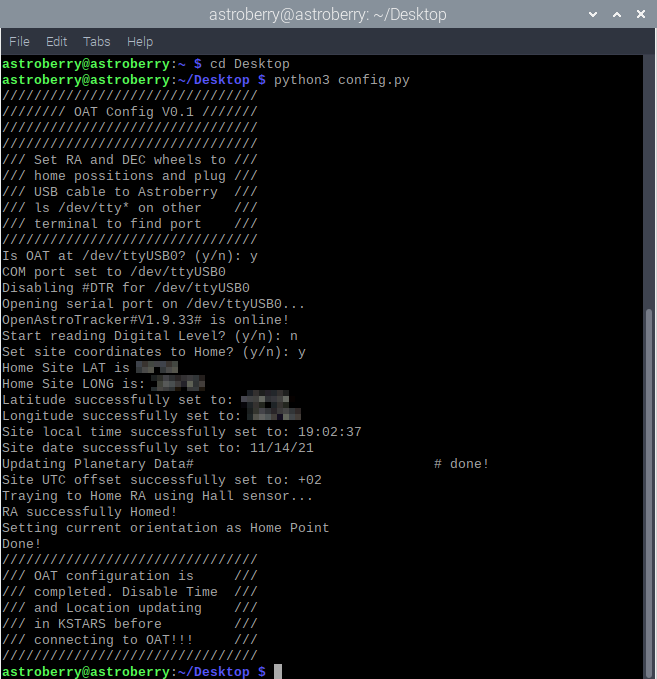
Put your mount RA and DEC axis in Home position. Open terminal, and: ls /dev/tty* to display current USB devices, connect the OpenAstroTech mount and notice port name.
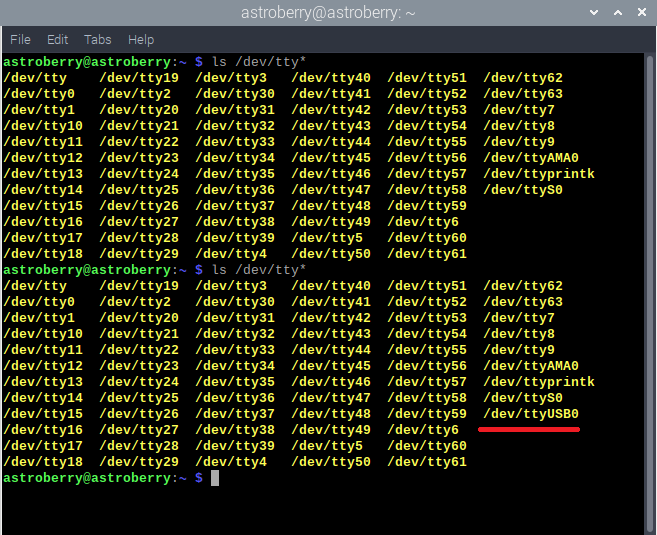
Navigate to script directory and: python3 config.py. Enter correct port when asked.
¶ What are the prerequisites?
Python v3 (or higher) with PySerial library installed. dpkg -l | grep python3 to see if python3-serial is installed. pip install pyserial to install.
¶ What settings are set by this script?
Try to read digital level (if installed)
Set Site Latitude (manual input, DD:MM format, positive for Northern and Negative for Southern Hemisphere)
Set Site Longitude (manual input, DD:MM format, 179W is -179 and 179E is 179 from 0 at Greenwich)
Set Site Local Time (automatic, make sure system time is correct)
Set Site Local Date (automatic, make sure system time is correct)
Set Site UTC offset (automatic, make sure system time is correct)
Try to autohome RA axis (if installed)
Set current mount orientation as Home position
¶ Joystick_INDI
if you have AutoPA add-on installed, this program at GitHub will allow joystick-like control of the Alt/Az axis of the OpenAstroTracker using keyboard arrow keys. You can use it to adjust Alt/Az error after running Ekos Polar alignment routine. Disconnect LX200 GPS from INDI control panel (no need to stop server) before running it.
¶ How do I use it?
Find out what port your OpenAstroTech mount is using, navigate to program directory and:
python3 joystick_INDI.py <serialport of OpenAstroTech mount e.g. /dev/ttyUSB0>
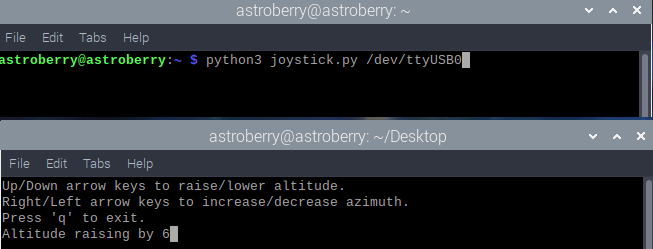
Press Up or Down on your Keyboard for Altitude control and Left or Right for Azimuth.
Hints:
Some users reported problems connecting via Joystick script. Starting KStart/Ekos and connecting to the OpenAstroTech mount via INDI might help before running the script (This might not be necessary and is not confirmed)
If you receive a error message about baudrate not defined, then edit the script in a text editor and look for the following line at around line 31:
ser = serial.Serial(serialport, baudrate, timeout = 0.2)
and replace baudrate with your baudrate (usually 19200) the line should then look like:
ser = serial.Serial(serialport, 19200, timeout = 0.2)
save the scrit and run it again.