¶ OATControl
Under Construction
OATControl is specifically written for the OAT and will not work with any other scope, even though it uses the Meade LX200 protocol to communicate with the OAT. We have, however, added many extra commands to that protocol that are very specific to the OAT and that allow OATControl to display and do things no other client can do.
Latest release can be found on OpenAstroTracker-Desktop repository in GitHub.
OATControl only controls the mount, it does not have the ability to connect to any cameras or other devices.
The program consists mainly of one screen, which is used to access the main functionality of the mount. There are some other smaller screens and dialogs that will be covered later.
You can set the target coordinates in the top left area, you can see the current coordinates in the top-right area, there are buttons to sync one to the other and there's a big slew button to move to mount from the current to the target coordinates.
You can also slew the mount with your keyboard. This is done from the mini-control window (which must be active), RA/DEC is controlled by arrow keys, ALT/AZ by WASD keys.
Once you have installed and connected to OATControl from the link above, you will be greeted by the control interface.
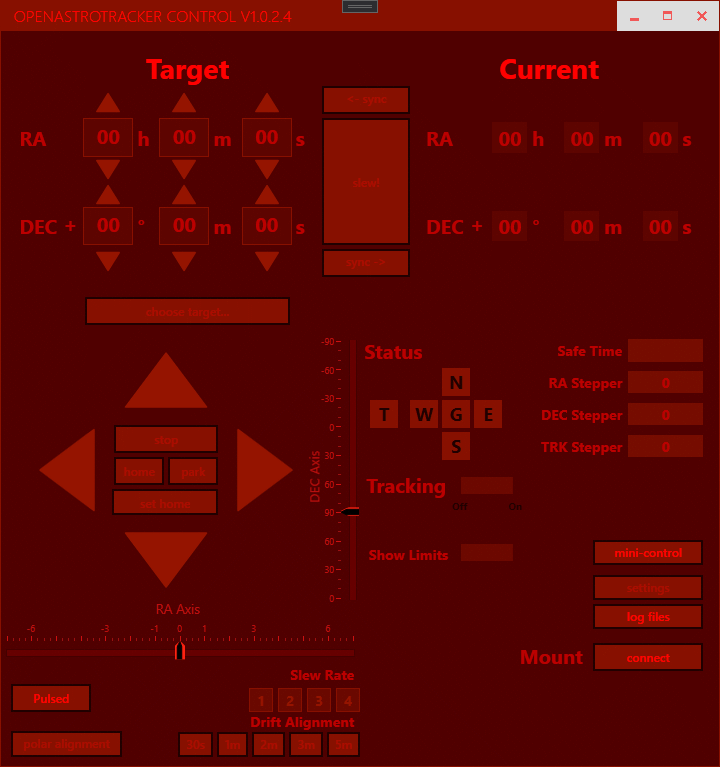
This is the main UI for OATControl (show here in the disconnected state) and from here you will be able to control all functions of the OAT.
¶ Connecting
To connect to the OAT, make sure it is powered up and plugged into a USB port of the computer, or (in the case of a ESP32 board) on the same network and press the connect button. This will bring up the connection dialog.
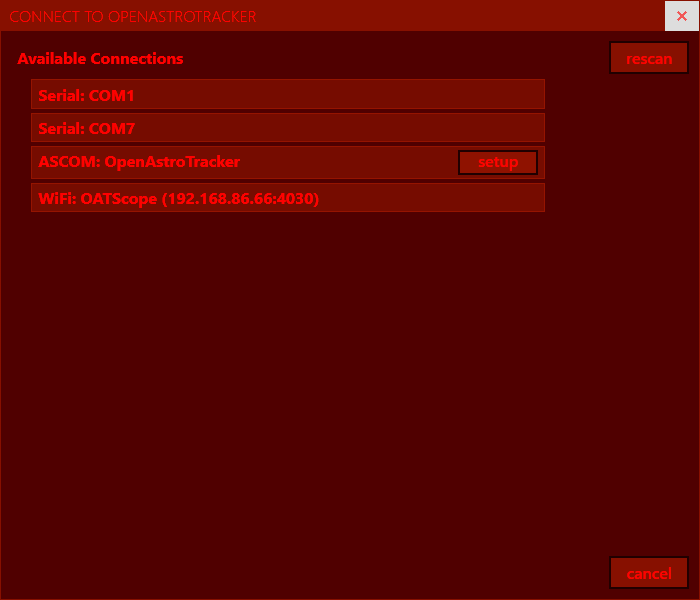
You can see that OATControl has scanned all available connections and is listing them here. You can single click one and click Next, or double-click one.
It is recommended that you connect using the ASCOM driver. This will make sure that other programs (like SharpCap/NINA/SGP) can also connect to the OAT at the same time.
If this is the first time using the ASCOM driver, you will need to configure it. Do this by pressing the Setup button in the ASCOM driver shown above. Select the correct COM port (it'll be one of the ones listed) and correct baud rate (19200).
Once you've decided how to connect you can click Next and after a brief connection period, you will be asked to confirm or enter your coordinates as shown below.
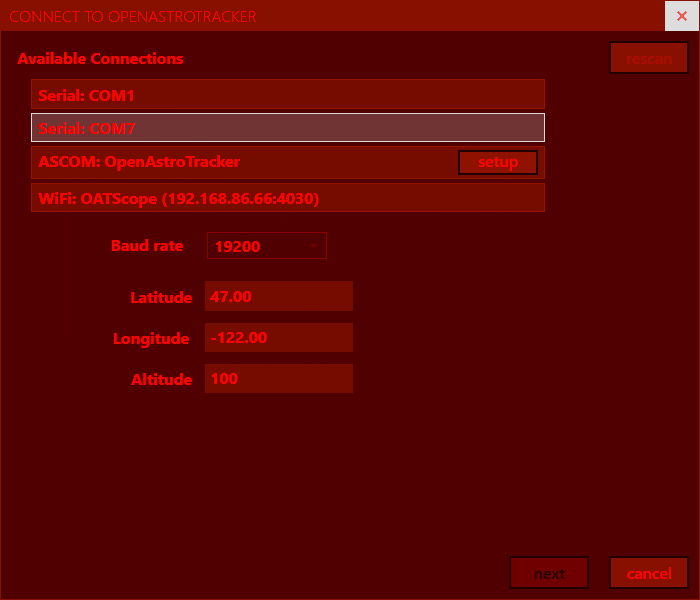
Either correct the coordinates or just click Next. The connect dialog will close and you should be connected. You'll then see the main UI in the connected state.
Let's look at all the available controls and elements of the UI.
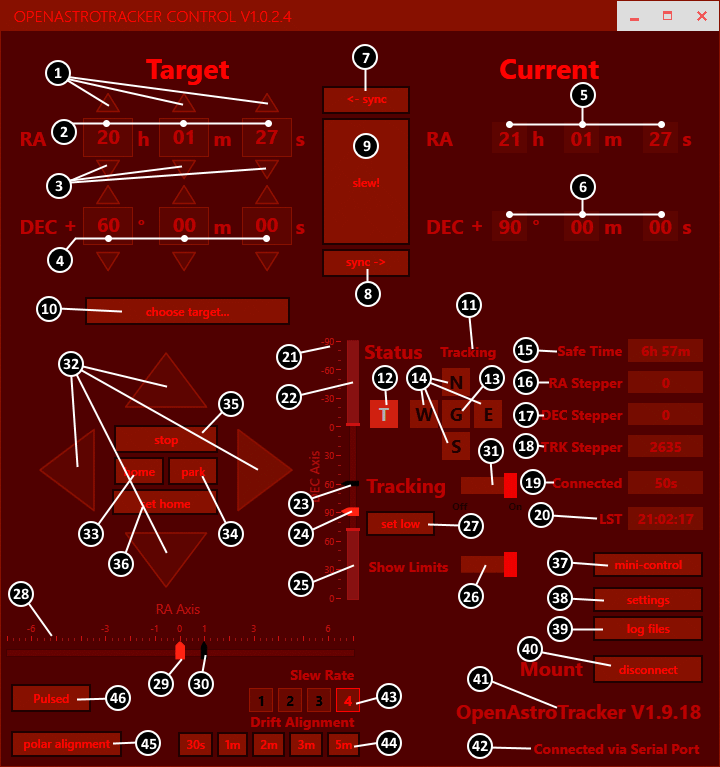
- These controls increase the hours, minutes and seconds of the Right Ascension (RA) coordinated of the target coordinate of the OAT as long as the mouse is depressed. The target is where the OAT will slew to when you press the
slewbutton (9). - These are the target RA coordinates of OAT in hours, minutes and seconds. Click in one of these to edit them directly.
- These controls will decrease the hours minutes and seconds of the target RA coordinate while the mouse is depressed.
- These are the target DEC coordinates of OAT in degrees, minutes and seconds. Click in one of these to edit them directly. These coordinates also have the inccrease/decrease controls above/below them (like the target RA coordinates)
- These are the current RA coordinates of the OAT.
- These are the current DEC coordinates of the OAT.
- This button will copy the current coordinates to the target coordinates.
- This button will copy the target coordinates to the current coordinates (without moving the mount!).
- This button slews the mount from the current RA/DEC coordinates (5/6) to the target RA/DEC coordinates (2/4). You will see a progress indicator appear below the current coordinates to indicate how far along the slew is.
- This is a button to bring up the Target Selector (see section below).
- This text are displays the current mount status. It will usually be
Tracking, but could also sayParkedorSlewing. - This indicator shows whether the mount is tracking. It will be bright red if it is tracking.
- This indicator shows whether the mount is guiding. It will be bright red if it is guiding.
- These indicators show whether the mount is slewing in the given direction. It will be bright red if it is slewing in the corresponding direction.
- The Safe time is a rough estimate of how long the mount can track without reaching the limits of the RA rings movement (where it will 'fall off' the bearings.)
- The current number of steps that the RA stepper has taken for slewing (not tracking).
- The current number of steps that the DEC stepper has taken.
- The current number of steps that the tracking stepper has taken (this is not really a seperate stepper, it uses the RA stepper motor, but tracking and slewing steps are counted seperately).
- The elapsed time that the mount has been connected to OATControl.
- The current local sidereal time that the OAT is operating under.
- The DEC scale of the OAT in degrees.
- The blocked upper range of the DEC movement.
- The position of the DEC stepper motor at the target DEC coordinate (4)
- The position of the DEC stepper motor at the current DEC coordinate (6). This is where the mount is currently pointed.
- The blocked lower range of the DEC movement.
- A toggle switch that can be used to show and hide the blocked limit ranges (22/25).
- When clicking this, the current DEC stepper motor position will be used to set the blocked lower limit (25).
- The RA scale of the OAT in hours.
- The position of the RA stepper motor at the current RA coordinate (5). This is where the mount is currently pointed.
- The position of the RA stepper motor at the target RA coordinate (2).
- This switch can be used to turn tracking off and on.
- These four arrows are used to perform manual slewing at the rate indicated by the selected Slew Rate (43).
- This button moves the mount to the home position (which should have been set previously with Set home (36)). It does not stop tracking.
- This will park the mount. It slews to home and then stops tracking.
- This can be used to stop all motors currently running.
- This can be used the tell the mount it is now in the home position (pointing at the celestial pole).
- This button brings up the mini-control (see section below).
- This brings up the Settings dialog (see section below).
- This opens the log file folder in a Windows Explorer window.
- This button connects and disconnects OATControl to and from the OAT.
- When connected, this displays the firmware version of the connected OAT.
- When connected, displays the method by which the OAT is connected.
- These four buttons determine the speed at which any manual slewing or stepper operation takes place at. Lower numbers are slower.
- This runs a drift alignment of the give duration. This process cannot be interrupted. The mount slews half the time east and half the time west.
- This button runs the built-in polar alignment routine. It is not very accurate, but will guide you through the process.
- This button will switch the slewing controls to use offset based speed slewing instead of the directional constant speed.
¶ Mini-control
The mini control is a small window that has the ability to let the user move any of the attached steppers as needed, both with the mouse and keyboard keys. The window is intentionally small and can be configured to stay on top of all other windows (by right-clicking on the mini-control button on the main UI) and can be moved anywhere on the screen as needed by grabbing the left side (11) and dragging it around.
It looks like this:
![]()
The controls offered are as follows:
- This displays the current RA coordinate of the OAT.
- This displays the current DEC coordinate of the OAT.
- These two buttons move the RA ring east (key:
left arrow) and west (key:right arrow). - These two buttons move the DEC ring north (key:
up arrow) and south (key:down arrow). - These four buttons are used to set (and indicate) the current slew rate (keys:
1-4). - This button slews the mount to the home position (pointing at celestial pole, key:
H) - This button slews the mount to the home position (pointing at celestial pole) and stops tracking (key:
P) - These two buttons move the Azimuth of the mount left (key:
A) and right (key:D). Only present with the AutoPA add-on. - These two buttons move the Altitude of the mount up (key:
W) and down (key:S). Only present with the AutoPA add-on. - These two buttons move the Focus in (key:
X) and out (key:C). Only present with a Focusers add-on. - The area showing the
RAandDEClabels can be used to grip the control with the mouse and move it around.
¶ Target Selector
TBD
¶ Settings Dialog
The Settings dialog is used to both examine OAT settings as well as fine-tune some. It looks like this:
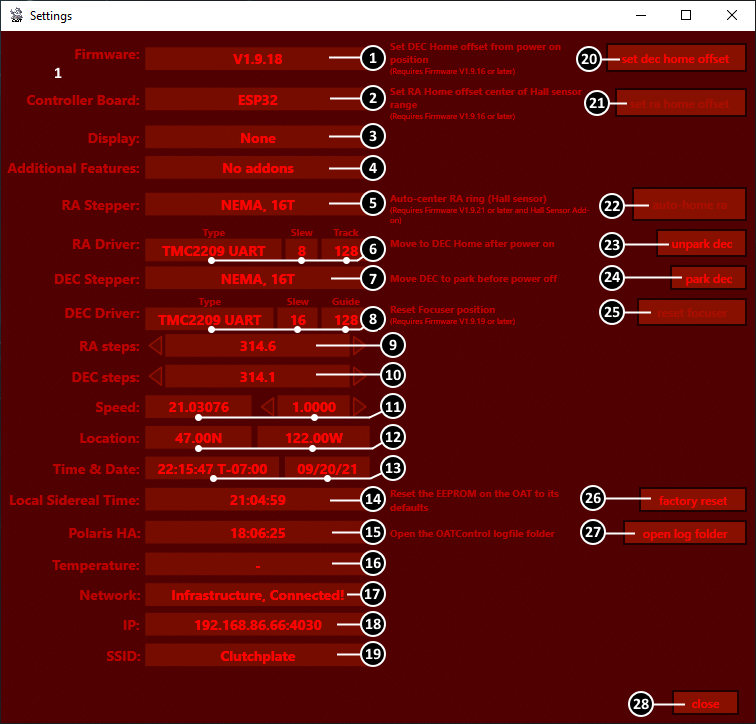
The various UI elements are as follows:
- The currently running firmware of the OAT.
- The board that is currently connected.
- The display type that is configured (if any).
- The addons that are present (if any).
- The type of stepper motor and pulley for the RA coordinate
- The driver and microstepping settings for the RA coordinate
- The type of stepper motor and pulley for the DEC coordinate
- The driver and microstepping settings for the DEC coordinate
- The number of steps needed to turn the RA coordinate by 4 minutes (one degree).
- The number of steps needed to turn the DEC coordinate by one degree.
- The tracking speed of the mount and the factor by which to correct the calculated speed.
- The Latitude and Longitude of the OAT's location.
- The local time and date.
- Local Sidereal time. This is calculated from the location and time. It represents the RA coordinate of the meridian line above the OAT.
- The hour angle of Polaris at the moment.
- The ambient temperature around the OAT. Requires the DigitalLevel add-on.
- The Wifi connection mode and status. Only for WiFi enabled boards like the ESP32.
- The current IP address if connected to WiFi. Only for WiFi enabled boards like the ESP32.
- The network SSID that OAT is connected to. Only for WiFi enabled boards like the ESP32.
- This button can be used to record the offset of the home position from the power-off DEC position. This is only useful if your DEC is at the same position when OAT is powered off, for example, beacuse the lens is a little front-heavy and rest on the RA ring. You should turn on the OAT, connect OATControl, slew DEC to the home position using manual controls and then click this button to record the offset.
- This button can be used to record the offset of the RA home position from the location that the hall sensor was detected. This requires the RA Hall sensor add-on (in development).
- This button can be used to automatically find the RA home position if the hall sensor add-on is installed. The mount's RA coordinate should be within 30 degrees of home.
- This button will slew DEC by the offset that was recorded with control 20.
- This button will slew DEC from the home position to the resting power off position. This button is only available if DEC is in the home position.
- This resets the internal focuser position to 50000. It does not actually move the focuser stepper. Requires a Focusers add-on.
- This button can be used to reset all values that have been saved but the firmware in EEPROM memory. It does not erase the firmware, just any settinmgs that have been stored. It is recommended to use this button whenever you upload new firmware that corresponds to configuration or hardware changes.
- This button opens a Windows Eplorer in the folder that holds the last few OATControl logfiles.
- Closes the settings dialog.
¶ Polar Alignment
TBD