¶ Troubleshooting
¶ Motors
See the troubleshooting section of the electronics page.
¶ Steppers turn in the wrong direction
See Calibration to determine whether this is actually the case.
If you have determined that one of the axes is turning the wrong way, you can edit your local config (see FirmwareConfiguration) to include one of the following lines:
#define RA_INVERT_DIR 1 to reverse the direction of the RA ring
#define DEC_INVERT_DIR 1 to reverse the direction of the DEC ring
¶ Steppers go double/half as far as expected
Make sure the XX_STEPPER_SPR settings are correctly set for your motors. It should be set:
200for 1.8° motors400for 0.9° motors2048for modded 28BYJ's4096for standard 28BYJs.
If you are using hardware jumpers to set microstepping, you'll need to multiply the values above by the microstepping factor.
¶ LCD Screen
¶ LCD screen doesn't show anything
If the upload completed and the RA drivers LEDs blink (for the BYJ48 steppers), the code is working. You will have to adjust the screen contrast via the potentiometer on the LCD. Turn the tiny screw on the small blue box until letters are visible on the LCD. This might take a lot of turns.
¶ LCD Screen shows something but not all
This can happen when the Arduino runs out of memory. Make sure you are on a supported device (Arduino Mega or ESP32). Check the output of Arduino IDE when uploading. If the program usage goes above 80%-85% or the data above 75%, you might be experiencing this.
¶ LCD Keypad buttons misbehaving
Sometimes (on some shields) the buttons act strange and e.g. LEFT triggers a DOWN (or other combinations). This is due to the shields being manufactured differently. Some shields provide different voltage levels on the A0 pin and OAT Firmware assigns them to wrong buttons.
To check for this, place the following line in you configuration_local.hpp file:
#define LCD_BUTTON_TEST 1
and recompile/upload. The display will now show the numeric value that each button generates as well as how the firmware will interpret the button. If one of them is off, make a note of the numeric value it generates.
Then open the LcdButtons.cpp file and adapt the thresholds of the following code lines (near line 90) to appropriate values (with some some reasonable paddings):
if (_analogKeyValue > 1000) _currentKey = btnNONE;
else if (_analogKeyValue < 50)   _currentKey = btnRIGHT;
else if (_analogKeyValue < 240)  _currentKey = btnUP;
else if (_analogKeyValue < 400)  _currentKey = btnDOWN;
else if (_analogKeyValue < 600)  _currentKey = btnLEFT;
else if (_analogKeyValue < 920)  _currentKey = btnSELECT;
¶ Tracking
¶ Is it moving correctly?
You really should work through the Calibration to make sure it's moving correctly.
When you use either the LCD or the PC OATControl app, using the arrows to move the mount from startup should cause this behavior (in the northern hemisphere):
- Pressing Left should move the RA ring logo to the left (CW) and decrease the RA hour time.
- Pressing Right should move the RA ring logo to the right (CCW) and increase the RA hour time.
- Pressing Up (from home position) will move the camera lens upwards and DEC will decrease and RA will flip by 12 hrs.
- Pressing Down (from home position) will move the camera lens downwards and DEC will decrease.
¶ Mount isn’t tracking
If the mount moves when you set coordinates but doesn’t if it’s tracking, check the LEDs on the RA driver. They should be “marching” in a straight pattern. If they do, the mount is tracking, but keep in mind that the movement is extremely slow, too slow to actually see any movement. To test the tracking, leave the mount on for 10-20 minutes and see if it has moved a little.
¶ I have Star trails on my exposures
First check that you have correctly set RAPulleyTeeth in OpenAstroTracker.hpp. If you printed the RA pulley, you will need to change it to 20. If you purchased gears, count how many teeth they have, they usually come in 20 and 16 tooth variants.
If you have set this correctly and are still getting star trails, look at the direction in which they occur. RA Tracking speed errors will cause horizontal streaks. If this is the case, you should set the Speed Calibration setting to either speed up (make it larger than 1.0) or slow down (make it less than 1.0) tracking. Access this in the CAL menu.
If you streaks are not continuous, you may have bumped the mount or other vibrations may have caused it. Telescopes are very sensitive to vibrations.
If the streaks are not horizontal you may not be correctly Polar aligned. If you have aligned by Polar Alignment only, you may need to also do a Drift Alignment to get an exact polar alignment.
¶ Star trails after a slew (GoTo)
This is a common behavior. The gears in the motor have become misaligned and first have to overcome the backlash. Wait one or two minutes and things should be back to normal. Current firmware does account for backlash when using GoTo to slew to various locations, but not after a manual slew.
¶ Connectivity
¶ ASCOM / PC not connecting, connection timing out
Did you enable configure the ASCOM properties of the mount to use the correct baudrate and port? Note that plugging the OAT into different physical USB ports can change the COM number that it uses.
To find the right COM port, open Device Manager and look under the section "Ports (COM & LPT)". (Un)plug the OAT and note which device appears. If you do not have the correct drivers it may show up in "Other devices". Google the name to find the right driver.
Also try using a USB-A to USB-C cable; the OAE control PCB board's USB-C connector does not have the transistors to negotiate a host/slave relationship required for a USB-C to USB-C cable.
¶ If I connect OATControl, PHD2 can't connect (or how to connect multiple programs to OAT)
COM ports on PCs can only be used by one single application at a time and that application has exclusive access to the port, no other application can connect until the first one disconnects.
This is a problem with mounts, because we have a number of apps that need to control the mount. You might want to start with SharpCap to polar align and then use N.I.N.A. to sequence, while PHD2 is guiding.
To enable this, ASCOM was created. ASCOM defines how certain classes of devices behave (for example mounts) and then applications use ASCOM to talk to a mount device instead of a COM port (or other communication channel). ASCOM is like a server, in that it allows multiple clients to connect to the same device. Each vendor of astro equipment writes an ASCOM driver for their device that interprets the calls that the clients make to the ASCOM server and translates them for the device hardware.
We have written an ASCOM driver for the OAT that does exactly this. In this way, you can connect OATControl, N.I.N.A., Stellarium, and PHD2 all at the same time and they can all control and query the mount. The driver takes care of making sure each command is sent one after the other and the reply returned to the correct client.
Each ASCOM client will let you configure the ASCOM driver from its interface, but it all ends up with the same configuration dialog in our driver. So once you do it from one application, there is no need to do it from any other application. But you do need to configure it at least once to point to the correct COM port. It is suggested you use OATControl for this and click the Setup button in the ASCOM connection line in the Connection dialog:
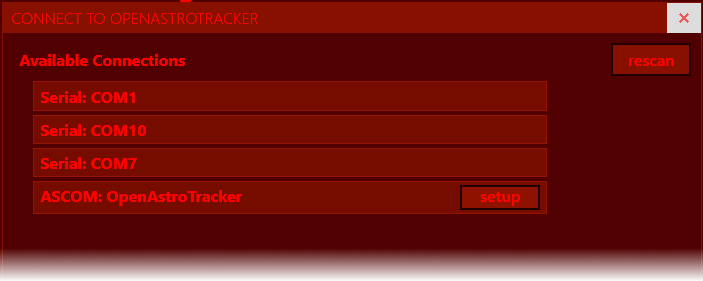
That will bring up the drivers configuration dialog, where you can setup the COM port, as well as control the mount.
¶ I can’t connect via Bluetooth
Yes, the current code base does not support Bluetooth. It is no longer on our roadmap, so it likely will never come. The other wireless option is to use the ESP32 board, which support WiFi connectivity.
¶ OATControl doesn't find my wireless ESP32
Check both the PC and ESP32 are on the same network (2.4GHz only, not 5GHz!) and double check that it is connected from your router settings or with a wireless scanner app.
If it is still not detected, go to "Network & Internet settings" > "Change adapter options" and right-click & disable any network adapters besides the one you are currently using to make sure OATControl is broadcasting to the right one. You may need to click the Rescan button on the Connect dialog.
¶ OATControl can't connect reliably via Serial
There can be a number of reasons why OATControl can't connect to OAT.
- There might be another process using the serial port. Make sure that :
a. the Arduino IDE Monitor window is closed.
b. no ASCOM client is connected.
c. no 3D printer slicer is using the serial port (it's happened).
d. no crashed OATControl or ASCOM driver is running. - Check that you have the right COM driver for the serial chip installed; see the first point in this section for links.
- You might be using the wrong COM port. COM port numbers can change when you plug the cable into different USB ports or hubs. Arduino IDE detects and lists the devices it finds on the ports, use it to confirm you have the right port.
To make sure that connectivity is correct, use the Monitor window in Arduino IDE to connect at 19200 and once connected, type :GVP# in the bar at the top and hit Send. If you see OpenAstroTracker# appear in the window, everything is working as expected.
¶ Other issues
¶ Firmware doesn't seem to boot
Make sure you do not enable features in the firmware that are not physically hooked up to the hardware.
For example, enabling teh LCD screen without connecting it will prevent the firmware from booting.
¶ Debugging Firmware
If you are comfortable with looking at firmware code and want to try and see what the cause of any problems that you are seeing might be, you might find some of these tips useful. This is one method the devs try to analyze what is happening in the firmware.
¶ Adding debug output to the firmware
Debugging the firmware is basically what we referred to in the beginning as printf debugging, meaning you would just sprinkle the code at strategic places with printf statements that would write information to the console. You would then run the program and follow the flow via the output. The firmware has such a system in place using the LOG() function. Since we have no console, the output is sent to the serial port.
This means that no application can be connected, since there are constantly logs being sent to the serial port that would confuse any attached program.
So to debug in this way requires that you send manual Meade commands via a terminal. Some of the devs use the Arduino Monitor, since it is pretty robust and has Send capabilities.
¶ Using Arduino IDE to drive the firmware
Start Arduino IDE, connect the OAT and select the COM port that it's connected to on the Tools > Port menu:

Once configured, select Serial Monitor command or press Ctrl-Shift-M"

This will open the Serial Monitor, which is like a terminal:
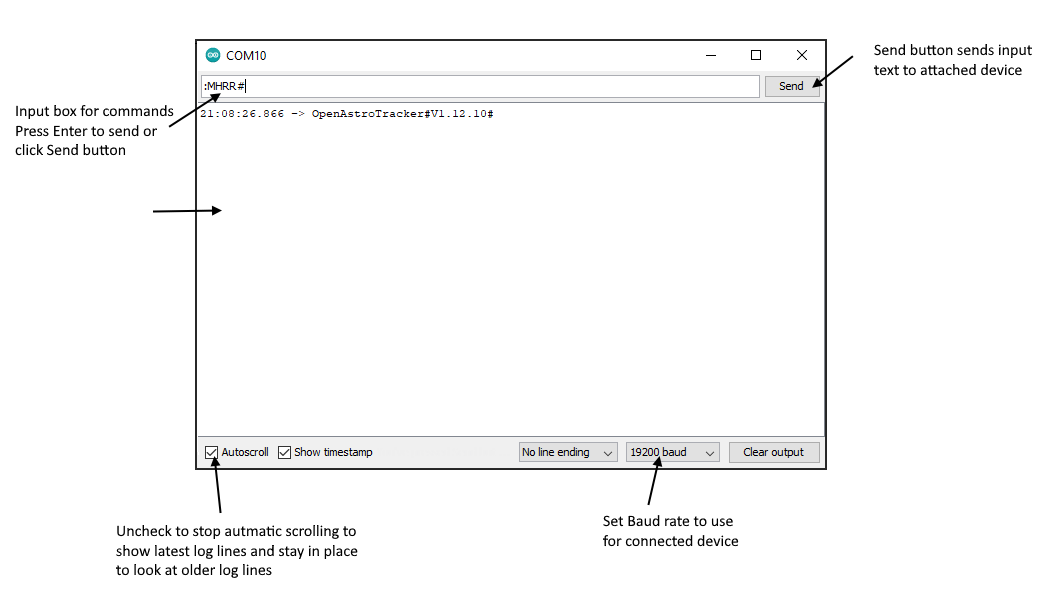
You type a Meade command into the Input box and press Enter or click Send. The firmware will respond in the window below. To copy the output text to the clipboard to help us diagnose problems via Discord, uncheck the Autoscroll checkbox, click inside the log area, press Ctrl-A to select all the text and then Ctrl-C to copy it.
For support on Discord paste it directly to a new message in the Forum channel or to a file that you can upload.
¶ Enabling a separate debug output port
Having debug output go to the same port as regular command replies will confuse any attached app, so it's not possible to connect with something OATControl or SharpCap, or N.I.N.A. To alleviate this pain, the Logging system also supports sending the logging output to a second serial port. This means the primary port will behave correctly and programs (or ASCOM) can connect as usual. To enable this you need some additional hardware and you have to add this to your local configuration file:
#define DEBUG_SEPARATE_SERIAL 1
#define DEBUG_SERIAL_PORT Serial2
Then connect something like this to the board and you will have debug logs come to another USB (serial) connection.
Note that the debug serial port runs at 115200 by default.
This will allow you to use ASCOM programs (or direct COM connections) while still seeing debug output.
¶ Making the firmware output debug logs
To enable debugging output to be generated, whether on the same or a separate port, you must add something like this to your local configuration file:
#define DEBUG_LEVEL (DEBUG_ANY)
This particular setting will generate a VERY verbose stream of text to the serial port. You can restrict the debug output to certain subsystems (see constants.hpp for a complete list), like DEBUG_STEPPERS for all stepper motor related output, DEBUG_MOUNT for all calculations and commands, etc., etc.
When debugging is enabled, there is a periodic output that just gives the current status (it's the output the the :GX# Meade command).
¶ OpenAstroGuider
¶ Exposure Time Bug with AR0130 Sensor
The AR0130 sensor has a bug where the exposure is not set correctly. An easy workaround:
- In PHD2, set the exposure to 0.5 or 1 second.
- Go to the camera settings (the little green camera button at the bottom), go to the second tab and set the exposure to automatic.
- Apply and let it run for 10-20 seconds.
- Go to the camera settings again and disable automatic exposure, then set the slider to the right most position. Then in the first tab set the gain to 100 and maybe very slightly increase the gamma.
- It should now be forced to its maximum exposure time, which is 0.5s. It should be enough to see plenty stars.
Note: Make sure that the slider at the bottom in PHD2 isn't too far to the right side. The max exposure the camera can do is 0.5s, but if you select a higher time in PHD2's main window, it will stack those 0.5s exposures to match your selected time. Recommendation is 2s (4x 0.5s stacked images).
¶ Add-Ons
¶ My GPS isn't finding any satellites
If you have the LCD, check whether the asterisk in the display is blinking. If it is not blinking, then the GPS unit is not communicating with the Arduino. Make sure that Arduino TX pin is connected to the GPS RX pin and the Arduino RX pin is connected to the GPS TX pin.
You can also skip this step (if you indoors, testing, for example), by pressing RIGHT. You then will get a menu asking whether to Sync (use the GPS), or Set (using buttons) the HA. Use the LEFTbutton to select Set and then hit SELECT.
It is possible to get a fix indoors, but it can take up to 10 minutes of uptime.
¶ Support
¶ How can I find and send logfiles?
For ASCOM Logs: In the ASCOM Chooser Dialog, check the option to enable Trace Logging. Then execute the action that causes problems and shutdown the app. Navigate to your C:\Users\<you>\Documents\ASCOM\Logs YYYY-MM-DD\ folder, you’ll find log files in here.
For OATControl logs: Start OATControl and click on the Log Files button, this will open the logs folder which is in your AppData folder: C:\Users\<you>\AppData\Roaming\OpenAstroTracker\. The logfiles of you last 6 sessions will be saved there.
For PHD2 Logs: Navigate to C:\Users\<you>\Documents\PHD2\. There will be a bunch of .txt files, containing either DebugLog or GuideLog. For troubleshooting your guiding, we are interested in the GuideLog files.
¶ Is there a support avenue?
Well, this is an Open Source project, so technically there is no official support. However, we will all try to help you as best we can, either on
- Discord server (much preferred) (link) where we hang out and discuss the tracker (amongst other things, like 3D printing, weather, AP equipment, pandemics, etc.). There are a lot of other knowledgable users that hang out here and help as well.
- Reddit in /r/OpenAstroTech which we might be slow to respond on....